twitter Facebook Google+

                 linkedin pinterest houzz  

Click for the BBB Business Review of this Countertops in Denver CO 

Google Review 

Sales & Promotions!

Architects, interior designers, and more ∨

Hire a decorator to find that just-right couch and coffee tables for your living room.
Find wall shelves, a customizable closet organizer and stylish furniture for home to whip your closet into shape.
Remodeling and Home Design

Qualify Us Now! ProView 

Cambria logoUp to $45,000 interest free for your project!Finance by Cambria

 convenient and easy.

  • No Money Down
  • Interest-free financing for up to one year without payments
  • Financing up to $45K for any project that includes Cambria (including cabinets, flooring, sinks, plumbing, install & more)
  • Secure paperless telephone application
  • Credit decision in less than 10 minutes


Entries in kitchen backsplash (6)

Wednesday
Feb192014

12 Ideas for a Knockout Kitchen

Article by:

Bored with plain white subway tile and “greige” walls? Tired of making design choices based on what you think a future buyer might want? These 12 ideas prove that kitchens don’t need to be cookie cutter — in fact, they’re a lot more fun when you personalize your space exactly the way you want it. Let them satisfy your craving for color and creativity. 

1. Geometric backsplash. Bright, bold and eye catching, a feature like this is sure to be a centerpiece. You can achieve a similar look with mosaic tile or by carefully applying paint. 

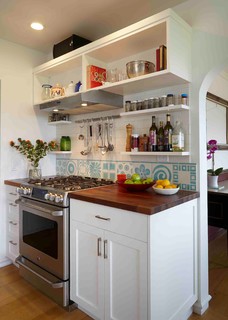
2. Bright color behind open shelves. Anyone can do this — just remove the doors from your upper cabinets and paint the backs a bright hue. Match the wall color, as shown here, for a seamless look. 

3. Chevron backsplash. A simple chevron pattern looks especially fresh and fun in vibrant turquoise and white. The yellow pots on the stove here really pop against the blue and white tile — and the palette would work equally well the opposite way, with turquoise pots against yellow and white tile.


4. Chic decals. White measurement decals on a black wall look refreshingly clean and simple … and they’re useful, too! You can easily find more decorative options too. 

5. Magnet wall. Stainless steel refrigerators are so common these days, we’ve lost the most convenient place for displaying notes, postcards and children’s art. Why not install a giant magnet board in the kitchen to take over? The sleek metal looks cool and just begs for creative personalization. 

6. Wallpaper. Wallpaper is so unexpected in the kitchen, and it’s a treat to see an interesting pattern on the walls instead of flat paint. Many wallpapers are not as delicate as you might think, but if you use one near the stove, it’s best to protect it with a sheet of Plexiglas or a specialty finish. Wallpaper is especially great in small kitchens  the pattern fools the eye into thinking the room extends farther than it actually does. 

7. Color and pattern mixed. Why stop with color orpattern when you can have both? This creative kitchen mixes it up with a warm pink hue applied behind half of the upper cabinets and the upper part of the wall, and a bold wallpaper design behind the bottom half of the upper cabinets.


8. Fridge matched to an accent wall. This petite kitchen is bursting with personality — a small pink Smeg fridge is tucked neatly into a nook in the buttery yellow cabinets, and there’s a fun scrap-wood backsplash. To get a similar look, track down a fridge or stove in a hue taken from your wallpaper, accent wall or backsplash. 

9. Chalked-up concrete. Take sidewalk chalk to the kitchen with a writable cement backsplash, and have fun creating a rotating display of sketches, doodles and lists. A concrete floor can be treated the same way, depending on the finish used — so you can let the kiddos draw on the floor! 

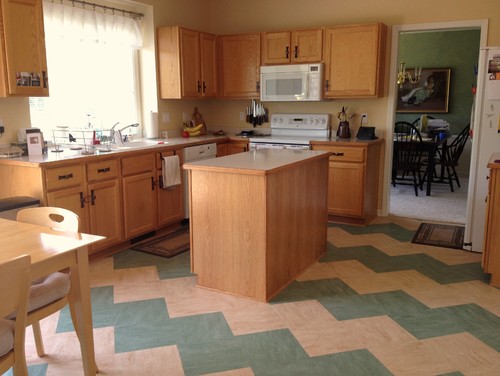
10. Zigzag linoleum. What a fun way to use plain, supercheap linoleum tiles. Simply apply tiles in two colors you like together in a zigzag pattern rather than in straight lines. 

11. Painted checkerboard floor. Like the classic black and white checkerboard floor, but updated in soft green and blue, this floor is lovely — and it’s a fairly easy DIY project. Mark the pattern carefully on a primed floor, paint in one color and allow it to dry fully before filling in the next. 

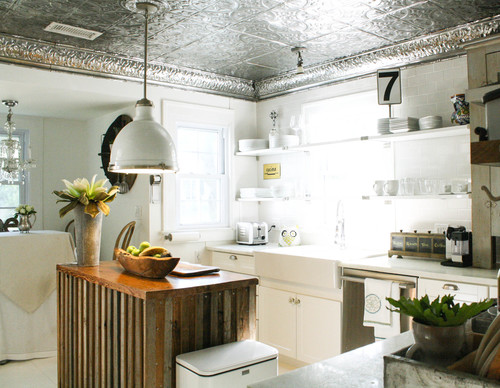
12. Pressed-tin ceiling tiles. This Florida cottage kitchen proves that big style doesn’t need to break the bank. Simple Ikea floating shelves, basic cabinets and a reclaimed-barn-wood island save cash and allow the amazing pressed-tin ceiling tiles and marble counters to take center stage. You can find new ceiling tiles in well-stocked home improvement stores, and vintage sets at salvage yards or on sites like eBay.

Monday
Feb172014

How to Add a Kitchen Backsplash

Article by: Mitchell Parker

The options for kitchen backsplashes are pretty much limitless in terms of material, color, size and cost. Ultimately, you’ll have to decide what’s best for you and your lifestyle. Knowing how to navigate the process of installing a new backsplash can help ease some of the stress. Here’s what to expect. 

Project: Adding a new backsplash.

Why: A backsplash can act as a focal point in the kitchen, creating interest and balance between the other materials and elements. 

Details: The difficulty and expense of the project will depend on the complexity of the design. First you’ll want to decide what kind of backsplash you’d like to have. As mentioned, the options are endless, from smooth, backpainted glass to complex ceramic tile patterns and custom murals. Look at photos, research materials, meet with a designer and visit showrooms to decide what’s best for you. 


Measure, remeasure and remeasure, says designer Mariette Barsoum. This will help determine what size of tile or material will work best. Then think about how everything will fit together. This is where an experienced designer can come in handy. A designer will be able to quickly come up with ideas for how the tile layout will end and begin, how it will wrap around your cabinets or range hood, and so on. 

The type of countertop you have will be a very important determining factor. For example, a busy backsplash would clash with a busy granite countertop that has a lot of variation. Make sure to consider how the material will enhance the other elements in the room, and vice versa. 


You’ll then want to figure out how much tile or other material you’ll need. Barsoum says a good rule of thumb is to add 10 percent to the amount of square feet of space. If you have 50 square feet for a backsplash, for example, order 55 square feet of tile. This will account for breakage and mistakes on the job. 

Barsoum also recommends working with the materials company or store to make sure what you’re ordering — tile, trim pieces etc. — will arrive at the same time. “Once the job starts, you want to finish it,” she says. “You don’t want to be going along and then have to wait because you’re missing three pieces of tile or bullnose.”
 

Cost: Because the options for materials are so vast, it’s difficult to give a ballpark estimate, but Barsoum says a typical backsplash including labor and materials should run around $1,500 on the low end and $6,000 and up on the high end. She says you can get 3-by-6 ceramic tile for $3 per square foot and 3-by-6 blue marble for $70 per square foot. 

In the example shown here, a kitchen backsplash Barsoum installed, she used marble that comes in 12-by-12 sheets at about $15 per square foot. Because there’s no pattern and the sheets are easy to work with, Barsoum says almost anyone can install these themselves.


Who to hire: If you’re confident in tiling techniques — leveling a wall and adding grout — this could be a DIY project. But Barsoum says the more expensive the material, the more you should consider hiring a professional. For most jobs a tiler is your best bet. 


Best time to do this project: Either during a kitchen remodel or after. You don’t want to add a backsplash if you plan to remodel your kitchen anytime soon, because you’d have to replace the backsplash anyway once you start ripping out cabinets or adding countertops.
 

How long it will take: Planning and getting the materials can take anywhere from a couple of days to several weeks. Again, it depends on the materials. If your tile choice is in stock, you can have it in a matter of days. If you’re ordering handmade tiles, it can take six to eight weeks. 

Once the job begins, it typically takes two or three days for tile to set. The good thing is, you can still use your kitchen throughout the job.

Friday
Dec272013

Kitchen Color: 15 Fabulous Green Backsplashes

Article by:

Sure, your kitchen backsplash serves a very practical function: protecting the wall area above your countertop from splashes and spatters. But it’s also the perfect place to add a dash of fun color. The weather where I live in Central Texas has turned rather frightful, so I’m starting this new series on colorful kitchen backsplashes with happy, fresh, spring-inspired green hues. Here I’ve gathered some of my favorite examples with tips for working ones like them into your own kitchen. 

Create an eye-catching feature wall in your kitchen by extending a bold-colored textured backsplash tile all the way to the ceiling. This larger-format tile works best on a wall where you are forgoing upper cabinets, so the pattern can be fully appreciated.  

This backsplash has vibrant green hues, but the intensity is broken up due to the subtle shade variations of the handmade tile. I like the mix of greens and wood tones, as it has a very natural, organic feel. 


This gorgeous green onyx linear tile backsplash also has a nice mix of colors. (Always see a sample of your chosen backsplash material in person before you make a selection.) 

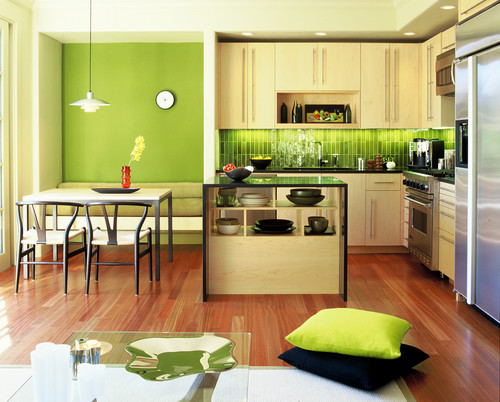
I love this kitchen for its openness to the outdoors as well as for its gorgeous splash of leafy green. The darker tile accent strip is a nice detail that helps break up the expanse of bold color and ties in well with the wood tones of the floor and table set. 

If you’re on the hunt for a kitchen backsplash material, you have no doubt noticed that tiles now come in every color, shape, size and texture imaginable, so I say why not go for something unusual? I’m a huge fan of these triangular tiles, which have a wonderful vintage-modern vibe. 

Large-format tiles are becoming increasingly popular, as are tiles in zingy colors. But the best thing about the tile here is that it was selected by the homeowner’s 2-year-old son. Very nicely done! 

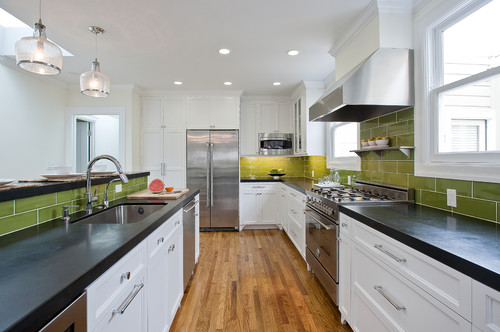
What a fantastic grassy green color. It really brightens up and enlivens this kitchen, even on a cold winter day. This line of tile is available in a wide range of rich colors as well as interesting shapes and sizes, and it’s also manufactured in part from recycled materials. It works well with a variety of design styles, from traditional to contemporary, and has thus become one of my go-to tiles. 

If you go with a bold green backsplash tile, try picking up the hue in small bits around the room for color balance and cohesiveness. You can take your chosen backsplash tile to your paint retailer and have the color matched, or you can even have a paint color formulated for you that’s a few notches lighter or darker than the tile, should you want to break things up a bit. 

For those looking for a softer, mellower green backsplash, there are plenty of options. If you do go with a lighter and more subdued hue, try selecting one in a glossy finish, because it will add interesting sparkle and texture to the kitchen. These pretty glass tiles pair nicely with the rich dark brown cabinets and light and neutral countertop.  

Here’s another glassy, soft green backsplash. This particular shade of green reads as a neutral, so accents of other, bolder colors can be added, such as the red-orange on the base of that fantastic kitchen island.  

These hand-crafted tiles have subtle variations in color, which adds much charm and warmth to this gorgeous kitchen. 

This backsplash has a wonderful sheen and texture in addition to a slight hint of green. This is how to do a light and airy kitchen right.  

My favorite interior design style is contemporary with bits of industrial and rustic thrown in for warmth and charm. This kitchen captures that style perfectly with its clean, horizontal lines and minimal ornamentation. The exposed ceiling beams, colorful salvaged-wood-clad island and vintage metal stools are perfect decorative elements. As is the light spring-green glass backsplash, which adds a nice hit of color but keeps to the clean, minimalist and contemporary vibe of the kitchen.  

Not a fan of grout lines? Looking for a clean and modern alternative to tile? Consider a back-painted glass backsplash. It’s an easy-to-clean surface that has a cool and contemporary vibe.  

Or you could skip the tile and glass entirely and paint the wall a fun hue. If you go this route, I’d recommend installing at least a short splash to give you a finished edge where the countertop meets the wall, and to protect the area from splashes. Then use a paint in a semigloss finish to give the wall extra protection and allow for easier cleaning. 

Wednesday
Dec112013

Kitchen Color: 15 Ravishing Red Backsplashes

Article by:

Last week we looked at some gorgeous green backsplashes. This week we’re swinging over to the other side of the color wheel to focus on rousing reds. Red can be a tricky color to work with, especially in superbright and bold shades. If it’s combined with too many other loud colors or elements, the effect can be overwhelming and at times garish. 

The key is to use just a little bit, because red really will go a long way toward adding vibrancy to your kitchen. That’s why a backsplash is a terrific place to add a dash of red. (Backsplashes typically encompass a relatively small section of a wall or walls, so this element is usually the perfect size for embracing reds.) Check out these 15 fetching examples of how to rock a red backsplash, along with the pertinent information for each in case you see something you like for your own kitchen. 

This beautiful glass mosaic tile adds some nice shimmer to a contemporary light-filled kitchen. Red partners well with warm wood tones, and the white countertop and ceiling add crispness. 


Here’s another gorgeous glass mosaic tile, this one in linear bricks instead of squares. The swath of red, which gets picked up by the pendants over the peninsula, adds a nice punch of bold color. Using a blend of colors for the backsplash tile (rather than one single color) makes the backsplash appear less monolithic, and therefore more modern or transitional in style than slick and contemporary.  

I love a kitchen with a garage door! It allows in so much natural light during the day, and gives the kitchen a cool industrial vibe. With so much light filtering in, you can really go big and bold with the backsplash. These tiles are dual glazed — each 2-inch by 4-inch tile is finished in multiple colors with glossy and matte glazes, which gives a slight mosaic look but in a subway-tile format. 

I’m a huge fan of three-dimensional tiles, and these ovals are among my favorites. Admittedly, the nooks and crannies might require a bit more elbow grease to keep clean but, to me anyway, the wow factor they add to the kitchen is worth the extra upkeep. 

For those who prefer a low-maintenance backsplash, look into back-painted glass. This can be a well-priced option for savvy DIYers, or check with your local glass supplier to find someone with the experience and know-how to help you create your own custom back-painted-glass backsplash. Here one works strikingly for a red-hot ubermodern theme. 

Here’s another unique glass backsplash option: Aura glass from Ann Sacks. This material is available in a range of sizes, from 4- by 8-inch bricks to various-size hexagons and sheets up to 24 by 40 inches.  

Get the look of a solid glass backsplash but with all the shimmering texture of a glass mosaic by selecting a small-format glass mosaic in a single hue. This gorgeous backsplash sparkles and adds a touch of glam to this elegant kitchen. 

Here’s another version of the Gloss Mosaic tiles from Artistic Tile. I like how the kitchen palette was kept very light, cool and neutral, which allows the hot, shimmery backsplash to take center stage. 

I recommend playing with scale, because there are now so many options available in backsplash tile beyond the once-standard 3- by 6-inch subways or 4-inch squares. These skinny sticks look clean, neat and modern. 

Or go big with a superwide-format subway tile. These 3- by 16-inch glass tiles look sharp in this cool kitchen.


Who says backsplash tile has to be rectangular? This tile has a softer, more organic geometric shape, which adds oodles of charm and a vintage feel. 

This is another favorite backsplash tile of mine. I love the irregular and random triangular and wedge shapes as well as the subtle color variation among the pieces. This particular tile requires fairly thick grout lines, so be sure to seal the grout according to the manufacturer’s specifications. 

This gorgeous iridescent glass mosaic tile would work with a variety of design styles, from traditional to contemporary. And it has a good amount of orangish-red coloration, so it harmonizes well with the orange tones expressed by the wood flooring and cabinets. 

These cool glass stick mosaic tiles are reminiscent of stained glass panels, but with a modern twist. You can run this tile vertically or horizontally. Installing it vertically, as shown here, draws your eye up the wall and makes the ceiling feel higher.  

Here’s another nice linear stick glass mosaic tile with beautiful coloration. The white grout helps showcase the individual tiles and ties in well with the crisp, white countertop.

Monday
Nov182013

Countertop + Backsplash: Making the Perfect Match

Article By:

Which do you select first — kitchen counter or backsplash? How do you coordinate colors? Is it OK to mix patterns? The seemingly unlimited countertop and backsplash choices can feel overwhelming.

I've had homeowners approach me after weeks or months of looking at and collecting samples of materials that they love separately but just don't love together. Some settle on a combination that looks good together, but they don't actually like either material on its own. 

Here are 10 examples of stunning and successful countertop and backsplash combinations to help you plan your own mix of kitchen finishes, along with tips to ease your selection process. 

Approach 1: Select the Countertop First

If you feel overwhelmed by the countertop and backsplash options, try focusing on countertop selection first. Your countertop is the workhorse in your kitchen and can constitute a good chunk of your budget, so you'll want to get it right. Your budget and the way you use your kitchen will narrow things down. Plus, there are generally fewer color and pattern options for countertop materials, whereas backsplash options are practically unlimited. Countertops will also be installed before the backsplash, so you definitely need to decide on them first if construction has already begun.

Browse the Houzz photo database for countertop materials that appeal to you and the compare pros and cons in the Houzz guides to countertops. If you want to see something in person, check out what's available at your local stone yard, kitchen and bathroom design showrooms, and home improvement stores.

Shown: Soapstone and butcher block counter; linear glass tile mosaic backsplash
 

Once you've homed in on your countertop of choice (congratulations!), you have immediately narrowed the field of options for the backsplash. Trust me, this makes your life easier. 

Now, you don't necessarily need to exactly match the color or pattern of your countertop to that of your backsplash, especially if you go for an unusual hue or a countertop material with a lot of movement in it. In these cases a simple and neutral-hued backsplash is a good choice, so that the countertop takes center stage and does not fight with the backsplash for attention.

Shown: Orange quartz counter (get the look withOne Quartz from Daltile); Oceanside Glasstile'sTessera mosaic blend in Veil backsplash


If you want to go bold with both your countertop and backsplash, bring a sample of your chosen countertop material with you as you shop for backsplash tile. You will be able to instantly limit your backsplash options to those that work with your countertop material. If you are struggling with finding the right backsplash to work with your countertop selection, consider hiring a pro, even if it's for just a few hours, to help you nail the selections. Or enlist the help of a color- or design-savvy friend.

Shown: Green quartz counter (get the look with Silestone); mosaic glass tile backsplash
 

Approach 2: Select the Backsplash First

Of course, if you happen to find a backsplash you absolutely love before you've even looked at countertops, I say go for it. Making this selection will absolutely help you narrow down the options for the countertop. If you go for a statement-making backsplash such as the one here, find a quiet, subtler countertop material so it doesn't fight with the backsplash.

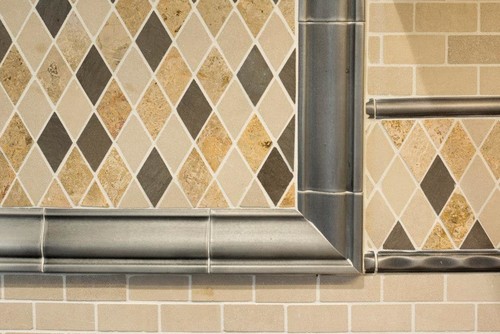
Shown: Pietra del Cardoso stone counter; Stone & Pewter Accents mosaic glass tile backsplash


I prefer that either the countertop or the backsplash be the star of the show, with the other material playing a supporting role. This stunning backsplash has lots of color and movement and, in my opinion, should not have to compete with an equally attention-grabbing countertop.

Shown: Caesarstone counter; glass mosaic Waterworks backsplash
 

That's not to say you shouldn't consider a mix of colors and patterns for both your countertop and backsplash. But if both of your materials feature multiple hues and have different patterns, aggregates or movement, stick to one overriding color palette for both materials. This will give the materials a nice cohesiveness, so they don't fight with each other.

Shown: Bianco Romano granite counter; stained glass mosaic tile backsplash
 

Approach 3: Use the Same Material for Both Counter and Backsplash

Love your countertop selection and want to keep this process simple? Consider running your countertop material up onto the wall as the backsplash. This is an especially smart option if you are required to purchase entire slabs of your chosen countertop material and you happen to have enough material left over to use the remainder as the backsplash.

Shown: Get the look with a Pietra del Cardoso stone counter and backsplash.
 

You can also use the same or similar countertop material for your backsplash but break it up by selecting a tile format for your backsplash rather than a slab. This can be a budget-friendlier option than purchasing extra slabs to create a backsplash.

Shown: Get the look with a Carrara marble counter or, for a more durable option, check out Misty Carrera from Caesarstone; Carrara marble subway tile backsplash
 

Another cost-effective approach is to run your countertop 4 to 6 inches up the wall as a short splash. It will give you a nice finished edge where the countertop meets the wall, and it will also provide protection to the part of the wall most likely to get wet or dirty. Just be sure to check your local building code requirements regarding the minimum height of noncombustible materials on the wall area above the range or cooktop.

Shown: Uba Tuba granite counter; colbalt-blue Daltile subway tile backsplash
 

Approach 4: Hire an Expert

Some homeowners just have a difficult time visualizing their finished kitchen, which is why material selection can prove so challenging. And all too often you are asked to make too many decisions in too short a time period. If you know you are prone to analysis paralysis, do yourself a favor and give yourself enough time to weigh your options, but with a firm deadline to make the decision. Engage the assistance of a friend whose taste you admire, or hire a design professional to help guide you or bless your selections.

Shown: Gray and white granite counter; oversize ceramic tile backsplash