twitter Facebook Google+

                 linkedin pinterest houzz  

Click for the BBB Business Review of this Countertops in Denver CO 

Google Review 

Sales & Promotions!

Architects, interior designers, and more ∨

Hire a decorator to find that just-right couch and coffee tables for your living room.
Find wall shelves, a customizable closet organizer and stylish furniture for home to whip your closet into shape.
Remodeling and Home Design

Qualify Us Now! ProView 

Cambria logoUp to $45,000 interest free for your project!Finance by Cambria

 convenient and easy.

  • No Money Down
  • Interest-free financing for up to one year without payments
  • Financing up to $45K for any project that includes Cambria (including cabinets, flooring, sinks, plumbing, install & more)
  • Secure paperless telephone application
  • Credit decision in less than 10 minutes


Entries in Counters (5)

Monday
Sep292014

12 Stylish Kitchen Counters That Seem to Float in Space

Want your kitchen countertop to be the hero of your new cooking zone rather than relegated to the background? One way to do that is to look beyond the basic block-like counter and incorporate a cantilevered, or floating, countertop into your kitchen design instead. Here are 12 cantilevered counters that not only offer showstopping style but also enhance functionality and create the illusion of more space.

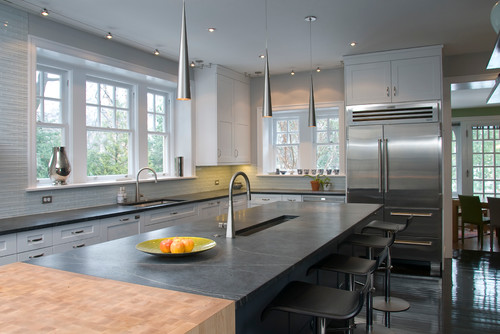
1. Suspended reality. This may look like an optical illusion, but there was no hocus-pocus involved when this striking, impressively long floating counter was built — that we know of, anyway. Its gravity-defying design is just one reason this cantilevered countertop commands attention. Its luxe, chunky look and sleek black color (which boldly contrasts the vibrant red cabinetry opposite) also ensure that the suspended structure exudes jaw-dropping appeal.

The expansive bar provides plenty of room for several people to sit and enjoy a drink or meal, while the open area beneath ensures that spills and crumbs can be cleaned up with ease, making this an ideal setup indoors or outdoors.

Tip: If your countertop is thick, opt for minimalist stools with a slim profile so the design doesn’t appear too heavy.

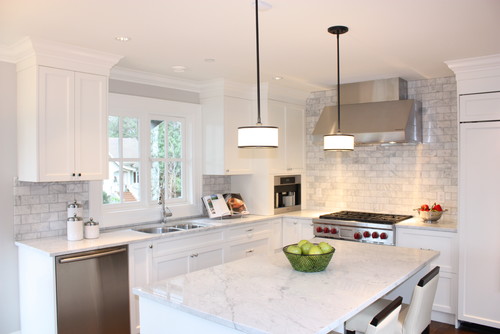
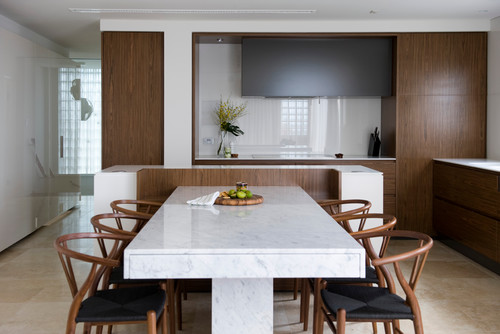
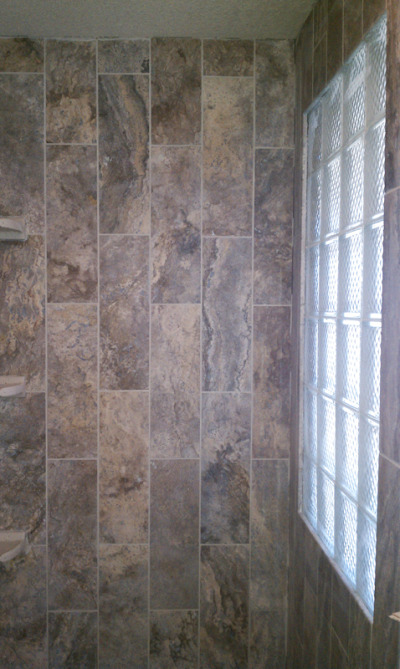
2. Natural wonder. If you want to infuse your kitchen with warmth, subtle sophistication and an air of luxury, consider a cantilevered-counter combo of natural stone and timber. Here the suspended style showcases the quiet beauty of the travertine top, while the wood cabinetry below softens the look and complements the stone’s neutral tones. 

But style isn’t all this counter has to offer. The cantilevered top also provides additional workspace (which helps offset the area taken up by the double sink and stovetop farther down the island) and room for extra chairs, which comes in handy when entertaining.

Tip: When choosing wood to pair with your stone countertop, look for one that’s free of prominent knots or patterns that could clash with the veining of the natural stone. 


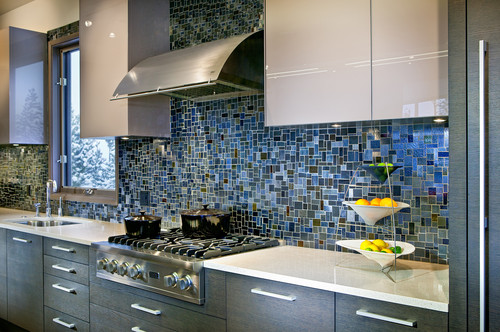
3. Minimalist chic. Although this cantilevered surface is a dedicated work zone, it also succeeds in injecting this modern rustic kitchen with a hearty dash of visual interest. The clever floating contraption is anchored to the wall by way of steel tabs that protrude from the metal surface and double as decorative elements that transform the vertical surface into an accent wall. Crisp white was a smart color choice for the surface, as it cuts through the room’s moody palette, while the thickness gives the space a clean, contemporary feel.

4. Cool and clean. If you hate being on cleanup duty after a family barbecue, a floating concrete counter like this one will make the chore a little easier to bear. Thanks to its suspended design, crumbs and spills can be swept or hosed away quickly. Polished cement also is durable, stain resistant and easy to clean, so it doesn’t require much effort to make the surface look as good as new after entertaining.

Also, note how the cool gray surface adds an industrial edge to the contemporary outdoor kitchen and entertaining area, while the countertop’s bold lines and streamlined look complement the sleek style of the space.

5. On the side. Now here’s a chic cantilevered counter with a twist. Rather than extending a section of the thin, neutral-toned countertop past the end of the island, designer Darren James placed a separate slab of stone (in a contrasting tone and thickness) on top and rotated it to sit across the width of the workspace. This not only helps define the cooking zone and visually separate it from the surrounding open-plan area, but also makes the space feel more communal, as the seating faces inward, fostering a sense of togetherness.

As you can see, the contrasting look and unique configuration of both counters also succeed in transforming a basic island top into a statement-making design feature.

6. See-through style. Don’t be too hasty to say, “Nuh-uh; no way” to a floating glass countertop. Sure, they’re not for everyone (like those with young kids), but they can work for some in the right space.

Here an eye-catching glass countertop appears to jut out from the corner of a taller wood prep zone. It’s stabilized by a metal bracket that supports the see-through surface. The material was selected to enhance the airy, spacious feel of the kitchen, and coupled with the suspended design, it successfully does just that. Although it’s an unconventional choice for a kitchen countertop, the structure here was designed to be a eating area, rather than a food-prep space, so the material should hold up fine.


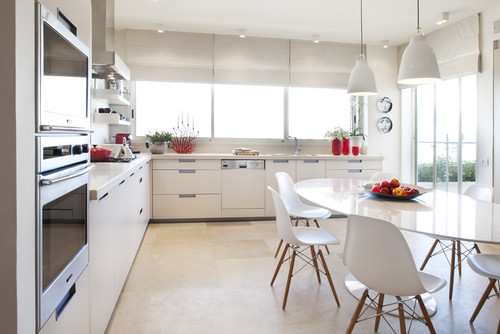
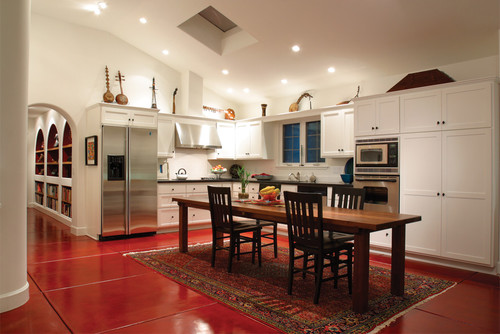
7. Family friendly. One design trend we’ve seen in the kitchen project section of Houzz is the integrated kitchen counter–dining table. This elegant transitional-style cooking and eating area shows how this concept takes shape with the help of a cantilevered countertop. 

Here the floating counter has been lowered so that it stands at table height, rather than matching the height of the adjacent concrete counter. This allows for more comfortable and ergonomic seating (unlike bar stools, which can sometimes cause aches and pains in your back and legs after you’ve been perched on one for a while —or does that just happen to short people like me?). This means your family and friends won’t mind sitting around the table for long meals and lengthy catch-up sessions.

The long, cantilevered counter provides loads of visual appeal too. The rustic, reclaimed wood table contrasts beautifully with the contemporary pastel pink cabinetry and industrial-looking cement counter, creating a space that oozes subtle sophistication but still makes a strong style statement. White retro-style dining chairs complete the look and add another layer of interest to the eclectic scheme.

8. Optical illusion. This stunning counter may appear as if it’s floating, but if you look closely, you’ll see that there’s actually a mirror-finish post that supports the stunning granite countertop from below — how sneaky! Even so, this showstopping cantilevered-look counter still deserves a mention, since it achieves the same airy, space-enhancing look as a suspended countertop, albeit with some help from a supportive friend.

Here it’s not just the striking countertop material that makes a dramatic statement. The undercounter lighting and the way the granite appears to be embedded in the white Caesarstone island also take the stylish kitchen counter to new heights. The lowered height of the bench makes this casual dining area more practical and comfortable, too.

Tip: If you’re worried that a natural stone countertop may be too high maintenance for you, choose an engineered stone or a high-quality laminate instead.

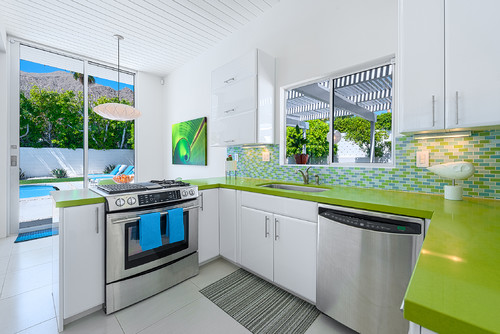
9. Green with envy. What was the first thing that caught our eye when we spied this cool cooking space? The striking island, of course  though the shimmering disco ball–like pendant light probably came in a close second. While the island’s eye-popping lime-green base immediately attracts the eye, the dramatic lines of the thick floating concrete top also command attention.

Polished concrete is a stylish and practical kitchen surface choice, as it not only injects any space with a cool, contemporary edge, but is also extremely low maintenance and environmentally friendly, making it ideal for those who desire an ecochic cooking zone that’s a breeze to clean. Did we mention the material is very affordable, too?


10. Space age. If you want to make a bold statement in your kitchen, opt for a cantilevered counter that’s fashioned from an interesting material in an unexpected shape, such as the cutting-edge, contoured design shown here. LED lights fitted underneath add to the freestanding form’s space-age vibe and help highlight the showstopping centerpiece.

Thanks to its tall height, there’s plenty of room to tuck several bar stools below the counter, which helps keep the pathways free of obstacles and ensures that the room maintains its clean, uncluttered look.

Tip: Install tinted LED strip lights below the floating countertop for a more dynamic and colorful look.

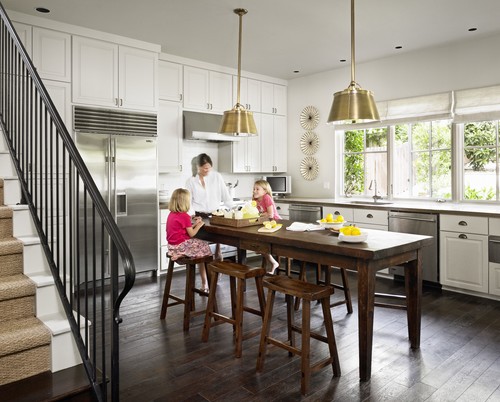
11. Going round. Worried that a suspended countertop won’t work in your spatially challenged cooking zone? This chic U-shaped kitchen shows how it’s done. Here a round floating bar is cantilevered out from the wall and floor cabinets, providing a spot for casual eats, an additional workspace and a social hub where family and friends can mingle when you’re entertaining. It also adds another layer of visual interest. Notice how the counter’s smooth, curved shape contrasts with the sharp lines and boxy forms that are used throughout the area.

12. Hidden treasure. Now you see it; now you don’t! A space-savvy cantilevered pivot table like this one is a clever, creative addition that will boost the functionality of any compact cooking zone. When extended, the table enhances the visual appeal of the space, thanks to its sharp lines and striking silhouette, transforming the otherwise basic kitchen counter into an interesting design feature. Note how the blonde timber and subtle wood grain echo the timber used underfoot and add warmth to the cool white palette, too.

Monday
Nov182013

Countertop + Backsplash: Making the Perfect Match

Article By:

Which do you select first — kitchen counter or backsplash? How do you coordinate colors? Is it OK to mix patterns? The seemingly unlimited countertop and backsplash choices can feel overwhelming.

I've had homeowners approach me after weeks or months of looking at and collecting samples of materials that they love separately but just don't love together. Some settle on a combination that looks good together, but they don't actually like either material on its own. 

Here are 10 examples of stunning and successful countertop and backsplash combinations to help you plan your own mix of kitchen finishes, along with tips to ease your selection process. 

Approach 1: Select the Countertop First

If you feel overwhelmed by the countertop and backsplash options, try focusing on countertop selection first. Your countertop is the workhorse in your kitchen and can constitute a good chunk of your budget, so you'll want to get it right. Your budget and the way you use your kitchen will narrow things down. Plus, there are generally fewer color and pattern options for countertop materials, whereas backsplash options are practically unlimited. Countertops will also be installed before the backsplash, so you definitely need to decide on them first if construction has already begun.

Browse the Houzz photo database for countertop materials that appeal to you and the compare pros and cons in the Houzz guides to countertops. If you want to see something in person, check out what's available at your local stone yard, kitchen and bathroom design showrooms, and home improvement stores.

Shown: Soapstone and butcher block counter; linear glass tile mosaic backsplash
 

Once you've homed in on your countertop of choice (congratulations!), you have immediately narrowed the field of options for the backsplash. Trust me, this makes your life easier. 

Now, you don't necessarily need to exactly match the color or pattern of your countertop to that of your backsplash, especially if you go for an unusual hue or a countertop material with a lot of movement in it. In these cases a simple and neutral-hued backsplash is a good choice, so that the countertop takes center stage and does not fight with the backsplash for attention.

Shown: Orange quartz counter (get the look withOne Quartz from Daltile); Oceanside Glasstile'sTessera mosaic blend in Veil backsplash


If you want to go bold with both your countertop and backsplash, bring a sample of your chosen countertop material with you as you shop for backsplash tile. You will be able to instantly limit your backsplash options to those that work with your countertop material. If you are struggling with finding the right backsplash to work with your countertop selection, consider hiring a pro, even if it's for just a few hours, to help you nail the selections. Or enlist the help of a color- or design-savvy friend.

Shown: Green quartz counter (get the look with Silestone); mosaic glass tile backsplash
 

Approach 2: Select the Backsplash First

Of course, if you happen to find a backsplash you absolutely love before you've even looked at countertops, I say go for it. Making this selection will absolutely help you narrow down the options for the countertop. If you go for a statement-making backsplash such as the one here, find a quiet, subtler countertop material so it doesn't fight with the backsplash.

Shown: Pietra del Cardoso stone counter; Stone & Pewter Accents mosaic glass tile backsplash


I prefer that either the countertop or the backsplash be the star of the show, with the other material playing a supporting role. This stunning backsplash has lots of color and movement and, in my opinion, should not have to compete with an equally attention-grabbing countertop.

Shown: Caesarstone counter; glass mosaic Waterworks backsplash
 

That's not to say you shouldn't consider a mix of colors and patterns for both your countertop and backsplash. But if both of your materials feature multiple hues and have different patterns, aggregates or movement, stick to one overriding color palette for both materials. This will give the materials a nice cohesiveness, so they don't fight with each other.

Shown: Bianco Romano granite counter; stained glass mosaic tile backsplash
 

Approach 3: Use the Same Material for Both Counter and Backsplash

Love your countertop selection and want to keep this process simple? Consider running your countertop material up onto the wall as the backsplash. This is an especially smart option if you are required to purchase entire slabs of your chosen countertop material and you happen to have enough material left over to use the remainder as the backsplash.

Shown: Get the look with a Pietra del Cardoso stone counter and backsplash.
 

You can also use the same or similar countertop material for your backsplash but break it up by selecting a tile format for your backsplash rather than a slab. This can be a budget-friendlier option than purchasing extra slabs to create a backsplash.

Shown: Get the look with a Carrara marble counter or, for a more durable option, check out Misty Carrera from Caesarstone; Carrara marble subway tile backsplash
 

Another cost-effective approach is to run your countertop 4 to 6 inches up the wall as a short splash. It will give you a nice finished edge where the countertop meets the wall, and it will also provide protection to the part of the wall most likely to get wet or dirty. Just be sure to check your local building code requirements regarding the minimum height of noncombustible materials on the wall area above the range or cooktop.

Shown: Uba Tuba granite counter; colbalt-blue Daltile subway tile backsplash
 

Approach 4: Hire an Expert

Some homeowners just have a difficult time visualizing their finished kitchen, which is why material selection can prove so challenging. And all too often you are asked to make too many decisions in too short a time period. If you know you are prone to analysis paralysis, do yourself a favor and give yourself enough time to weigh your options, but with a firm deadline to make the decision. Engage the assistance of a friend whose taste you admire, or hire a design professional to help guide you or bless your selections.

Shown: Gray and white granite counter; oversize ceramic tile backsplash


Monday
Nov112013

The Kitchen Counter Goes to New Heights

Article By: 

Traditional counter heights are useful. They allow us to enter any kitchen and, even with our eyes closed, find the counter where we expect it to be. Despite this significant convenience, industry standard counter heights don’t work for everybody, because there’s no such thing as industry-standard human beings. 

You don’t have to stand for the one-size-fits-all mentality. I spoke with numerous designers who are bucking the norm to offer clients custom features that won't hurt (and might actually help) resale value. 

The benefits of multiheight kitchen counters. Do you feel overexerted every time you prepare a meal? Architect and universal design expert Carol Sundstrom explains why this might be. “If you are short, reaching up and extending forward to chop on a standard-height countertop contributes to shoulder strain,” she notes. “If you are tall and constantly bending forward to see the food you're prepping better, or extending your arms fully to reach a countertop that is too low for you, that contributes to both back and shoulder strain.” 

Having multiple counter heights is a great solution for multiple users. “I prefer to see more than one height of countertop in a kitchen, rather than all the counters raised up because the owners are tall, or all the counters lowered because the owners are petite,” Sundstrom continues. “Aside from making friends and family who may not share your same proportions feel comfortable when they are helping you, you also preserve your resale value.” 

A good height. Though there is no industry standard to such custom features, Sundstrom suggests raising and lowering counter heights in 2-inch increments when mocking up a kitchen, then fine-tuning them. 

Features that can be stepped up or down in a kitchen. Eat-at counters offer great benefits, as this one by Yvonne Randolph shows. The 12-foot island was divided in half to form a table-height eat-at counter. "The clients, who are in their 60s and entertain a lot, didn't want the clunky effect of sitting at bar stools," Randolph says. "They have a deaf son and daughter-in-law, so they decided to round the edge. It's much easier to sign around a table without corners."


You don’t need to communicate through sign language to appreciate such a feature.
 

Counters that work for every preference and body. This kitchen, designed by Toni Sabatino, offers a lowered sink area, the height of which is 31½ inches, as opposed to the standard 34½ inches. The motive was purely aesthetic. “We chose to make the copper sink the focal point and felt the break in the counter would draw the eye.” 

In another of Sabatino’s designs, two stepped-down eating areas bring the food and conversation down to a comfortable seated level, rather than forcing bodies to climb up to the action. 

The idea for this kitchen design, by M.J. Lanphier, was to have standard dining-table-height seating for the clients' children. The homeowners didn't want any chairs to be too tall for them, especially in light of the island's above-standard height of 36½ inches. 

A bonus of varying heights. This lowered table also provides a physical separation between the children's clean homework area and the food prep station. 

Though this table purposely can fit only two chairs for the two children, your own stepped feature can just as easily fit more with judicious leg placement. 

“A center pedestal leg on a table allows people to pull up at the counter anywhere without straddling a leg or bumping into one as you get into place," Sundstrom says. "It also offers the ability of fitting more people around comfortably without triggering the need for table leaves.” 

Aside from dining counters and prep counters, baking centers and cooktops can also have stepped features.


Dishwashers, too, can be taken to new heights — either in their conventional form, as shown here, or as drawers. “Two separate dishwasher drawers, each mounted right under the counter, can ease back strain,” Sundstrom says. “This also enables a dishwasher to be installed in a lower-than-standard countertop height.”


Monday
Oct212013

6 Ways to Rethink the Kitchen Island

The hardworking kitchen island can be a very functional and beautiful centerpiece of a kitchen design, and it's one of the most popular features of a modern kitchen. But it's not the only way to go. In some spaces an island can feel more cumbersome than useful. If you are feeling the urge to break away from the island-centric kitchen, check out our bevy of inspiring ideas below. 

Save space with an island and table in one. The innovative kitchen in this Sydney home features an island counter on one side, with built-in seating and a marble-topped, extendable table on the other end. Combining a table with an island is a great space saver, and an extendable table can seat a crowd without taking up too much space on a daily basis. 

Another great island-table hybrid, this set works extra hard — the stools are comfy enough to sit on through dinner, yet they can be tucked completely under the table to free up kitchen workspace during prep time.


Encourage cozy suppers with a kitchen table. With an ample-size rustic wood table in the center of your kitchen, family and friends are sure to gather around it night and day. It's so much warmer and friendlier than a big, blocky kitchen island, and it's perfect for spreading school projects out on as well. 

Streamline your kitchen with a modern dining set. If you have counter space covered and appliances tucked against the walls, as in the L-shaped kitchen shown here, why bulk up your kitchen with an island at all? A marble-topped Saarinen dining table and Eames chairs (as shown here) are a highly covetable pairing among modern design enthusiasts and enhance the light, airy feel of a white kitchen. 

Get the best of both worlds with a working-height table. When you need more kitchen prep space but don't want a giant island with to-the-floor storage, a tall table is a good solution. You can still comfortably do prep work, but this type of table takes up far less visual space than a built-in island. 

Taller kitchen tables are also great for narrow spaces. A slender table like the one shown here doesn't take up too much space but allows ample room to work. If you wanted to sneak in a bit of extra storage, you could track down a table with drawers or an open shelf, or have a knife rack built into the side. 

Enhance flow in an open-plan space with a kitchen table. When your living, dining and cooking spaces are visually linked, a gigantic kitchen island in the middle of everything can look out of place. Choosing a table instead, whether counter height or dining height, will give your entire space a more relaxed, comfortable feel. 

An old wooden table with a rich patina warms up any kitchen but works especially well when the kitchen opens to a wider living space. Add a soft rug underfoot to boost the comfort factor even more. 

Cozy up a contemporary island with plush seats. You can also work with an existing island by choosing ultraplush upholstered tall benches, instead of the typical bar stools. These are extra wide and have a shape that makes them look more like mini settees than stools, and they look supremely comfortable.


Tuesday
May212013

Get Grout Magically Clean - Stains and All

If your grout is grossing you out, this deep-cleaning method will help it look new again!

Photo: American Cabinet & Flooring | Project Manager Randy WilsonTile - whether it's used as flooring, in the kitchen as a backsplash or for counters, or in the bathroom - has one great downfall: grout. Since grout is porous in nature, unsealed grout absorbs all kinds of stains, from mildew to coffee and everything in between. To say it's a headache to keep grout clean is an understatement.

NOTE: Be wary of using too much lemon juice with marble, since it can etch or damage the stone if left on too long. Hydrogen peroxide can be a safe alternative.


We inherited marble tile counters when we purchased our home. It's pretty clear that the grout was never properly sealed, so it soaks up stains like crazy. It makes our kitchen feel gross and grimy, even if it was just cleaned. While I'd love to replace the counters with a solid surface like quartz, it's just not in out budget - plus, we just can't justify getting rid of something that's perfectly fine otherwise.

Luckily, I have a foolproof method that will lift most household stains from that pesky grout. 

What you'll need:

  • Oxygenated bleach (like OxyClean)
  • Warm water
  • Coarse scrubbing brush (like an old toothbrush)
  • Towel
  • Lemon
  • Grout sealer

TIP: Cleaning colored grout should be done with special care. Bleaching agents (like chlorine bleach) can discolor and harm the colored grout. Fortunately, oxygenated bleach does not contain corrosive chemicals and is safe to use on all grout. 

1). Clean the surface thoroughly, removing any surface residue or debris. Let the grout dry fully.

2). Dissolve 2 tablespoons of oxygenated bleach in 2 cups of warm water. Wet the brush in the mixture and apply it to the grout. Let is soak in, then scrub the grout in a circular motion, which will loosen the stain more effectively than a front-and-back motion. If needed, dip the wet brush into the oxygenated bleach to make a paste. Wipe clean, then let dry.

TIP: To lift extra dark stains, squeeze lemon juice onto the stain, let it soak in, then scrub, wipe clean and let the grout dry. Use lemon juice sparingly, since it can damage some tile finishes.

3). Spray the tiles and grout with an ecofriendly cleaning spray and wipe them clean. Let the grout dry fully before making a final decision on whether your hard work paid off - damp grout looks darker than dry grout. 

4). Apply grout sealer after the grout has fully dried to avoid any future stains. Be sure to reapply it each year. 

Still having trouble getting that grout clean? For those impossible-to-remove stains, you might want to consider:

  • A commerical tile and grout cleaner
  • A coarser brush (avoid using metal bristles, though, as they can erode the grout)
  • Grout Renew

If after you've tried all three, the stain is still hanging strong, you may have to resort to removing the old grout and replacing it with new. 

TIP: An electric multitool, like the Dremel Mult-Max, helps to make quick and safe work of removing the old grout. 

(You are reading an article originally posted on Houzz)