twitter Facebook Google+

                 linkedin pinterest houzz  

Click for the BBB Business Review of this Countertops in Denver CO 

Google Review 

Sales & Promotions!

Architects, interior designers, and more ∨

Hire a decorator to find that just-right couch and coffee tables for your living room.
Find wall shelves, a customizable closet organizer and stylish furniture for home to whip your closet into shape.
Remodeling and Home Design

Qualify Us Now! ProView 

Cambria logoUp to $45,000 interest free for your project!Finance by Cambria

 convenient and easy.

  • No Money Down
  • Interest-free financing for up to one year without payments
  • Financing up to $45K for any project that includes Cambria (including cabinets, flooring, sinks, plumbing, install & more)
  • Secure paperless telephone application
  • Credit decision in less than 10 minutes


Entries in Kitchen (78)

Monday
Aug192013

Kitchen Storage Solutions for Every Nook

Article By: Nicole White Quinn

Today's clever kitchen designers have storage solutions to fill every nook and cranny in all sorts of kitchens. These handy helpers can help you take advantage of every square inch. 

When you're grappling with backsplash material decisions, consider something that can help you snag some extra storage, too. This stunning kitchen has a secret that amps up the storage possibilities without taking away from its clean look. 

The designers installed sliding doors in the marble backsplash behind the stove and put extra shelving behind them. The beauty of this technique is that you can achieve the best of both worlds — a beautiful backsplash and storage. 

Tip: You'll need to have enough space within your walls to make this work, which means you'll need to have this discussion very early on with your contractor.


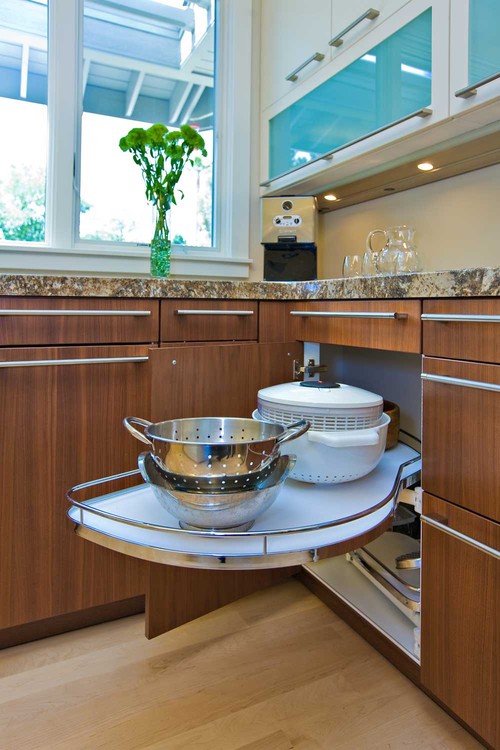
Corner drawers are a great alternative to the lazy Susan. Cut on a diagonal, they simply pull out like standard drawers to make use of an otherwise hard-to-reach corner space. 

Tip: 
Have your drawers made in varying sizes to keep things organized. Pot lids and smaller items can go in the smaller drawers, and plastic containers and pots and pans in the larger drawers.


If you prefer a cabinet door in the corner of a base cabinet, and you don't like lazy Susans, rotating and sliding shelves can help you access corners with ease. 

Tip: 
Unlike corner drawers, these pullouts can be installed in both upper and lower cabinets.
 

Even the toe kick area, once wasted space, can be used for storage when you add a very shallow drawer for small items. 

Tip: You'll have to bend a lot to access a toe kick space, so consider storing items here that you'll need to access just once or twice a year — such as serving dishes, chargers and holiday napkins. 

Open shelving is often the most budget-friendly way to deal with the small space left at the ends of most upper and lower cabinets. If custom cabinets are in your budget, closing those shelves with a curved door is a great way to keep things neat and tidy without installing two separate doors to cover the corner. 

Go beyond basic shelving for your base cabinetry. Today's kitchen organization additions come in every kind imaginable to help you sort and store your belongings. Use a mix of slide-out shelving and drawers to access heavy items, and custom pullouts to house mixers, spices, cutting boards and baking sheets. 

The end cabinets in a kitchen layout typically get fitted with a door facing for a polished look. Here the homeowner has found a clever space for keys, a pegboard and a dry erase board for notes and to-do lists, and installed slats for magazines and cookbooks. 

Friday
Aug162013

10 Tiny Kitchens Whose Usefulness You Won't Believe

Article By: Vanessa Brunner

From unfolding apartments to clever remodels to creative rentals, these 10 tiny kitchens show that their owners and designers haven't just learned to deal with small spaces — they've embraced them. With solutions including cutting boards on drawers for extra counter space, affordable alternatives to wallpaper and innovative storage, these small kitchens can't help but inspire. 

1. Pocket-Size Vintage-Style Kitchen
Homeowner: Robert Kelly of Piedmont, California

Robert Kelly's vintage-style kitchen is only about 145 square feet, but he doesn't need much more space — even with kids and pets around. Kelly's home was built in the 1920s, and preserving the original style was a big priority. Each appliance and finish was chosen to complement the house as a whole. The beautiful vintage stove was given to him by a friend.


The most difficult part of Kelly's renovation was planning the kitchen in relation to the rest of the house. The traffic flow had to be arranged with emphasis on one side of the space, leaving more space for cabinets and counters on the other. Relocating the interior stairs, the exterior stairs and the windows helped achieve this but presented some complications.  

2. Clean, Modern and Efficient Kitchen
Homeowner: Steve Justrich of San Francisco

Designer Steve Justrich's renovated 1912 kitchen was carefully designed to make the most of its 90 square feet. Justrich relied on simple tricks — placing the refrigerator flush to the wall in an old doorway and purchasing small European appliances — to save on space. Open shelving instead of upper cabinetry and a turquoise Venetian plaster ceiling create the illusion of more space.


A tiny dishwasher is all Justrich needs for a day's worth of dishes. A built-in cutting board and a strainer for the sink expand counter and prep space. Colorful artwork and Heath pottery add cheer to the simply designed space.  

3. A Tiny, Makeshift Bakery
Homeowner: Yossy Arefi-Afshar of New York City

Yossy Arefi-Afshar loves to bake, and refuses to let her tiny New York kitchen stop her. Although she's learned some hard lessons about planning along the way ("I'll never forget the time I got too ambitious with my menu and ended up doing dishes in the bathtub the next day," she says), she's learned to work with what she's got.


When Arefi-Afshar is working on a big baking project, she simply clears everything off the counters and moves it to another part of the apartment. For some extra surface area, she'll pull out a drawer or two and place a sheet pan or cutting board on top.


4. Space-Saving Spanish Kitchen
Homeowner: Christian Schallert of Barcelona, Spain

This cleverly designed 260-square-foot Barcelona apartment functions in different modes — each appliance and piece of furniture tucks into a hidden panel. Panels made of Viroc and wood pop open with a simple push, revealing refrigerators, seating and a bed.
 

The kitchen panels are all on the same side of the house. A fridge, an electric stovetop, a sink, a freezer, a microwave and a dishwasher all fit into this one wall. After meals, everything simply gets tucked back into its hidden panel.  

5. Eclectic and Personal New York Kitchen
Homeowner: Natalie Holbrook of Manhattan, New York

Natalie Holbrook's new apartment was an upgrade in size and style from her previous tiny, prewar home. While the kitchen was a step up, it was still small and lacked any unique style. When she first moved in, Holbrook wanted to cover this wall in wallpaper, but the potentially messy installation and expensive price tag dissuaded her.


Instead, she came up with an impromptu, stylish and inexpensive collage made of Polaroids, Instagram prints and other photos. Including the tape, the whole thing cost less than $35.  

6. A Food Blogger's Brooklyn Rental
Homeowner: Cara Eisenpress of Brooklyn, New York

A rental kitchen isn't just limited in size, it's limited in style too. Food blogger Cara Eisenpress uses cute art and her prettiest canning experiments to add color and interest to her tiny Brooklyn kitchen.
 

A huge part of keeping a small kitchen tidy is prioritizing belongings. Not everything could fit in her kitchen at first, so the most used items were kept on hand. On the other side of the kitchen, a wall-mounted wine rack and tall bookshelves take advantage of wall space for storage. A small setup seats four people for a casual meal.


7. Luxe Appliances in a Small Space
Homeowner: A Manhattanite who loves to cook

The owner of this 400-square-foot New York City apartment loves to cook and knew that his lack of square footage didn't have to be an inhibitor. Together, the client and designers Michael Chen and Kari Anderson came up with a unique "unfolding" concept — a built-in cabinet that holds a closet, a desk and a bed, and divides the apartment into zones.
 

This unfolding cabinet solved the issue in the great room, but the dilapidated kitchen still had some problems. The designers found a tiny Viking range to install at the end of the narrow kitchen space. Two undercounter units replaced a full-size fridge, and walnut and stainless steel open shelving provided functional and attractive storage.  

8. Ecofriendly Bare Essentials 
Homeowner: Jay Shafer of North Carolina

This movable 7- by 16-foot home is combined with an equally tiny home next door for a total of 620 square feet of living space. Jay Shafer, founder of Tumbleweed Tiny House Company, calls this home (along with his wife and young son). This energy efficient and ecofriendly housing solution relies on the basics, including a bare-bones kitchen. The front door of the house opens into its small kitchen and dining space. A sink, a prep surface, a portable electric range and a small fridge serve the family's basic needs. A shelf above the sink holds most of the dishes and other kitchen essentials. 
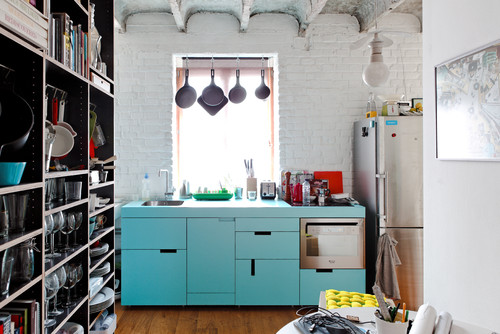
 

9. Colorful and Custom European Kitchen
Homeowner: Lukas Kordik of Bratislava, Slovakia

This space-saving customized kitchen is full of smart storage solutions. The bright blue kitchen cabinetry provides plenty of color while taking up minimal space. An electric stove top, an oven set flush into the cabinetry and integrated drawer handles keep things simple. Having the main kitchen unit in a single block saves space and keeps the kitchen open.
 

Designer and homeowner Lukas Kordik created an impressive unit of floor-to-ceiling shelving to hold essentials and decorative items.  

10. Cheerful San Francisco Rental 

Homeowner: Kimberly Hasselbrink of San Francisco

Food photographer Kimberly Hasselbrink loves her San Francisco apartment, but her kitchen is seriously lacking in space and natural light. She hasn't gotten the go-ahead to make any changes to it, so for now she's dressed up her space with thrift store accessories and one-of-a-kind art.
 

Hasselbrink keeps the space neat and clean by using hidden storage. She doesn't like to keep anything out unless it's useful and attractive, instead adding color and visual interest through easy-to-change decor, like these prints fromJon Holcomb and Wendy MacNaughton

Wednesday
Aug142013

12 Items Worth a Spot on Your Kitchen Counter

Article By: Charmean Neithart

In certain areas of my house, clutter just shows up out of the blue. The kitchen countertop is a dumping ground for random, misplaced objects left by children and a naughty husband. On any given day I find junk mail, empty grocery bags, the ubiquitous unfinished glass of milk and spare change. 


I like my countertops sparse, so I take responsibility for clearing them each night after dinner. As part of my nightly ritual, I clear the countertops, wipe them clean and then reposition all the things for the next day. I like a combination of functional things and pretty things out on my countertops, but I am very picky about my selections. It is a working area, after all, so function comes first. Here are some ideas for countertop styling that looks good and is functional, too. 

Kitchen scale. This is a handy kitchen tool, especially for those who track portion sizes. A scale can also be useful for baking and weight conversions. You can find scales online in every color of the rainbow and digital versions, too. 

Fruit bowl. I keep a bowl on my counter filled with fresh, seasonal fruit to encourage healthy snacking.


Silverware caddy. We use a silverware caddy for three square meals a day and just leave it on the counter. It makes perfect sense on a countertop close to the table or dishwasher. 

Condiment canisters. You can place canisters for sugar and flour, plus salt and pepper shakers, right on top of the counter. These canisters can be glass, ceramic or tin. The styling details are endless, but I suggest airtight versions to keep out pests. 

Mixer. I know an appliance garage is a handy thing, but I honestly like seeing mixers. I love the color and the simple engineering of a mixer. We use ours all the time, so it earns a counter spot in our house. Try a baking corner with a mixer, measuring cups and a rolling pin.


Cookbook stand. The book stand is one of my favorite countertop accessories. Use it for a hard-copy cookbook or an iPad with a recipe app. The best book stand is heavy enough to support even a large book. Consider a cast iron one with felt pads on the bottom to prevent scratching. 

Oversize bowls. Here is an idea sure to appeal to some but not others. Oversize bowls can sometimes be hard to store, especially with standard-depth upper cabinets at 13 inches. I use oversize bowls a lot for pasta and salad. Find the best-looking and thickest one you can and leave it on the counter. 

Herb plant. I like to keep rosemary on my kitchen counter for the fragrance and general softness it brings to the hard surfaces in my kitchen. Of course, I snip a bit here and there for cooking. Find a sunny spot on your counter and water your plant once a week. Other herbs to try growing are mint and basil. 

Utensils and ingredients. I really like a container for tall utensils right next to my stove. I use a slotted spoon just about every time I cook, so why not have it there at the ready? And I think it's fine and interesting to keep oils and salt and pepper right within arm's reach. 

Coffeemaker. Another power appliance in many homes, the coffeemaker need not be hidden away. Those who drink coffee every day should consider a coffee section for their counter.


Blender. Another kitchen tool available in any color, a blender is handy for blending soups, juices and smoothies. My favorite is the Vitamix Professional Series 750.


Toaster. My family loves toast. I bought the biggest toaster I could find, and there still is a line at breakfast time. The toaster definitely gets a spot on the counter in my kitchen. Keep yours next to a bread drawer or bin for a complete toasting section.

Friday
Aug022013

Install Your Kitchen Sink for How You Like to Cook and Clean

Article By: Jennifer Ott, Assoc. AIA + LEED AP

Once you've decided on the material for your next kitchen sink, you'll want to decide what kind of installation to do. There are four basic categories of sink mounting types: 

  • Apron front sinks, also known as a farmhouse sinks, have a broad, exposed front edge and are usually quite wide and deep.
  • Undermount sinks get attached to the underside of the countertop for a clean look.
  • Drop-in sinks are installed on top of or over the countertop.
  • Integral sinks are made from the same material as the countertop, often fabricated as a seamless unit within the countertop.

Usually aesthetics and cost rule this decision. Drop-in sinks tend to be the most budget-friendly, primarily because you can easily install them yourself in an affordable laminate countertop. Undermount and apron front sinks often require professional installation and can only be mounted to a sturdy and non-porous countertop material, which can add considerable cost to the project. Integral sinks are generally the most expensive type, due to the cost of the material and fabrication. Read on for more information and examples of each to help you make your selection. 


Apron Front or Farmhouse Style

These charming sinks are right at home in traditionalor cottage-style kitchens with their exposed fronts and potential for decorative detailing. Apron front sinks are typically wider, deeper and heavier than the other sink types, so they require at least a 36-inch-wide sink cabinet. The sink cabinet must also be able to accommodate the apron front.


Of course, apron front sinks are no longer just for old-world or farmhouse-style kitchens. There are many stunning modern versions of the apron front sink available today, such as the brushed stainless steel beauty pictured here. Also, while these sinks have traditionally come with a single bowl, they now also come in divided, two-bowl versions.

These are certainly attractive sinks, but if you are considering installing one in your kitchen there are a few issues to keep in mind. I've heard a few complaints about how easy it is to accidentally break a dish or glass against the apron when aiming to place the item in the sink. 

Also, if you go for a stainless steel or copper version, be aware that the apron could get scratched up from contact with belt buckles or metal buttons on your jeans. And, unless it is installed as an undermount (with the countertop extending over the sink edge), there will be a seam between the sink and countertop, where moisture and gunk can collect.
 

Undermount

This is my favorite mounting type for a sink. I like the clean look, not to mention the easy-to-clean design. You can undermount a sink to any sturdy, non-porous countertop, such as natural stone, concrete, quartz and solid surfacing. I have heard of successful applications to wood countertops, but extra care must be taken to protect the wood from water. There are also laminate countertop manufacturers that claim you can undermount a sink to their material. Discuss with your countertop retailer to see if this is an option for you. 


Depending on your particular undermount sink, you may have some options regarding the reveal — or how much or little of the top of the sink is visible just below the inside edge of the countertop. I tend to prefer a no-reveal, or zero-reveal, look — just a smooth, straight drop from the countertop into the sink. This makes the sink and surrounding countertop area super easy to clean, as there is no ledge for food particles to collect in. You can also specify a "negative reveal" where the countertop extends over the edge of the sink. 

I think a slight negative reveal —⅛ inch or less — is fine, but any more than that and you run the risk of breaking dishes on the overhanging lip of the countertop as you lift them out of the sink. I would also be wary about not being able to see and maintain the water-tight seal between the sink and countertop — it can be difficult to view with a negative reveal.


Drop-in

This is a popular sink style for those on a tight budget, for those installing a sink within a porous countertop body material (such as wood or laminate) or those looking to repurpose a vintage sink or get a vintage look.

This type of sink is installed over the countertop, into a cutout, and then sealed around the edge where the sink lip meets the countertop. The obvious downside to a drop-in sink is that the raised lip makes it more difficult to wipe food particles directly into the sink, as you can with an undermount sink.


Where undermount sinks have a clean, minimalist feel, drop-in sinks are very charming and work well in rustic or farmhouse-style kitchens. Similar to apron front sinks, drop-in sinks can be a real eye-catching decorative element in a kitchen.


Integral

If you'd rather your kitchen sink blend in, and you are installing stone, metal, solid surface or quartz countertops, think about having an integral sink fabricated. Your countertop fabricator simply forms a sink using the countertop material. The look is very clean and seamless — perfect for a contemporary kitchen. 


Here's a close-up of an integral sink. These sinks have no nooks and crannies for food particles to collect in, making cleanup a breeze.


An integral sink is one of the more expensive mounting types because these sinks are usually custom designed and manufactured. You are paying for the raw material as well as fabrication and installation, which can be costly. But for those with the budget for it, it's certainly an appealing option.


Monday
Jul292013

Kitchen FAQs: Selecting Your Sink Material

Article By: Jennifer Ott, Assoc. AIA + LEED AP

Anyone who has built or renovated a kitchen knows what it can feel like to make so many decisions in a very short amount of time. Educating yourself about your options beforehand can help cut down on some of that stress. Here, we take a look at sinks — specifically the choices you have when it comes to materials.

Cost, functionality and aesthetics should all weigh in when you select your sink material. For instance, you can get a well-priced stainless steel sink, but be aware of how easily it can scratch and show water marks. White fireclay or cast iron sinks are beautiful, but may require some elbow grease to stay bright and white. Integral quartz sinks are becoming increasingly popular, but they can be expensive and aren't necessarily bulletproof. 

Not sure what's right for your kitchen? Read on to learn more about these popular material options for today's kitchen sinks. 

Stainless Steel

By far the most popular material for kitchen sinks, stainless steel sinks are heat and stain resistant and are available in a variety of types, styles and sizes. I recommend going for a brushed or satin finish rather than a mirror finish — water marks and scratches will be less noticeable. Also, look for sinks that have sound-absorbing pads on the bottom. Consumer Reports recently tested stainless steel sinks and found that these pads, rather than sound-absorbing spray or a thicker gauge of steel, performed best in reducing the noise commonly associated with stainless steel sinks.

Prices for stainless steel sinks run the gamut, but you can get a decent quality stainless steel sink for not a lot of money, making it my pick for those on a tight budget.

Cost: $100 to $800 is typical, but prices can go higher depending on gauge, size and mounting type.
 

Composite Granite

Composite granite sinks are my go-to sink, both for my clients and my own kitchen. They are good-looking, durable and don't show water marks or scratches the way stainless steel sinks do. They come in a variety of neutral hues, but I prefer the darker grays, browns and black because they camouflage food filth the best. This is my own sink pictured here, and I must confess, I don't clean it nearly as often as I probably should because it never looks dirty. Although these sinks are durable, they can crack if mishandled — I've heard stories of sinks being damaged during shipping. Always inspect your composite sink thoroughly before installation to make sure it suffered no trauma during transit.

Cost: $300 to $600
 

Fireclay

Manufactured from clay fired at an extremely high temperature, fireclay sinks are highly resistant to scratches, staining and chipping. Cleanup is easy — just dish soap on a sponge, or use a mild abrasive cleanser for tougher marks. These are the sinks I recommend for anyone who wants a white kitchen sink.

Cost: $400 to $1,000


Cast iron

Clad in a tough enamel finish, this is another highly durable sink I recommend for white sink fans. It comes in other colors, too, but I'd suggest avoiding faddish colors for items that you want to keep around for a long time, such as your kitchen sink. Keep in mind that cast iron sinks are heavy, so make sure your cabinets are structurally sound and you provide adequate support for the sink.

Cost: $300 to $900
 

Natural Stone

If you are putting in natural stone countertops, such as beautiful soapstone, think about installing a sink to match. Some stones are susceptible to stains, though, so get a sample of the stone you are considering and test it out to make sure you are happy with how it stands up to staining. Soapstone is fairly stain resistant, but it is a softer stone, so you either need to be careful with it or be OK with it developing a patina over time.

Cost: Varies depending on the stone but typically starts around $1,000


Quartz

If you're going with a quartz countertop, you have the option of installing a matching quartz sink. One thing to keep in mind with quartz however, is that the darker, more solid-colored quartzes tend to show scratches and dings much more than lighter colors that have more aggregate or patterning to them.

Cost: $800 to $1,200

Solid Surface 

Like natural stone and quartz, solid surface sinks can be integrated into the countertop for a smooth, streamlined appearance that's super easy to clean. Again, it's best to get a sample of the material you are considering and put it to the test to make sure you are OK with its durability, as some solid surfacing shows scratches.

Cost: Solid surface countertops start at around $50 a square foot; there is typically an additional fabrication and installation charge for an integral sink.
 

Copper

In the market for something different? Copper sinks are big on charm and also happen to be rust-resistant and antimicrobial, making them a great choice for the kitchen. Just be sure to select a high-quality copper sink that is at least 99 percent pure copper — a small amount of zinc may be added for strength. Avoid harsh chemicals with these beauties and instead clean up with a mild soap and water, according to the manufacturer's recommendations. 

Cost: $500 to $1,200 but can go up depending on gauge and any hand-crafted detailing.

Page 1 ... 7 8 9 10 11 ... 16 Next 5 Entries »