twitter Facebook Google+

                 linkedin pinterest houzz  

Click for the BBB Business Review of this Countertops in Denver CO 

Google Review 

Sales & Promotions!

Architects, interior designers, and more ∨

Hire a decorator to find that just-right couch and coffee tables for your living room.
Find wall shelves, a customizable closet organizer and stylish furniture for home to whip your closet into shape.
Remodeling and Home Design

Qualify Us Now! ProView 

Cambria logoUp to $45,000 interest free for your project!Finance by Cambria

 convenient and easy.

  • No Money Down
  • Interest-free financing for up to one year without payments
  • Financing up to $45K for any project that includes Cambria (including cabinets, flooring, sinks, plumbing, install & more)
  • Secure paperless telephone application
  • Credit decision in less than 10 minutes


Entries in Kitchen (78)

Monday
Nov112013

The Kitchen Counter Goes to New Heights

Article By: 

Traditional counter heights are useful. They allow us to enter any kitchen and, even with our eyes closed, find the counter where we expect it to be. Despite this significant convenience, industry standard counter heights don’t work for everybody, because there’s no such thing as industry-standard human beings. 

You don’t have to stand for the one-size-fits-all mentality. I spoke with numerous designers who are bucking the norm to offer clients custom features that won't hurt (and might actually help) resale value. 

The benefits of multiheight kitchen counters. Do you feel overexerted every time you prepare a meal? Architect and universal design expert Carol Sundstrom explains why this might be. “If you are short, reaching up and extending forward to chop on a standard-height countertop contributes to shoulder strain,” she notes. “If you are tall and constantly bending forward to see the food you're prepping better, or extending your arms fully to reach a countertop that is too low for you, that contributes to both back and shoulder strain.” 

Having multiple counter heights is a great solution for multiple users. “I prefer to see more than one height of countertop in a kitchen, rather than all the counters raised up because the owners are tall, or all the counters lowered because the owners are petite,” Sundstrom continues. “Aside from making friends and family who may not share your same proportions feel comfortable when they are helping you, you also preserve your resale value.” 

A good height. Though there is no industry standard to such custom features, Sundstrom suggests raising and lowering counter heights in 2-inch increments when mocking up a kitchen, then fine-tuning them. 

Features that can be stepped up or down in a kitchen. Eat-at counters offer great benefits, as this one by Yvonne Randolph shows. The 12-foot island was divided in half to form a table-height eat-at counter. "The clients, who are in their 60s and entertain a lot, didn't want the clunky effect of sitting at bar stools," Randolph says. "They have a deaf son and daughter-in-law, so they decided to round the edge. It's much easier to sign around a table without corners."


You don’t need to communicate through sign language to appreciate such a feature.
 

Counters that work for every preference and body. This kitchen, designed by Toni Sabatino, offers a lowered sink area, the height of which is 31½ inches, as opposed to the standard 34½ inches. The motive was purely aesthetic. “We chose to make the copper sink the focal point and felt the break in the counter would draw the eye.” 

In another of Sabatino’s designs, two stepped-down eating areas bring the food and conversation down to a comfortable seated level, rather than forcing bodies to climb up to the action. 

The idea for this kitchen design, by M.J. Lanphier, was to have standard dining-table-height seating for the clients' children. The homeowners didn't want any chairs to be too tall for them, especially in light of the island's above-standard height of 36½ inches. 

A bonus of varying heights. This lowered table also provides a physical separation between the children's clean homework area and the food prep station. 

Though this table purposely can fit only two chairs for the two children, your own stepped feature can just as easily fit more with judicious leg placement. 

“A center pedestal leg on a table allows people to pull up at the counter anywhere without straddling a leg or bumping into one as you get into place," Sundstrom says. "It also offers the ability of fitting more people around comfortably without triggering the need for table leaves.” 

Aside from dining counters and prep counters, baking centers and cooktops can also have stepped features.


Dishwashers, too, can be taken to new heights — either in their conventional form, as shown here, or as drawers. “Two separate dishwasher drawers, each mounted right under the counter, can ease back strain,” Sundstrom says. “This also enables a dishwasher to be installed in a lower-than-standard countertop height.”


Tuesday
Oct292013

Which Is for You — Kitchen Table or Island?

Article By: Tiffany Carboni

The eat-at kitchen island has become as de rigueur as energy-efficient appliances. It has revolutionized the kitchen experience, joining chef and diners in one space. We couldn’t possibly live without the island. Or could we? 

While the kitchen island isn’t going away anytime soon, there's been renewed interest in bringing back the humble kitchen table. If you're considering one yourself, the team at HartmanBaldwin Design/Build and others have some great tips for making it work.  

While most of HartmanBaldwin’s clients still prefer to have a kitchen island if they have room for it, some families are bucking the trend. These homeowners “are artists and wanted a long dining table within the kitchen where they could enjoy large dinner parties as well as a space to work on their art projects,” says Karla Rodriguez, HartmanBaldwin's marketing director.

Kitchen tables double as prep space. Islands obviously provide great prep space, as they often include a sink, dishwasher and trash disposal. But if you can find room for those features along the perimeter of your kitchen, you might be able to eschew the island for a central dining table that can double as a superb workstation. “For this kitchen we knew the clients would have enough workspace, thanks to the size of the table and its proximity to the cooking triangle, which gives them all the benefits of an island without an actual island,” says Rodriguez. 

“With today’s modern family, we find that more and more homeowners are requesting that their new kitchen design incorporate a workstation for everyone,” says Tim Campos,HartmanBaldwin's marketing coordinator. “The simple reason: The kitchen has now become the general hub for the family, and clients want a space that also accommodates everyday tasks such as homework, crafts etc.”

While eat-at islands surely offer a suitable platform, some folks prefer the warm homeyness of a central table.
 

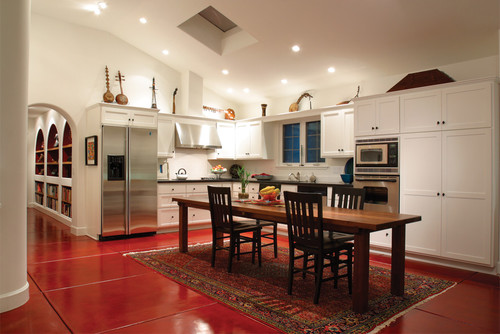
Completing the look. This 11- by 22-foot kitchen in Los Angeles needed an air of formality for dinner parties, so the HartmanBaldwin design team gave it a refined elegance — including room for art — while addressing the family's comfort. A colorful concrete floor balances the art-filled walls. “Since our clients walk around barefoot in their home, smooth concrete was the ideal choice for looks while being cool on the feet," Rodriguez says. "We added the rug to soften the space and warm the feet when they’re sitting at the table.” 

Will you have enough storage? “Most people request an island to replace a kitchen table because they need the additional storage that an island offers,” Campos notes. If you want a table instead of an island, "make sure the rest of the kitchen cabinetry has ample space for supplies and tools,” he advises.

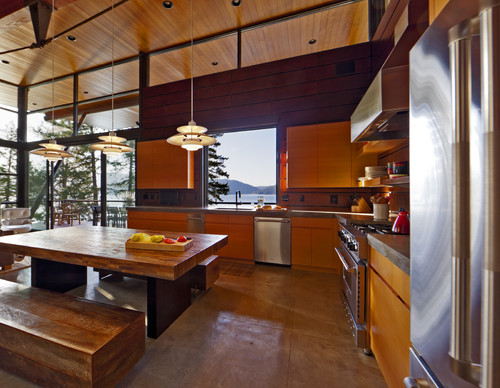
This kitchen is centered on a custom table by Terra Amico made of salvaged wood. The table is matched with six black chairs from Pottery Barn. A furniture-like black cupboard holds glasses and tableware, freeing up space in the perimeter cabinets for items that might otherwise have been stored in an island. 
 

The absence of an island allows the kitchen's length to be appreciated from every angle while letting the entertaining area take center stage. 

A sole dining table is a great way to incorporate a workspace that seamlessly switches over to a dining space, but it's also a place where people face one another — instead of the cook — for a type of gathering most islands don't provide. 

Here an antique table set with antique chairs breathes an old-fashion feel into this otherwise white kitchen by Sage Kitchens. A small rolling island in the background can act as an additional workstation when needed.
 

How big should your kitchen table be? This is an important detail to work out. “Avoid any piece that will overpower the space,” advises Rodriguez. “The keyword to a design of this nature is 'balance.'”

Many dining tables extend to accommodate larger groups — that's something most fixed islands can't do.


What's the right shape? Round tables with pedestal bases allow a comfortable exchange between diners. Their shape allows many people to squeeze in close without anyone having to straddle a corner spot. However, in a wide galley-style kitchen such as this one, a rectangular or oval table can fit more people without anyone's getting awkwardly close to the cabinetry. 

This countertop-height table is 3 feet wide and 7½ feet long, providing seating for six people to connect comfortably with one another in the heart of the kitchen. When the table's not in use as a dining area, the chairs can be pulled away to create easy access to the spacious workstation.


Tip: When you're adding a table to your kitchen, extendable or not, carefully consider how cabinets and appliances with doors — namely, refrigerators and dishwashers, will interact with the dining table and chairs when the doors are fully open. A table's dimensions (including its extensions and chairs when occupied by guests) should never compete for space with open appliances or cabinets.

Lighting the kitchen table. “Lighting is something to pay close attention to when working on a tablecentric design,” says Campos. Just like lighting over an island, a central table's lighting design needs to provide good task lighting as well as warm ambience to set the right mood for entertaining.


Monday
Oct212013

6 Ways to Rethink the Kitchen Island

The hardworking kitchen island can be a very functional and beautiful centerpiece of a kitchen design, and it's one of the most popular features of a modern kitchen. But it's not the only way to go. In some spaces an island can feel more cumbersome than useful. If you are feeling the urge to break away from the island-centric kitchen, check out our bevy of inspiring ideas below. 

Save space with an island and table in one. The innovative kitchen in this Sydney home features an island counter on one side, with built-in seating and a marble-topped, extendable table on the other end. Combining a table with an island is a great space saver, and an extendable table can seat a crowd without taking up too much space on a daily basis. 

Another great island-table hybrid, this set works extra hard — the stools are comfy enough to sit on through dinner, yet they can be tucked completely under the table to free up kitchen workspace during prep time.


Encourage cozy suppers with a kitchen table. With an ample-size rustic wood table in the center of your kitchen, family and friends are sure to gather around it night and day. It's so much warmer and friendlier than a big, blocky kitchen island, and it's perfect for spreading school projects out on as well. 

Streamline your kitchen with a modern dining set. If you have counter space covered and appliances tucked against the walls, as in the L-shaped kitchen shown here, why bulk up your kitchen with an island at all? A marble-topped Saarinen dining table and Eames chairs (as shown here) are a highly covetable pairing among modern design enthusiasts and enhance the light, airy feel of a white kitchen. 

Get the best of both worlds with a working-height table. When you need more kitchen prep space but don't want a giant island with to-the-floor storage, a tall table is a good solution. You can still comfortably do prep work, but this type of table takes up far less visual space than a built-in island. 

Taller kitchen tables are also great for narrow spaces. A slender table like the one shown here doesn't take up too much space but allows ample room to work. If you wanted to sneak in a bit of extra storage, you could track down a table with drawers or an open shelf, or have a knife rack built into the side. 

Enhance flow in an open-plan space with a kitchen table. When your living, dining and cooking spaces are visually linked, a gigantic kitchen island in the middle of everything can look out of place. Choosing a table instead, whether counter height or dining height, will give your entire space a more relaxed, comfortable feel. 

An old wooden table with a rich patina warms up any kitchen but works especially well when the kitchen opens to a wider living space. Add a soft rug underfoot to boost the comfort factor even more. 

Cozy up a contemporary island with plush seats. You can also work with an existing island by choosing ultraplush upholstered tall benches, instead of the typical bar stools. These are extra wide and have a shape that makes them look more like mini settees than stools, and they look supremely comfortable.


Friday
Oct182013

Woodipedia: Is It Cherry or Is It Alder?

Article By:

Stains have made it very easy to color one type of wood to make it look like another kind. But there are two species of wood that really do look alike in their raw state: cherry and alder. Here's how to tell the difference. 

When you think of a cozy country kitchen, most likely you are envisioning warm-colored cherry cabinets. "Cherry was one of the most popular cabinet woods in rural areas throughout the country, because it was so widely distributed across the United States," notes Andy Richmond, vice president and certified appraiser at Garth's Antiques in Delaware, Ohio.

Yet there is another wood species that features a milder version of cherry's reddish tones and grain patterns. Alder is affectionately referred to by woodworkers as "poor man's cherry." With a coat of finish, it can easily pass for cherry to less-discerning eyes. 

Cherry basics. When we speak of cherry, we are really referring to black cherry — Prunus serotina. A distinctive element of most cherry wood is gum spots, or pitch pockets. They're short, black streaks that look like hardened resin deposits.

Sometimes cherry has pin knots — tiny brown circles that again add visual interest. High-end cherry is figured, meaning undulating rays of light seem to shoot across the grain, lending the board a shimmering depth. This radiant effect is called chatoyance.


Alder basics. Commonly known as red alder, Alnus rubra grows principally in the Pacific Northwest, where it is the most commercially abundant hardwood. The consistent grain pattern and quiet coloration of alder is polarizing. Some people like it for exactly that reason, while other people find it boring. Alder can have pin knots, but it doesn't have gum spots.

You'll sometimes hear references to clear or knotty alder, but those are just general descriptions. "That's not a grade," says Walt Maas, manager of Bohnhoff Lumber in Vernon, California. "There are industry standards for grading lumber — like there are for grading meat. Each type of wood has its own specifications that professional hardwood lumber graders follow." 

This makes it easier to compare prices when shopping. However, Maas notes that some companies put their own proprietary grades on lumber, which makes comparison shopping more difficult.
 

Differences between cherry and alder. There are three main differences. First, alder is significantly softer, so it weighs less. Second, alder is cheaper. And finally, alder has no sapwood, which is the creamy colored wood on the edge of a board. Like walnut, cherry is known for having a lot of sapwood. 

Cost. Cherry's price is somewhat dependent upon the amount of sapwood. Most boards have more heartwood (the pinkish-red color) on one side and noticeably more sapwood on the opposite side. The percentage of each on a single board influences pricing. Another factor is board width. Wider boards of all species are more expensive.

Maas reports that the current wholesale price of cherry at his yard is $3.20 per board foot. Alder is priced substantially lower, at $2.70 per board foot.
 

Color. While alder is fairly even in color, cherry's basic red cast can have a whole spectrum of variations. This makes it difficult for woodworkers to color match the boards on large projects. Gene Leslie of Rancho Cucamonga, California (who made the cherry cabinets shown here) evened out the disparate tones by treating all the wood with lye to artificially age it while maintaining the clarity of the grain. Amateurs need to be thoroughly educated on this process before attempting it, however, since lye is highly caustic. 

When making tabletops and cabinet door panels, woodworkers frequently cut off the sapwood to feature the prized heartwood. The sapwood is then used for the interior structures, especially in drawer construction.
 

Durability. Black cherry rates 950 on the Janka scale for hardness, which puts it on equal footing with soft maple but far below tougher hard maple (1,450) and black walnut (1,010). 

Alder is rated 590, ranking it as a very soft hardwood, slightly above poplar (540).


Not cherry. While there are no wood types erroneously identified as alder, there are several misnamed cherries. Chief among them is Brazilian cherry, also known as Jatoba. It's an extremely popular flooring choice these days, not only because of its cherry-like color, but also because of its durability. Brazilian cherry rates 2,350 on the Janka scale. (Remember, hard maple is 1,450.)


Other woods masquerading as cherry are Patagonian cherry, Bolivian cherry and African cherry, which is also known as Makore.
 

Finishing. Cherry and alder are both prone to blotching when finishing coats are applied. Again, some people accept this as a beautiful trait of real wood, while other woodworkers try every finishing trick in the business to minimize it. It's a good idea to ask for a finished sample. 

UV stability. Cherry naturally patinates to a darker, richer color over time. American antiques specialist Andy Richmond notes that antique cherry furniture can resemble mahogany.

It's also a notoriously UV-unstable wood, which some woodworkers use to their advantage. To quickly and painlessly deepen the color of some cherry boards, woodworker Gene Leslie intentionally leaves them out in the sun after milling them.
 

Sustainability. Domestic hardwoods have been endorsed by the U.S. Deptartment of Agriculture as a preferred green building material — in large part due to the responsible harvesting methods practiced by the American hardwood industry. The other important factor in the sustainability of American hardwoods is the minimal transportation requirements, compared to those of imported exotics.


Friday
Oct112013

How to Replace Your Kitchen Faucet

Article By: Meg Padgett

Kitchen remodels require a multitude of skills from conception to completion, and ours was no exception. From tearing down walls to replacing floors, we've been through it all — and we're exhausted. Luckily, the very last change was the quickest and easiest to tackle.

Replacing our basic kitchen faucet with a gorgeous one-handle high-arc pull-down faucet was the finishing touch our kitchen remodel needed. The process was surprisingly easy — it's a do-it-yourself project that almost anyone can accomplish. 

All you'll need are a new faucet and a few household tools:

  • Adjustable basin wrench
  • Slip joint pliers
  • Safety glasses
  • Bucket or bowl for catching water 

Clean out the area underneath the sink so you have ample space to inspect your work area and move about freely. Next, turn off both the hot and cold water supplies via the shutoff valve under the sink. Test that the water is off at the faucet.


Using a basin wrench or slip joint pliers, unscrew the connections for each water line at the shutoff valve. Have a bowl handy to catch any residual water, and place the ends of the water lines in the bowl.


Unscrew the mounting nuts that hold the faucet to the sink, using either the wrench or the pliers. Remove the faucet from the sink and set it aside. Instead of tossing the old faucet into the trash, consider donating it to a salvaged goods shop, like a Habitat for Humanity ReStore. Check here for locations

Once the old faucet has been removed, clean the surface of the sink. I used a baking soda paste to eliminate water stains. 

Place the gasket that came with your new faucet around the sink hole and slip the supply lines and faucet tailpipe through. Our new Moen Woodmere faucet required only a single hole for installation, so we capped the remaining three holes on our stainless steel sink with covers that can be found at any hardware store. In lieu of capping, consider adding accessories such as a soap dispenserwater filter faucet or hot water dispenser. You can also use the deck plate that is provided with some models.

Note: Some faucets do not include gaskets; you need to apply sealant to the sink.


Secure the faucet in place from beneath the sink with the provided installation hardware. Ensure the faucet is positioned correctly and then tighten the mounting nut securely. Check the faucet from above to make sure it doesn't wobble or wiggle. 

Attach the faucet's supply lines to the shutoff valves and tighten the connections with a wrench.


Our faucet included a pullout sprayer, which required a few extra steps. If yours does too, simply insert the spray hose through the faucet and push through until the hose is visible beneath the sink.


Then attach the spray hose to the water line and push in the locking clip.


Turn on your water supply and test that the water is working. If the stream is irregular, you'll need to adjust the flow at the supply.


Attach the spray nozzle to the spray hose.


Tighten the connection with a wrench or pliers.


Attach the spray nozzle weight to the hose between the marked area and the curve.


Once again test that the spray nozzle works.


Here's what everything looks like from below once the faucet is fully installed.


Page 1 ... 5 6 7 8 9 ... 16 Next 5 Entries »