twitter Facebook Google+

                 linkedin pinterest houzz  

Click for the BBB Business Review of this Countertops in Denver CO 

Google Review 

Sales & Promotions!

Architects, interior designers, and more ∨

Hire a decorator to find that just-right couch and coffee tables for your living room.
Find wall shelves, a customizable closet organizer and stylish furniture for home to whip your closet into shape.
Remodeling and Home Design

Qualify Us Now! ProView 

Cambria logoUp to $45,000 interest free for your project!Finance by Cambria

 convenient and easy.

  • No Money Down
  • Interest-free financing for up to one year without payments
  • Financing up to $45K for any project that includes Cambria (including cabinets, flooring, sinks, plumbing, install & more)
  • Secure paperless telephone application
  • Credit decision in less than 10 minutes


Entries in Kitchen (87)

Wednesday
Feb122014

Going Up: Vertical Storage Holds More Kitchen Stuff

Almost every kitchen can benefit from vertical storage. You can, of course, plan for vertical storage in a new kitchen, but very often you can also find space in an existing kitchen. It is amazing how much and how many different kinds of storage can be packed into a very tall and narrow or shallow space. So look around; maybe you have an empty wall where you can squeeze in more room for what you need. 

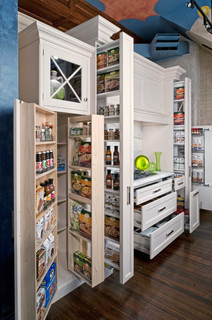
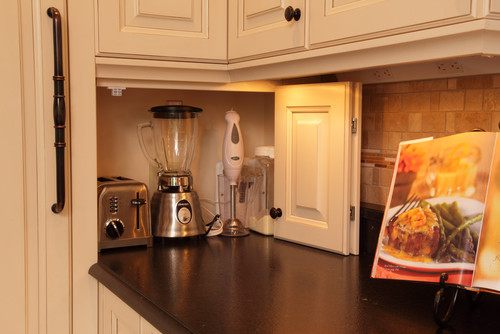
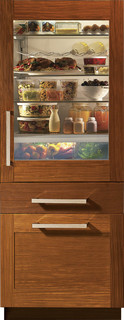
Here is a wall of tall cabinets just packed with storage in a New York loft. The pantry cabinet on the left has swing-out shelves that allow easier access to food than would deep, stationary shelving. The real stars of this vertical storage, however, are the very narrow pullout cabinets, used here for oils and herbs and located right next to the cooktop where they will be used. The mix of cabinet doors creates a pleasing arrangement when closed.


Spices and oils are natural items for storage in a tall area. Although very shallow, this closet stores a multitude of items. It has been carved from between the studs and finished with a matching cabinet door.


A deeper space accommodates some large apothecary jars, tins and bottles and makes a wonderful display area as well.


Pots and pans take up more precious cabinet space than just about anything else, so hanging them on an otherwise empty wall makes sense. There are rails made specifically for this purpose; galvanized pipe or even some towel bars could work too. Just make sure to anchor them well.


These pots and pans, each hung on their own hook, create an organized display. In addition, this space allows for some shallow shelf storage below.


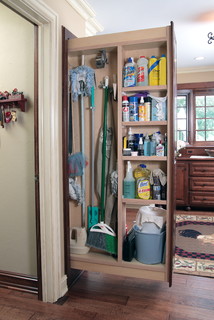
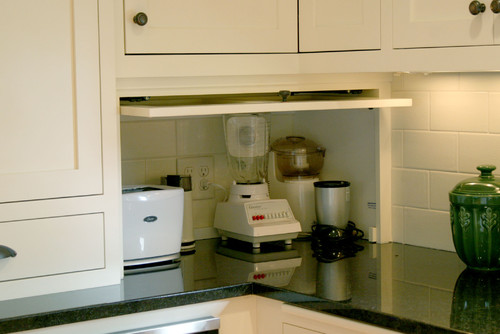
Everyone needs a broom closet; here the brooms, mops and cleaning supplies are very efficiently housed in a narrow pullout cabinet. Everything is handy and accessible, much easier to grab than from underneath the sink.


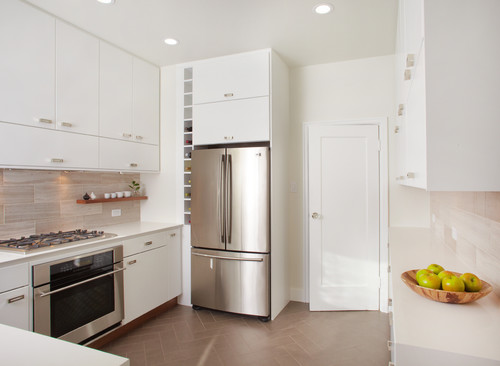
Just a few inches of space next to a refrigerator have been used to build wine cubbies here. The cubbies match the width of the spacer below that makes sure the refrigerator has enough clearance to open. 

A similar situation: to the right of a window, a slice of space has been appropriated for wine storage. On the left dishware is kept at the ready. These vertical storage units morph into horizontal storage across the tops of the windows here for even more found space. 

Barely more than a wall, this extremely shallow area not only stores platters and plates; it acts as a display wall, too.


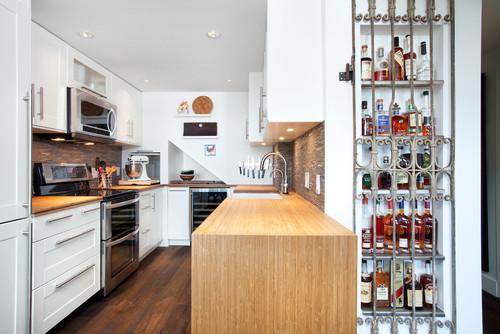
While there was probably ample cabinet space in this kitchen for a bar, a small sliver of space was found on the end wall to showcase the owner’s whiskey collection. The antique decorative grille provides visual interest and highlights the collection. A similar approach could be used to house bright glassware or smaller serving pieces. 

In this narrow galley-style kitchen, there was not enough room for more cabinets. Enter shallow, open, floor-to-ceiling shelves. These create not only extensive storage but a graphic display as well.

Monday
Feb102014

Considering a New Kitchen Gadget? Read This First

Article by:

I'll admit it: I have an expensive juicer that’s still in its box in my kitchen cabinet. It’s been there for months and cost close to $400. (We paid for it using wedding gift cards.) It’s our fourth one. But that’s because the other three (all the same model) failed within days. By the time we got a different brand and model, my wife and I had lost interest in the constant upkeep and chopping of an entire garden and orchard to get only one glass of juice for each of us. 

Of course, I’ve suggested we return the juicer in exchange for something (or many somethings) that we’ll actually use, but my wife refuses to hear it. She plans to use it next week. She promises. 
 

In the same cabinet, we have a large Crock Pot that we never use, another juicer we bought at a garage sale (never use) and some electric chopper thing, also still in its box. If only I had thought about my actual cooking habits rather than give in to a fantasy about what my life might be like if only I had the right gadget, I would have saved a lot of space and money. 

In a recent Houzz discussion about the worst home gadget, users pretty much echoed my dilemma. Popcorn makers, ice cream makers, waffle makers, rice makers (think before buying something with the word “maker” in it, by the way) — they all get used once and end up collecting dust in a cabinet. 

So I decided to put together some questions we can all ask ourselves the next time we have the impulse to buy yet another bulky, complex, promises-to-make-my-life-easier home gadget. You might find that a good sharp knife and rearranging your busy schedule to allow just a little more prep time in the kitchen are all you need.


Can you use your hands? Cooking is a hands-on process, and that’s the way it should be. For most of us, it’s relaxing and therapeutic. There’s a subtle joy in chopping vegetables, measuring ingredients and working with your hands and simple tools. Once you take that out of the equation and surrender that control to a hulking, electric, ear-splitting gadget, you’ve relinquished the soul that goes into making good food. 


And face it: You’re not ever likely to cook a meal for a hundred on a Friday night. That means you probably won’t get much use out of large appliances and gadgets meant to do a simple task at a high volume. 
 

Do you have space? If you’ve got the space — and money and need — to store every new gadget on the market, then by all means, have at it. But the majority of homeowners are very tight on space in the kitchen. 

So before you buy, survey your cabinet space and take measurements. Where will the gadget or appliance go? If you have space only up high, how will you reach it? Will you need a step stool or ladder? And how heavy is the appliance? Do you have dishwasher space to accommodate the parts? A large enough sink to wash the machine in? The disruption this new gadget will cause in your life might just outweigh the perceived benefits.
 

Do you have time? A big complaint with appliances is that they take a long time to clean. Most of them can’t go in the dishwasher, and even if some parts do, it takes time to disassemble the appliance, wipe it down and reassemble it. 

Also, have you ever made your own pasta? It takes a long time. So maybe a pasta maker is not something you need on a regular basis. 


What can you use it for? Avoid appliances or gadgets that offer to do one simple task just a little bit better: a garlic peeler, a lemon zester etc. Most of the time, you’ll find that a good kitchen knife will do the trick; plus it’s easier to clean and more empowering. 

Also avoid gadgets that promise to do too many things. A multiuse gadget will likely do 10 tasks poorly, while 10 solid hand tools will perform great.


What will you use it for? If you made a pureed soup one time last year and thought maybe a handheld blender would make your life easier, maybe you should reconsider. Having a gadget that you take out only once or twice a year isn’t very efficient. Similarly, you probably don’t need a stand mixer if you bake only every so often.  

Spend the money elsewhere. I can’t express strongly enough how important and useful a good set of kitchen knives is. One sharp knife can do the work of all those Slap Chops and multipart dicers. Plus, there will be less to clean up. And nothing beats a sturdy, handheld can opener. 

Sleep on it. Never give in to a late-night infomercial or cooking demonstration on the spot. With any investment — no matter what the cost — give yourself time to really think about how important the gadget will be to you. Ask yourself the aforementioned questions first.

Wednesday
Feb052014

10 Ways to Set Up Your Kitchen for Healthy Eating 

Article by:

It's remarkable I’ve never had scurvy, because until recently, I rarely ever ate vegetables or fruit. So this year my New Year’s resolution was to eat more produce. Prior to 2014 a half-rotten banana would linger, very lonely, in my fruit bowl for a week, and I never made time for cooking either. However, as I try to establish new habits (including not spending an obscene amount of money per week on takeout), I find I love a baked sweet potato with crumbled goat cheese on it, or to slow cook quinoa (something I’d never tried before) with apples in the Crock-Pot. What has helped me the most was setting up my kitchen for healthier eating success.

As the first month of the new year comes to a close, don’t get discouraged if you’ve slipped on some of those resolutions. Instead, make reaching them easier on yourself by getting the right setup. Here are some ideas to get you started. 

1. Keep fresh herbs and spices handy. Herbs make healthy food much more savory and flavorful, which will help you cut down on less healthy choices like salt and butter. Plus, check out how gorgeous you can make an herb garden look in the kitchen. This vertical garden by Bright Green is a living work of art.

I realize keeping things alive indoors can be a challenge for a lot of us. Growing herb plants need fresh air and sunlight to thrive. Simply keeping herb jars handy in a cabinet next to the stovetop is the low-maintenance version of this suggestion.
 

2. Enjoy making pretty still lifes out of your produce. This sounds silly, but it works. Put out a large platter, a fruit bowl or that cake stand you never use and play with arranging. 

It will inspire you to keep the kitchen stocked with an array of colorful fruits and vegetables, and they’ll always be the first thing you see when you enter the kitchen for a snack.


3. Play favorite tunes while you cook. Have a radio, docking station or speakers set up so that you can enjoy catching up on NPR or listening to a favorite podcast or playlist while you cook. 

Try to get several things done once you’re on a cooking roll. I’ve been putting my quinoa and apples in the Crock-Pot while I bake sweet potatoes, whip up mini quiches in muffin tins and cook spaghetti squash in the microwave. This means all of my healthier choices will be easy to grab for the next few days, and I’ve only spent an hour in the kitchen.
 

4. Add other electronic devices that you like to use in the kitchen. If you’re addicted to cooking shows, bring a TV into the kitchen so you can keep up with Julia, Emeril or Giada. If you love to keep track of new recipes on the Internet, make an iPad station a part of your kitchen. 


5. Organize the pantry in an attractive way. Keep your healthy items front and center and make low-cal snacks easy to grab. Hide your secret chocolate stash in case of a total craving (sometimes you just have to have it), so you don’t get tempted by looking at it every time you open the pantry cabinet door.


6. Keep a tea station handy. Making tea is a wonderfully relaxing ritual, and if you get the munchies, you may find that the scent and warm comfort of tea take care of them (if not, by all means go munch). 

7. Organize the fridge. Take everything out, give it a good cleaning and keep all this great food you’ve made and produce that needs refrigerating front and center.


8. Use smaller plates. Every diet-tips article I’ve ever read seems to advocate this — tricking the brain into seeing an overflowing, full plate. I tend do doubt how well it works, because just like with my clock that’s set 10 minutes ahead to trick me into getting up earlier, my brain does the math. However, there is something about having to get up for seconds that gives me pause, so why not give it a try? Stock up on smaller plates and see how they serve you.


9. Make sure your small appliances are available. If you have to go digging through a messy cabinet and looking for all of the pieces, chances are that you won’t use it. Let the Crock-Pot, juicer, food processor and other small appliances clutter up the countertops if it will make you slow cook that chicken chili or quinoa. 

Down the line you may decide to install an appliance garage (below) or other special cabinetry that allows easy access to your small appliances.
 

10. Keep sneakers close at hand. Cooking requires a lot of standing, so have good support for your feet while you work. Keep you sneakers stashed in a drawer, closet or mudroom nearby. 

Wednesday
Jan292014

11 Ways to Update Your Kitchen Without a Sledgehammer

OK, so you have a perfectly good kitchen. The layout works; the cabinetry is solid; but it just needs a little uplift. There are plenty of relatively minor changes you can make that don’t involve restructuring your life and house. Here are a few.

1. Repaint your cabinets. A fresh coat of paint can transform a kitchen from dark and dingy to light and airy. If you are a few years away from that big kitchen reno, this is a great time to have some fun with color.


2. Upgrade your countertop. Upgrading a dated countertop will give new life to your entire kitchen and add value.  

3. Install a new backsplash. If your cabinetry and countertop work nicely but your room lacks pizzazz, a new backsplash can add lots of personality and really dress up a kitchen. A bit of texture, sparkle or gloss will give simple cabinetry a lot of presence. 

4. Make a statement. New jewelry always picks up my mood. It can do wonders for your kitchen too. New hardware can dress up plain cabinets, while standout lighting fixtures can add a surprising wow factor.  

5. Change your faucet. A detachable hose with a hand spray comes in handy for so much more than just giving a bath to the cat. I prefer a faucet with a flexible braided water-supply hose. It looks better than a plain black rubber hose and will last longer.


6. Expand your horizons. Need more surface area? Don’t think you need to start from scratch. If you have an island, you can introduce a different material on an added eating counter either below or above the counter.

The standard counter height is 36 inches. A nice option, like you see here, is to add an extension at table height (30 inches is typical). The great thing about adding a table-height extension is that regular kitchen and dining chairs will pull up to the counter comfortably. If you prefer a higher surface, you could go with bar height (40 to 42 inches). 


7. Consider refacing. New cabinet fronts and doors can dress up the cabinetry boxes if the layout already works and they are solid. 

8. Rethink the uppers. Open shelving offers an opportunity to display collections or just keep frequently used items accessible. Wine comes to mind, but that’s just me. 

9. Add some cozy touches. A runner is a great addition to a galley kitchen. I don’t know why we are disciplined to treat our kitchen like it has a different set of rules when it comes to decor. I’m all for adding a table lamp for an unexpected element in a kitchen. 

10. Add a floating island. If a new bank of cabinetry is beyond the budget, try a ready-made freestanding piece to add extra storage and a surface for working and eating surface.

Add a new top to a freestanding piece of furniture and extend the edge for an eating counter. The minimum overhang would be 10 to 12 inches, but there are a few considerations when extending the top. Take care not to shift the balance of weight so much that the piece is unstable (people love to rest their elbows, adding weight to the surface). Also you may need to add brackets to support the overhang.


11. Add a showstopper. A simple kitchen with simple cabinetry is downplayed by a showpiece range. Playing up one feature is a great way to detract from less interesting elements.

Monday
Jan272014

Get the Look of a Built-in Fridge for Less

Counter-depth refrigerators are popular appliances for new kitchens. Their appeal is that they save precious aisle space by sitting flush with the cabinets rather than sticking out. This makes the kitchen look smooth, custom and visually organized. These models can also be finished with matching cabinet doors for an even more cohesive look. 

The downside is that they are very expensive. They can cost two to three times more than a regular freestanding refrigerator, and must be wider to incorporate the same cubic-foot storage. If you want this look without the extra expense, design your kitchen and cabinets so that your regular-size refrigerator sits flush with your cabinets. 

Freestanding refrigerators come in many sizes and configurations. While typical base and tall cabinets are 24 inches deep, freestanding refrigerators can be 30 inches deep or deeper, with varying widths too. Therefore, you should select your refrigerator early in the planning process. 

To get that flush look, you can either recess a freestanding unit several inches into a wall or have your cabinets furred out several inches to meet the refrigerator.

In this kitchen, if you look carefully, you’ll see that the 24-inch-deep base cabinets that extend to the left are recessed behind the oven cabinets. The appliance portion of this wall, therefore, has been furred out. Note that the side cabinet panel on the right has been ordered in a larger size to accommodate the depth of the refrigerator, which is greater than 24 inches.


In this case the refrigerator door sticks out beyond the base cabinets. But because there are deep side panels and a deep cabinet overhead, the refrigerator looks incorporated into the cabinetry and built in. A deep cabinet above the refrigerator is a good place for tray storage or even a TV, as shown here.


Here is another kitchen where deeper cabinets accommodate the greater depth of a freestanding unit. This refrigerator is a bottom-freezer model.


Here the homeowners built a wider set of deep cabinets, which include some open shelves for display.


Another way to “build in” your freestanding refrigerator is to actually build it into the wall, rather than cabinets. If your kitchen plan will allow it, this is probably the easiest and most cost-effective way to get the look, because you can make the opening the exact width and depth you require. You also won’t have any cabinet modification costs. 

This is particularly nicely done. The very linear refrigerator fits neatly into the opening and is trimmed out with house molding. The display shelf above draws the eye up. With a wine refrigerator next to the main refrigerator in a small peninsula cabinet, this is a good area for dispensing drinks.


This kitchen utilizes a very effective way to incorporate a deep refrigerator: The cabinets are stepped, for a very custom look. From the corner to the left of the refrigerator, the cabinets are typical sizes: 12 inches deep on top; 24 inches deep on the bottom. Next comes the upper cabinets and the appliance garage unit, probably 15 to 18 inches deep. The deepest cabinet is around the refrigerator, with display cabinets above. 

On the end is a tall open cabinet that creates an interesting visual display as one enters the kitchen. Note that this cabinet is actually pulled back a few inches from the refrigerator depth, so it continues the stepped look and also makes that corner a little less intrusive.
 

Cabinets and a refrigerator sandwiched within stud walls create a clean and contemporary look here. The cabinets were probably furred out within the walls. 

This refrigerator is the centerpiece of an open display area. This would be a very cost-effective way to house a refrigerator and small appliances while using a short wall. (This treatment even accommodates a radiator.)

Page 1 ... 3 4 5 6 7 ... 18 Next 5 Entries »