twitter Facebook Google+

                 linkedin pinterest houzz  

Click for the BBB Business Review of this Countertops in Denver CO 

Google Review 

Sales & Promotions!

Architects, interior designers, and more ∨

Hire a decorator to find that just-right couch and coffee tables for your living room.
Find wall shelves, a customizable closet organizer and stylish furniture for home to whip your closet into shape.
Remodeling and Home Design

Qualify Us Now! ProView 

Cambria logoUp to $45,000 interest free for your project!Finance by Cambria

 convenient and easy.

  • No Money Down
  • Interest-free financing for up to one year without payments
  • Financing up to $45K for any project that includes Cambria (including cabinets, flooring, sinks, plumbing, install & more)
  • Secure paperless telephone application
  • Credit decision in less than 10 minutes


Entries from August 1, 2013 - August 31, 2013

Friday
Aug302013

Bathroom Design: Getting Tile Around the Vanity Right

Article By: John Whipple

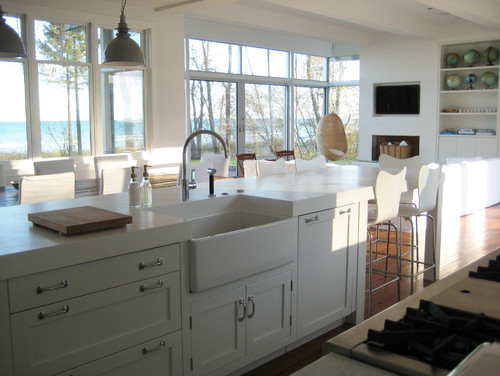
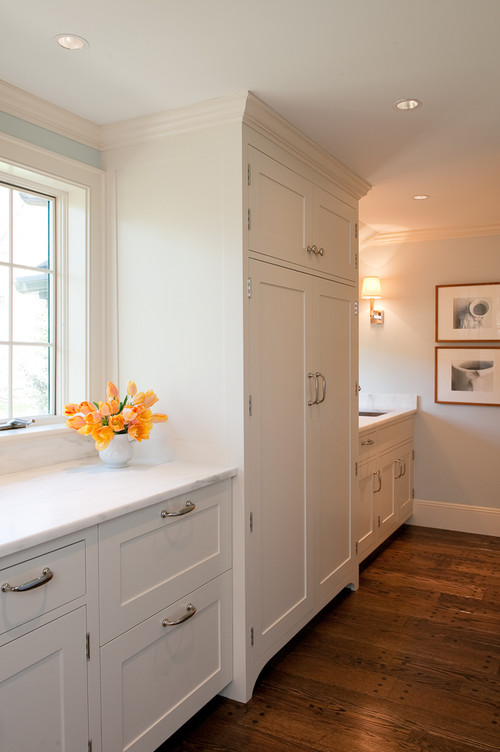
Tiling under your new vanity or custom cabinets can prevent shower or sink water from finding its way into your house. Extending tile all the way under freestanding or floating vanities can make a room look and feel larger, too. These vanities are popular choices in today's bathrooms, so it's important to understand the pros and cons of bringing tile all the way under your bathroom storage. 

See how these bathrooms combine vanities and floor tiles, and learn what you should specify when working with your bathroom contractor. 

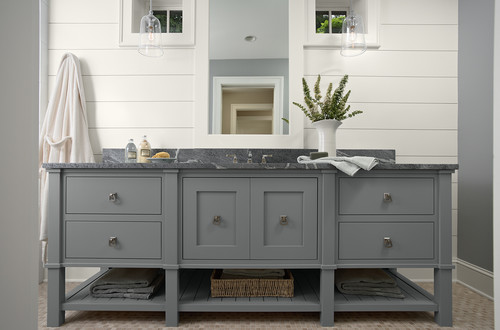
Making sure the floor is perfectly level is an important step for a vanity like this. Trying to level a vanity after tile installation can be a real chore. If you're having a vanity custom built, designing adjustable legs can help get your vanity and vanity top perfectly level. 

Tip: Consider omitting extra legs in custom vanity designs and securing the vanity to the wall if needed. Getting eight legs to sit perfectly flat is much harder than four! 

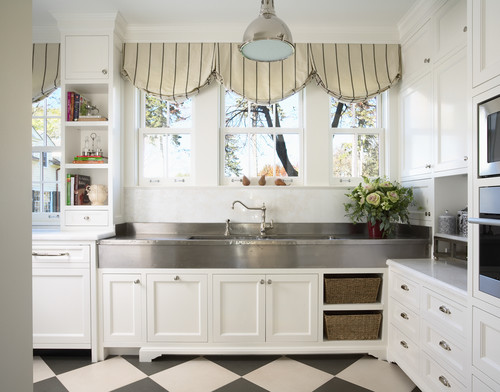
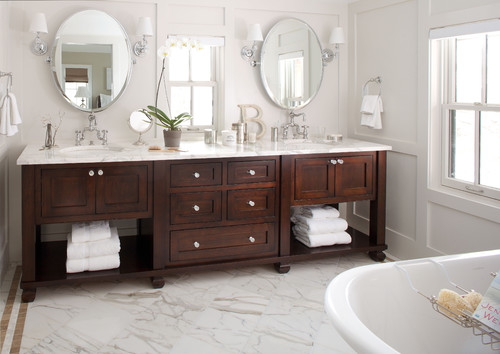
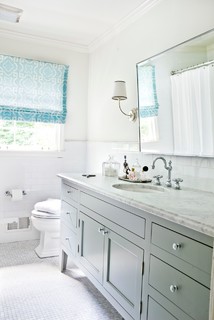
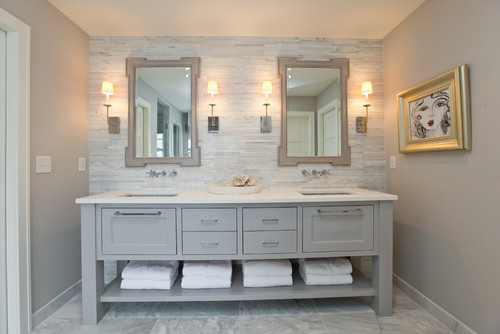
If your bathroom floor is a little unlevel and you don't want to spend the money or time making it perfectly level, a little shoe molding (the small strip of molding at the bottom of the vanity toe kick in this photo) on your vanity can visually even things up. Shoe moldings add a lot of charm to a vanity's look and help protect the vanity from water damage. 

Tip: If you are going to use a shoe molding, plan to shim the vanity off the ground by about ⅛ inch or so, so that the only wood in contact with the floor is the shoe molding. If there's ever a leak in your bathroom, the shoe molding, rather than the bottom of your vanity, will absorb the damage. It's much easier (and more affordable) to replace shoe than the entire vanity.


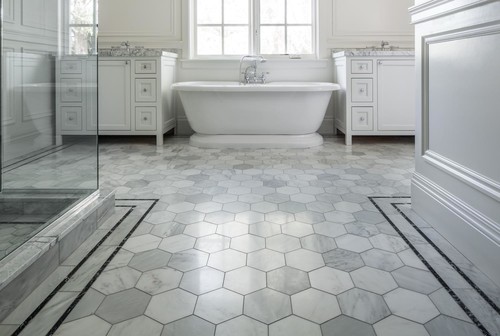
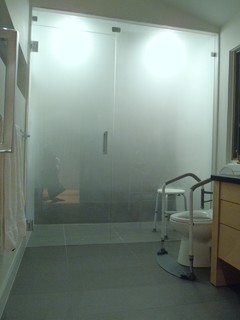
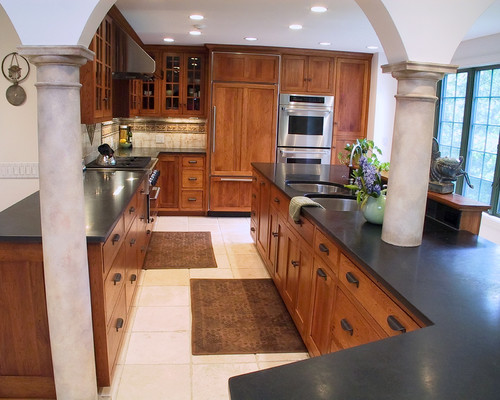
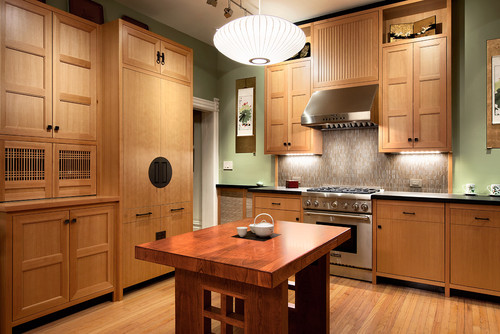
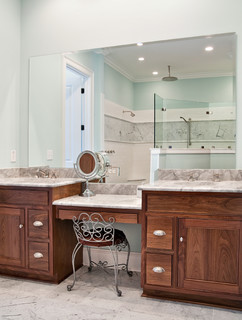
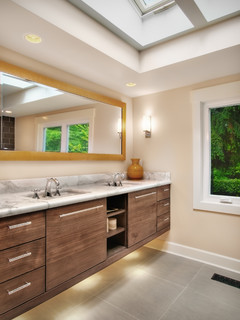
I love how this vanity has higher legs and extra foot room. Traditional bathroom and kitchen cabinets often have a smaller kick space (the little recess below the bottom drawers) with little to no room for your toes. If you like to get up close to your vanity and lean toward the mirror when getting ready, a freestanding vanity with extra leg height is a great idea. 

Tip: If you're installing radiant floor heating, you'll want it to go all the way under your vanity with a design like this. That way your feet will still stay warm when you're up close to the mirror. We prefer cable heating systems rather than heating maps for this very reason; they allow for greater heat placement control.


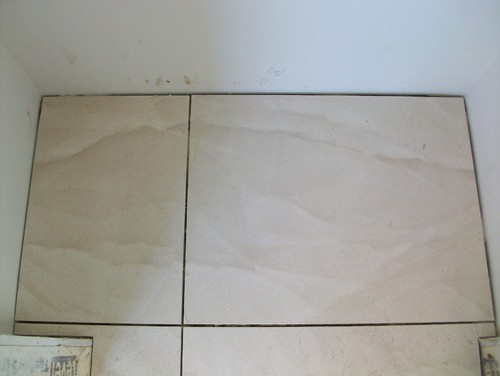
Tiling under your vanity can help seal up any voids that might collect water and harm your home's construction. Sink and drain lines can leak if not properly installed or prepared, and often this leak runs down the back side of a vanity and into the floor. 

Tip: Make sure all your water supply lines have trim collars inside the vanity. These collars act like little water deflectors and can keep water from running back along a pipe and into the wall.
 

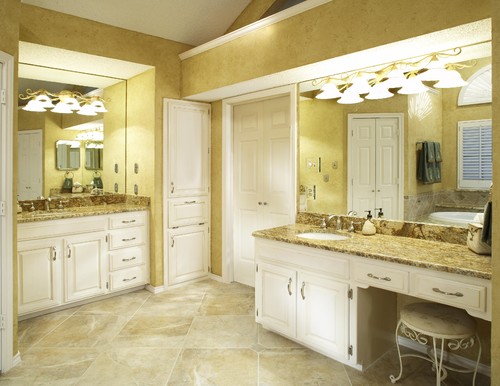
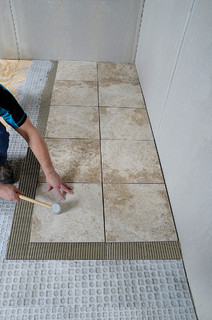
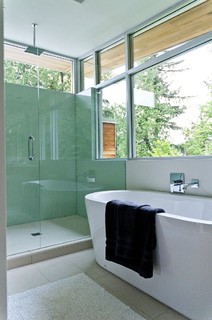
In a larger bathroom, the high cost of tile could be a big factor when you're deciding whether or not to tile under a vanity. Usually we order a 10 percent overage in bathrooms, but for some large bathrooms I'll just order 5 percent and use the off cuts under the vanity. This allows the client to get the benefits of tile under their vanity without added cost. 

Tip: If your tile is crazy expensive, consider using a cheaper, similar tile under the vanity. No one will know but you.
 

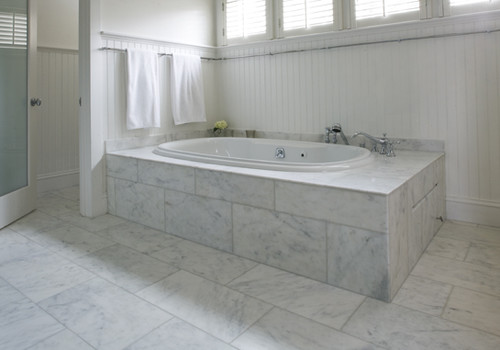
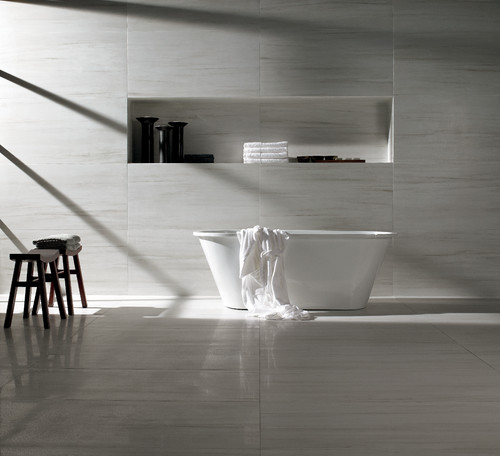
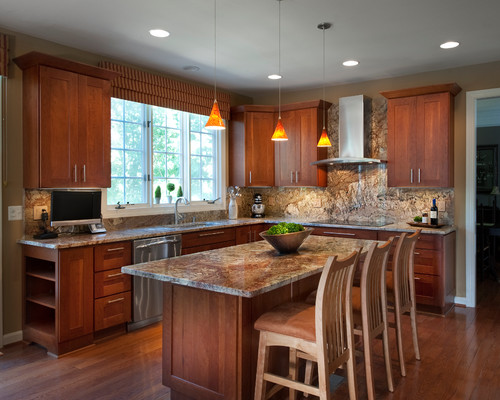
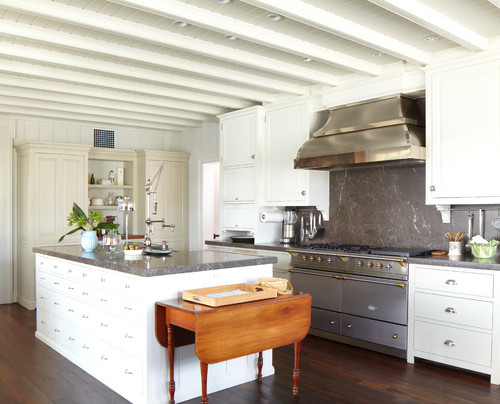
Larger vanities with a solid countertop like this can add a lot of weight to a tiled floor. If you're aiming for a similar look and style, considered the added weight your vanity will bring to the room and make sure your contractor prepares the floor for this kind of installation. 


Tip: Curious if your floor is strong enough? Try this simple test for excessive floor deflection: Fill a drinking glass to the top with water, place it in the room before tiling and walk around the room. Move the glass to a few different locations and walk around each time. If the water spills from the glass anywhere, the floor most likely has too much bounce and might not be suitable for a heavier vanity.
 

Adding some light under a vanity makes for a great night feature and brings another layer of lighting to the room. Some tile is so shiny that it acts like a mirror under the vanity, so make sure that the bottom of your vanity is not littered with job tags, addresses or overspray from finishing.

Tip: If you want a more even glow from the lighting, consider shining the light toward the back wall instead of straight down. This creates a little less light but a more even glow.


Wednesday
Aug282013

Why Bathroom Floors Need to Move

Article By: John Whipple

"Tenting" is a terrible word to a tile professional. When a bathroom floor has been installed incorrectly, tiles can press against one another and pop up off the floor, creating a tent shape. It's not just tile that does this — almost every material in a home expands and contracts with time, including the plywood subfloor, which can develop popped tiles or cracked grout joints. 

These professional pointers for preparation and installation techniques can help keep your bathroom floor from tenting. 

Avoid large-format tile. More grout joints allow for minor movement and spreading out. 

If you have a large bathroom — like this beautiful space — with loads of natural sunlight, a smaller and lighter tile is definitely a safer option. Darker tile absorbs heat and expands and contracts more than lighter tile. 

All of a home's building materials expand and contract; the hardwood floor, the tile and even the countertops all move over time. Any good pro should know how to account for these size changes and prevent expansion from wreaking havoc in a home. 

Tip: Make sure your tongue and groove subfloor does not get filled with dust, debris or adhesive mortar (thinset). This subfloor needs the ability to move, and the joints should not be too tight. 

This photo shows some great tile work. The beautiful tile is nicely lined up, but I especially appreciate how there's no mortar or thinset where the tile meets the wall. Using mortar here can lead to tenting issues, since it prevents the tile floor from moving and expanding. This clean finish is exactly what you want to see in your bathroom. Make sure your tile contractor understands that you don't want your installation done with thinset on the edges that meet the wall. 

If you drive over bridges frequently — like I do every day — you'll notice that bridges have expansion strips. During the summer the bridge is quiet, since summer's heat has expanded the bridge's concrete and the expansion strips are pressed tight. But in the winter, driving over the same bridge sounds quite different; the expansion strips are wider, and they click-clack as your tires hit them. 

Designing tile floors to expand and contract follows some of these same principles. Uncoupling membranes underneath floor tile can improve your floor's flexibility. This photo shows a professional installing a Strata Matuncoupling membrane to account for minor floor movement.


Hearing a hollow noise when you're walking across newly tiled floors could be the early signs of tile bond failure. This sound results from poor thinset coverage.

In this photo the floor tile goes underneath the tub skirt. This is a solid design that allows for movement on the floor tile. 

Tip: Gently tapping set tiles with the wooden handle of a rubber mallet can help you find the hollow noise where poor thinset coverage has occurred. 

All steam showers have a modified thinset to account for quick thermal expansion. The powerful steam and heat in steam showers require a thinset that can accommodate immediate expansion and contraction. 


Glass expands more than many other building materials. Large panels like these let in lots of sunshine and quickly heat up the bathroom, increasing thermal expansion. 

For an installation like this, I'd make sure that the corners of the shower stall had two layers of a waterproofing membrane. Products like NobleSeal TShave a thicker membrane that can take some compression in the corners.


With extremely large bathrooms, expansion strips inlayed into the tile assembly are a must. In my opinion, any room larger than 15 feet in one direction should be using some kind of expansion strip and speciality thinsets and grouts to increase expansion and combat mortar fatigue.

Monday
Aug262013

5 Favorite Granites for Gorgeous Kitchen Countertops

Article By: Charmean Neithart 

Selecting a countertop material for your kitchen remodel or new build is a big decision. I often encounter clients with a mental block when it comes to making a decision on the numerous considerations, like color and edge detail. Additionally, once the countertop hurdle is over, then there is cabinet selection. 

I like granite and use it often for its durability and its earthy colors that add great texture to a kitchen. I have a few favorites that I have worked with over the years. These granite selections get my stamp of approval because of color, movement and their flexibility in complementing different cabinet styles. Take a look at these countertop selections and how they seamlessly blend with either painted or stain-grade cabinets to make winning combinations. 

1. Bianco Romano

Bianco Romano with painted cabinets. I suggest this granite when I have a homeowner who wants that classic white kitchen. This granite works great with pure white, warm white or beige cabinets. Additionally, nickel or oil-rubbed-bronze hardware works great with all the colors of the stone, which include white, cream, gray and a deep bordeaux.


Bianco Romano with stain-grade cabinets. Due to the warm white, beige and gray palette, this granite works equally as well with stain-grade cabinets. I have seen it work beautifully with walnut and medium oak. 

2. Seafoam Green

Seafoam green with painted cabinets. This granite is just beautiful. The shade of green is earthy, with gray and brown undertones. There are great markings in the stone that look almost geometric to me. This granite works with painted cabinets and satin nickel hardware. I prefer this stone when it is polished.
 

Seafoam green with stain-grade cabinets. If you are looking for a rustic or earthy feel for your home, this is a great combination. Add oil-rubbed-bronze or copper fixtures for the perfect lodge experience. 

3. Costa Esmeralda 

Costa Esmeralda with painted cabinets. I first came across this granite when I had a homeowner ask me to create an ocean palette throughout the house. This granite is between green and blue, and of course will vary from batch to batch. The green-blue of the stone blends perfectly with sandy white cabinets and nickel hardware and fixtures.
 

Costa Esmeralda with stain-grade cabinets. It's equally stunning with stain-grade cabinets, for a masculine and warm look. This granite works particularly well in light-filled kitchens; the sunlight highlights the stone's complex coloring. 

4. Absolute Black 

Absolute Black with painted cabinets. This is my idea of a classic kitchen. I love this traditional look of white cabinets and Absolute Black granite, which looks great polished or honed. Painted cabinets in many colors pair perfectly with this granite, and nickel, chrome or oil-rubbed-bronze fixtures and hardware look terrific.


Absolute Black with stain-grade cabinets. Another classic look that can feel rustic or modern. I love Absolute Black with medium oak or walnut. Rift-cut oak also has a great transitional look. 

5. Typhoon Bordeaux 

Typhoon Bordeaux with painted cabinets. One of my favorite granite selections, Typhoon Bordeaux comes in cream, gray, brown or brick red. It's a perfect choice for a light kitchen that has red undertones in the flooring. This granite really can vary by batch, from subtle brick-red veining to strong waves of brick red. Try it with beige or cream cabinets for a warm, light-filled kitchen.
 

Typhoon Bordeaux with stain-grade cabinets. I'm a sucker for warmth, so this combination really appeals to me. The brick red and browns in this granite pair beautifully with walnut, oak, mahogany and cherry cabinets. It works well in Spanish homes that feature Saltillo floors. The deep red and brown in the granite and the rustic charm of Spanish architecture are a match made in heaven.

Friday
Aug232013

8 Top Hardware Styles for Shaker Kitchen Cabinets

Article By: Rebekah Zaveloff

Shaker-style cabinet doors are so flexible stylewise that they can go either traditional or modern depending on what you pair them with. Decorative elements like lighting, tile and hardware can really change the tone and overall style of a kitchen. Cabinet hardware is often referred to as the jewelry of a kitchen, and just like with an outfit, it can really alter the overall look of your space. 

1. Traditional Nickel or Steel Knobs and Bin Pulls

Shaker cabinets are known for their simple, clean lines, and often you'll see them paired with simple, unadorned cabinet hardware. Whether your style is vintage or modern, you'll find that a Shaker door is one of the most versatile doors styles available. A vintage-style kitchen with white Shaker cabinets is often seen finished with a combination of timeless cup or bin pulls and knobs.

Traditionally you'll see knobs on doors and bin pulls on drawers. For drawers 30 inches and wider, two bin pulls are often used.

What they do for the kitchen: Add retro flair.

What they work well with: Inset cabinetry with exposed hinges, stainless steel, white marble and honed black countertops, industrial-style lighting.


On vintage bin pulls, the face screws are functional; on reproductions the face screws may be faux, with the pull attached through the back.

2. Vintage Glass or Ceramic Knobs

Vintage-style glass, also referred to as Depression Era glass, is another classic hardware choice for Shaker cabinets. With a stained cabinet finish, it's nice to create some contrast with the hardware by using a white glass knob. 

Putting knobs on drawers is a great vintage touch, though pulls are more user friendly for everyday use. 

This type of knob comes with and without a face screw, as well as in a variety of colors, transparent and opaque, as well as clear.
 

What they do for the kitchen: Create a historical feel that can go Victorian, Arts and Crafts or colonial revival.

What they work well with: Glass-front hutch cabinets, stained wood cabinets, butler's pantry or scullery-style cabinets, subway tile, black and white kitchens.


3. Vintage Pulls With Exposed Screws

This type of hardware is reminiscent of vintage double-hung window hardware and can add a great vintage or industrial touch to a new kitchen. It looks completely different in a nickel finish than in oil-rubbed bronze or antique brass.
 

Antique Brass Aubrey Pull - $10 »
I love the authenticity of this pull with the exposed screws, and it comes in a bunch of finishes and sizes, so it can work in lots of different applications. I'm quite partial to antique brass these days, especially on darker cabinets, and I love the high contrast of oil-rubbed bronze on white cabinets. 

What they do for the kitchen: Add a utilitarian and industrial feel.
What they work well with: Other humble and hardworking materials, such as subway tile, stainless steel countertops, commercial-style appliancesfarm sinks and industrial-style lighting.
4. Tubular Bar Pulls
A traditional-style kitchen with Shaker cabinets gets a modern touch with nickel or stainless steel tubular bar pulls. This type of hardware is often seen on slab or flat-panel doors, but it works equally well on a Shaker-style door. Tubular bar pulls can be long and dramatic or short and classic.

Laurey Stainless Steel Melrose Bar Cabinet Pull - $12 »
Tubular bar pulls are sometimes referred to as barrel pulls and are offered by almost every hardware company. They come in a variety of sizes and finishes, making them a great choice if you're looking to add modern flair to your Shaker-style kitchen cabinets. 

What they do for the kitchen: Modernize it
What they work well with: Long and skinny mosaic tiles, oversize and rectangular tiles,ebony or espresso stained Shaker cabinets, modern pendant lighting.
5. Flat Bar Pulls
In this kitchen, the hardware's accentuated length and polished nickel finish add a little modern glamour. In the same way a font choice affects the look of a logo, the decorative hardware of a kitchen can transform the overall experience of the space.
Italian Designs Classic Pull - $15.95 »
Flat bar pulls come in multiple lengths and finishes, from sleek stainless steel to hand-forged white bronze. 

What they do for the kitchen: Add a contemporary edge.

What they work well with: White or dark Shaker cabinets, square-edged stone or concrete countertops, full-height glass backsplashes, oversize rectangular tile in a stacked pattern
Flat bar pulls are a terrific way to modernize a Shaker-style cabinet, complementing it with a linear and squared-off look. As you can see, when run vertically and horizontally, the hardware really creates a focal point in the kitchen.

6. Accented Wire Pulls

This kitchen leans more traditional, with tall crown molding, a decorative hood surround and a bronze faucet, but the cabinet doors are still classic Shaker.


Antique Pewter Cabinet Pulls - $5.19 »
These pulls go by different names, but they're basically wire pulls with decorative details. 

What they do for the kitchen: Allow you to add more decorative moldings and traditional elements.
What they work well with: Traditional elements like plate racks, crown molding, bronze accents and decorative hood surrounds.

7. Arced and Footed Bar Pulls

For a more classic look, there are arced and footed pulls. These go by many different names and can also fall into the wire-pull category. These pulls are traditional and just decorative enough without being too fussy for a Shaker door. Mixing finishes on dark and light cabinets helps to create contrast on each and keeps the kitchen from feeling stale.

What they do for the kitchen: Add a more traditional and decorative element.

What they work well with: Stone mosaic tile backsplashes, nickel diamond-mesh cabinet inserts, marble countertops with a decorative ogee edge.
 

Go Ahead: Mix Your Finishes
When people say all white kitchens look alike, I can't disagree more. Just changing the finish of the hardware completely changes the look of a kitchen, even when the hardware is exactly the same style.

Depending on the other finishes in your kitchen, you may consider satin nickel, polished chrome or nickel, or oil-rubbed bronze. Don't feel like you have to match the cabinet hardware to the lighting or plumbing fixture finishes. I like to mix finishes by using antique brass light fixtures and polished nickel pulls to give a kitchen a more collected-over-time feel.

When using two or more cabinet finishes, as with the stained island and white perimeter cabinets shown in this kitchen, it's perfectly fine to mix up the finishes of the hardware as well! Not everything has to match — the nickel finish wouldn't look as good on the stained island as the antique bronze finish does, for example.


Wednesday
Aug212013

Here's Help for Your Next Appliance Shopping Trip

Article By: Vanessa Brunner

When shopping for new appliances or planning your dream kitchen, the first step is to do some hard thinking about what you really need, how your kitchen is laid out and the way you live and cook. 


What kind of cook are you? Do you want to go ecofriendly? Mix vintage appliances with new? Will multiple generations be using the kitchen? What's the best refrigerator shape and style for your household? Once you've addressed the necessities, consider special features like a warming drawer or wine fridge to make cooking and entertaining easier and more fun. 

There's a lot to consider. Start your planning with these practical guides to selecting appliances, along with plenty of photos to inspire you. 

Find the right appliance layout. Is the kitchen work triangle dead? To some this kitchen layout plan seems antiquated; to others it's vital. Regardless of your point of view, the work triangle has some important aspects that can help you plan your kitchen appliance layout.  

Go the ecofriendly route. Stop smacking your head against the wall every time your electricity bill comes. Choosing and using your appliances wisely can help cut down on your bills and your carbon footprint.  

Look beyond stainless steel. Many homeowners are looking for a change from stainless steel. Mix things up a bit with warm white. The right finish and applications work well in traditional, vintage and modern kitchens. 


What's old is new again. The charm of vintage and retro appliances can be appreciated by almost everyone. But not everyone finds the work involved in finding, repairing and maintaining these appliances worth it. See if this investment is worth your while. 

Embrace universal design. Design your new kitchen for today and tomorrow. Whether you're living in your "forever" home or want to accommodate special needs right now, these appliances can contribute to a universally designed kitchen that everyone's comfortable in. 


Specific Appliances

Ovens. 
Gone are the days when ovens had to be placed right under the range. Today oven arrangements have more to do with the confines of a kitchen and with individual cooking styles than with appliance limitations. 
 

Cooktops. Finding the right cooktop isn't just about looks — even if you love those big gas ranges, they could actually hinder your kitchen's potential. What's right for you? Take a look at this guide — you might be surprised.


Hood fans. Fans are often left until last when shopping for kitchen appliances. Even if they're not as fun to look at as a colorful new fridge, they're just as important. Learn the lingo and get ventilation that suits your style and budget.  

Stovetops. The stovetop tends to be one of the most expensive appliances in your kitchen, so make sure your investment is worthwhile. Yes, function and style are important, but you also want to make sure the stovetop fits with your preexisting cooking space, counter height and cabinetry.


Ranges. When chosen and installed correctly, a range can act as much like a piece of art as an appliance. Take a look at some of the most popular range colors, materials and styles on the market.

Small-appliance storage. Who doesn't love kitchen gadgets? Waffle makers, mixers, coffee machines, food processors and ice cream makers are part of what makes cooking fun. But all tof hese single-purpose appliances can pile up fast, taking up tons of counter space. Keep these goodies tucked away neatly with a few smart storage ideas.


Microwaves. Microwaves certainly aren't the prettiest of kitchen appliances, but they're a necessity for most homes. Make the most of yours — you'd be surprised what a difference the right output and installation can make.  

Refrigerators. There's quite a range in refrigerator prices — several thousand dollars depending on brand, size and style — so make sure every dollar you spend is worthwhile. How much space do you need? What accessories will make your life easier? This guide can help you narrow down the choices.  

Warming drawers. Keep your food piping hot, warm plates and even slow cook some foods with one of today's most popular small appliances: a warming drawer.  

Microwave drawers.Most of the time, a microwave gets installed somewhere hard to reach — above the refrigerator, on a top shelf or right above the stove. Installed just below the countertop, microwave drawers make it even easier to warm up your food. 


Wine refrigerators. Most wine lovers don't have the room for a wine cellar, but that doesn't mean they can't keep favorite bottles at hand. A wine fridge is easy to install and takes up hardly any room — perfect for smaller spaces like apartment kitchens.