twitter Facebook Google+

                 linkedin pinterest houzz  

Click for the BBB Business Review of this Countertops in Denver CO 

Google Review 

Sales & Promotions!

Architects, interior designers, and more ∨

Hire a decorator to find that just-right couch and coffee tables for your living room.
Find wall shelves, a customizable closet organizer and stylish furniture for home to whip your closet into shape.
Remodeling and Home Design

Qualify Us Now! ProView 

Cambria logoUp to $45,000 interest free for your project!Finance by Cambria

 convenient and easy.

  • No Money Down
  • Interest-free financing for up to one year without payments
  • Financing up to $45K for any project that includes Cambria (including cabinets, flooring, sinks, plumbing, install & more)
  • Secure paperless telephone application
  • Credit decision in less than 10 minutes


Entries in Flooring (19)

Monday
Dec092013

Bathroom Floor Tile: Glass Mosaic for a Luxurious Look

Article by:

Glass mosaic tile flooring can certainly add beauty to a bathroom, but it’s still a hotly debated material choice for flooring. No one can deny how great it looks, but some people question its durability and safety in a wet environment. Here you’ll learn all about the pros, cons and costs to help you decide if glass mosaic tile is a good fit for your bathroom. Could this luxurious material work for you? 

The basics. Glass mosaic tile, made up of many small tiles in different colors or the same color, can dramatically change a space. You will want to find an experienced installer and use proper setting materials and grout.


Cost. Glass mosaic tile is considered a high-end material, so it’s more expensive than average bathroom flooring. However, there’s a wide price range: High-quality, beautiful glass tile in sheets is typically $25 to $40 per square foot; custom murals can be $70 to $150 per square foot; and standard solid colors can start as low as $4 per square foot.


Advantages. Glass mosaic tile is one of the most lavish and luxurious bathroom flooring materials on the market. With its gorgeous reflective surface, it will add value and appeal. It also has a nonporous surface that’s resistant to stains, mold, mildew and chemical damage. 

Disadvantages. Make sure your glass tile has been approved by the American Society for Testing and Materials for flooring use. Confirm all the ins and outs of the warranty with the manufacturer. 

Hire an experienced professional to install your glass tile bathroom floor, since installation can prove tricky due to transparency. You can’t rush glass tile installation or treat it like larger-format tiles. 

Also, while glass mosaic tile is surprisingly strong, its surface is susceptible to scratching and etching and can also become slippery when wet.


Sustainability. Many glass tile manufacturers have become environmentally aware and have created ecofriendly lines using recycled glass.


Maintenance. Glass mosaic is quite easy to clean, and it is important to maintain your floor to lengthen its life span and boost its reflectivity. One of the most important things you can do to help keep your glass tile floor in tip-top shape is to keep it free of dirt and grit that can scratch its surface. You’ll also want to wash away soap scum and mineral deposits with a standard bathroom cleanser and a soft bristle brush.


“Look at what is indicated on the grout bag. Glass tile is not going to be influenced by many things, but the grout often is affected by what is used,” says Christina White, general manager of Hakatai Enterprises.“This may in turn change the appearance of the tile, when actually it is the grout that has changed.”


Monday
Oct282013

What to Ask Before Choosing a Hardwood Floor

Article By: Mitchell Parker

So you’ve decided to get hardwood floors. Easy enough, right? Pick a wood and be done with it. 

Not so fast. There are a lot of factors that will determine what kind of hardwood floor your home can accommodate, and what will look best with your existing or planned furnishings and decor. 

You have some basic options: solid wood and engineered wood. Solid wood is what you generally think of as a hardwood floor: thick, solid planks of wood. Engineered wood is made of a veneer layer that sits atop a core of plywood. This construction deals with moisture a bit better and is recommended for concrete slab subfloors. Which brings up another point. The construction of the floor you're working with pretty much will dictate what kind of wood you can use. 

Here's how to prepare yourself for choosing a hardwood floor for your home. 

1. Where will the wood be going?

Installing hardwood floors on a second story is much different than doing so in a basement. A space beneath ground level is what’s known as below grade. A floor that’s even with the outside ground level is on grade, and any floors above this are above grade. Where you're installing the wood will limit your recommended options.

“For example, you’re not supposed to put solid wood below grade, because the moisture coming up through the ground can cause problems,” says Bob Hagen, who owns Magnus Anderson Hardwood. “So an engineered wood is recommended."


2. What is the subfloor made of? 

Find out what kind of subfloor you have. The three most common types are concrete slab, plywood and particleboard. This will help you determine whether you can install solid wood floors, or if an engineered wood would be best. 

Concrete. “If you have a concrete slab floor, you’re pretty much limited to engineered wood,” says Andrew Zheng, manager of Unique Wood Floors, which specializes in and ships prefinished hardwood. But don’t fret. You can still get any type of wood in an engineered format. And the thickness of the veneer on engineered wood varies. Higher-end engineered woods "are no less than solid woods in performance and price,” Zheng says. 

(Note: Even the hardest woods, such as Brazilian cherry and hard maple, will ding on an engineered floor if the plywood onto which they are veneered is soft, like lauan, which is a commonly used base.)

Another option is to install plywood over the concrete, but you’ll have to pay for the additional plywood, insulation and labor. “Most people just choose to stick with what they have,” Zheng says. 

If you’re still not sold on the engineered product, Hagen says there's a way to still have solid wood on a concrete slab (as long as it's on grade). It just needs to be glued down, preferably by an experienced professional. 

The downsides are that you need completely flat boards (hard to come by in longer lengths), and the glue is so strong that there’s a permanency to it. “If you have a leak or a flood, getting the material up is incredibly difficult,” Hagen says. “You’ll also want to check the VOCs [volatile organic compounds, which are toxic] in the product. And we ask clients about any chemical sensitivities.” 

Plywood. This is probably the most common subfloor and allows for the most versatility with hardwood floors. You can nail solid wood on top or use engineered wood. 

Particleboard. This material was commonly used under carpet in homes built in the 1970s. It’s basically a cheaper version of plywood. For hardwood floors, you'll need to replace the particleboard with plywood. Then you can add engineered or solid wood. 
 

3. What are your living habits?

Think about how much abuse your floors will take and learn about specific wood species and their durability. Do you have kids and pets? Have large parties often? Or are you a single person who travels a lot? 

If you have a high-traffic house, you’ll want to go with a harder wood. The Janka scale measures how strong a wood is; basically a BB is fired into a plank and the size of the dent it leaves is measured. “Red oak is considered the bell curve,” Hagen says. “It’s pretty hard and medium priced.” 

You can also play with grain patterns as well as with stains and finishes that will hide dents and scratches.
 

4. What style is your home?

You might love the look of hickory but then think differently when you see it covering a floor in a kitchen with modern cabinets. That's because some woods lend themselves better to certain styles. 


When choosing a wood, consider cabinets, trimwork and door casings to make sure the wood won’t clash with other design elements. And coordinate with the colors of the walls and the amount of natural light. This will affect color choice. If you have a lot of windows and skylights, then you probably have enough light to balance out really dark floors. If you have a dark house already, a lighter floor choice will help brighten things.

If your style is modern: Natural maple lends itself well to modern styles. “It’s more of a Norwegian-looking design with a clean look and not a lot of variation,” Zheng says. Gray-stained oak and boards without knots create a clean aesthetic that also works in modern settings.

If your style is traditional: Go with something like hickory. "It mixes lighter and darker pieces, and it’s more like a traditional cabin feel," Zheng says. Also, boards with knots and wider planks fit a more traditional style.

Of course, designers do incredibly creative things with mixing old and new, so don’t discount a wood just because it’s considered more appropriate for a certain style. Playing with grain pattern and stains can yield all sorts of interesting results.
 

5. What’s important to you? 

Is budget the biggest factor? Or is the appearance all you care about? 
Determining what’s most important to you will help you determine the right wood for your floor. 

Cost. 
Engineered wood isn’t always the cheapest route, so don’t think you can’t have solid wood floors on a budget. Zheng says you can purchase generic oak flooring in various stains for $3.50 to $4 per square foot, while lower-end engineered floors start at $2.50 to $3 per square foot. Beautiful hardwood like the popular acacia species can be as high as $6 per square foot.

Maintenance. 
If you want something that will hold up over time, you'll want to look at the harder woods (with higher Janka ratings). Also pay attention to the stain. 

The traditional method for staining wood uses a polyurethane finish, which produces a higher sheen. If the floor gets dinged or scratched, light bouncing off the semigloss finish can exacerbate the appearance of those flaws. 

Oil finishes are increasingly becoming more popular these days. They soak into the wood and provide a more matte finish. This can help hide wear and tear; plus, they last longer. While the up-front cost is higher, you won’t need to restain the floor as often, saving you money in the long run.

You can play around with finishes too. Hand-scraped or wire-brushed treatments rough up the appearance, creating a worn look so that if something does scuff it, the mark is not as noticeable. Note that the thickness of the veneer on an engineered floor affects how often it can be sanded down and finished.
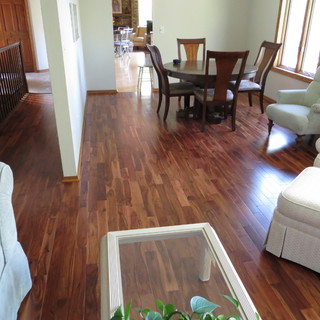
 

Appearance. Everyone's preference is different. Some people are attracted to oak more thanwalnut, and vice versa. 

Acacia, shown here, is an exotic wood from Asia that Zheng says is a hot seller right now, because of its mix of lighter and darker tones; plus, it’s harder than hickory. The cost ranges from about $4 to $6 per square foot at his warehouse. The unique look is worth the higher cost for some. 

Pay attention to knots and grain pattern. Patterns in hickory and maple are different than in oak. You might want to spend the extra money for a unique grain pattern, or you may want to save money and go with a less-expensive wood with a better stain.

Consider plank width, too, which alters the appearance of your hardwood floors. Wide-plank walnut and 7-inch European oak are popular in traditional homes at the moment. 


The best thing you can do is see and feel the wood in person. “Wood is a living species. You need to feel what you’re attracted to. You’re the one living in the house, not the designer pushing you,” says Ilan Zamir, CEO ofAmber Flooring.
 

6. How will you stain and finish it? 

A stain adds color to the wood. The finish protects the floors from getting dirty. Any stain or finish can be applied to almost any wood. Some people like the color of oak but want the grain pattern of walnut. That's where staining can come into play. 

Some people can’t tell the difference between unstained black walnut and white oak that's been stained espresso. Others can look at those woods and their grain patterns and immediately know the difference. It all depends on what's important to you. 

A finish affects the maintenance. A solid wood that’s been hand scraped for a lower-sheen matte finish is easier to maintain, because you won’t see as much wear and tear. But maybe you want a semigloss look. 

Also, purchasing wood that's been prefinished will give you a good idea of what it will look like and will save you the time and effort of finishing the floors onsite. Engineered wood is usually prefinished.
 

7. How will you test it? 


This step is incredibly important. The last thing you want to do is install 800 square feet of black walnut based on a photo or tiny sample you saw in a showroom only to find it's overpoweringly dark and contrasts poorly with your furnishings. 

Always ask for a 2- by 2-foot sample of what the floor will look like with a stain and finish on it. Use this to test it with your paint colors and decor to make sure it's exactly what you want.

Monday
Oct142013

Bathroom Surfaces: Ceramic Tile Pros and Cons

Article By: John Whipple

Often praised for its durability and variety, ceramic tile is a popular choice for bathroom finishes. If you're drawn to color and texture, this material can deliver on both fronts. But the sheer variety of ceramic tiles is endless, which can make finding just the right tile very difficult. 

Because ceramic tends to cost less than porcelain and is much lighter, it's often used for wall and ceiling installations. However, there are some major cons to this material, too: It's not as strong as porcelain, so it doesn't make the best walking surface. It can be very cold underfoot in the winter, and heavy tile can be difficult to install. 

Curious if ceramic tile will work in your bathroom? Here's what you should know before making the purchase. 

The basics: Ceramic tiles are wide ranging; all are generally made from red or white clay that's been fired in a kiln and glazed or finished. If you're a tile nerd like me, ceramic tile technically includes porcelain tile too, but for this ideabook we'll exclude that category. 

Cost: Ceramic tile is often priced below $2 per square foot. Higher-end tiles can easily run $20 to $40 and more per square foot. The average tends to be around $7 to $9 per square foot. 

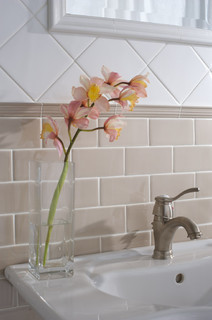
Pros: Ceramic tile can be incredibly affordable, and there's a ton of variety in styles, colors, finishes and textures. It's also easy to customize it for details like chair rails, soap dishes and special edging and nosing, as in this bathroom.


Cons: Ceramic tile is not as strong as its cousin, porcelain tile, but what it lacks in strength, it makes up for in price.


Special considerations: Since ceramic tiles often have texture, you may want to consider this to add dimension to your bathroom. The eased edge on this tile adds a little extra something to a bathroom wall, but can make it difficult to figure out how to cut end tile. Consider using a tile edge profile, like a Schluter strip, to make the transition less awkward. 

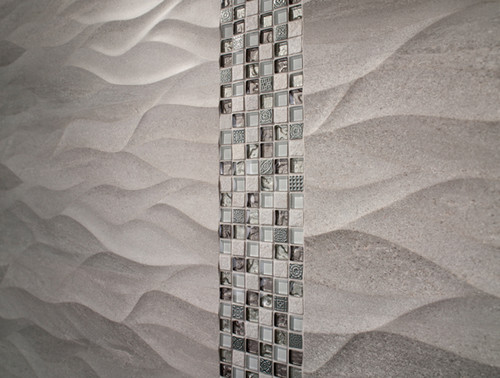
However, today's ceramic tile offers much more than an eased edge. This wavy tile from Porcelanosa is just one example of the texture and detail available today. 

This type of tile can make for a great accent in a bathroom, but I'd avoid using too much texture in a shower , since it can make for difficult cleaning. Try using it for a feature wall or feature corner instead.
 

Maintenance: Make sure you choose a ceramic tile with a durable finish. How can you tell? Buy a sample, take it home and clean it to death. 

I recommend cleaning ceramic tile with a white nylon scrub brush and a little soap. You shouldn't need much more than that. Ceramic is very durable, but it's best to stick to mild household detergents and to spot test before using anything new. 

Installation: Installing ceramic tile is pretty straightforward; it could even be a DIY project if you have some experience working with tile. Many of today's ceramic tile actually has directional arrows on the back side; make sure you keep them lined up the same way so you get the correct look. 


Friday
Sep132013

7 Kitchen Flooring Materials to Boost Your Cooking Comfort
Article By: Jennifer Ott

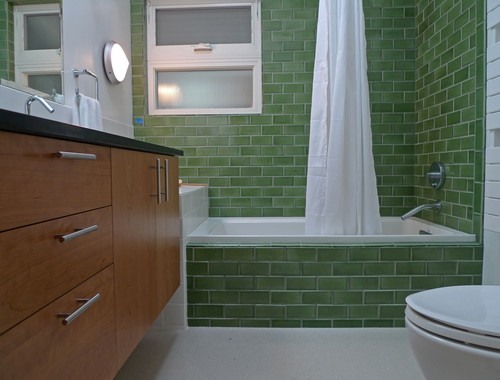
I love the look of polished concrete floors in kitchens, but concrete — along with other nonresilient floor surfaces, such as stone, ceramic and porcelain tile — can take a toll on your joints. I've heard complaints from many homeowners who regret putting in a hard flooring material in their kitchen because of the subsequent knee, hip or back pain they feel after standing or walking on it for a long period. Fortunately there are plenty of softer, resilient kitchen flooring types available that are as functional as they are good-looking. 
Cork


Sustainably harvested from the bark of the cork oak tree, cork is an excellent resilient floor choice in a kitchen due to its high level of cushioning. It's available in a variety of colors, patterns and textures, and in tile or plank formats. It is somewhat self-healing but can get scratched and dented. You can mitigate this by regularly applying a protective layer of wax or polyurethane and by using protective felt pads on the feet of your furniture.

Material cost: $4 to $14 per square foot 

Linoleum


Not to be confused with vinyl flooring, linoleum is made from all-natural and renewable materials such as linseed oil, pine rosin and powdered cork. It's soft underfoot yet quite durable, and it comes in a wide range of colors and patterns. As with cork, applying and maintaining a protective finish will keep it looking good for many years.

Material cost: $5 to $10 per square foot
 

Rubber


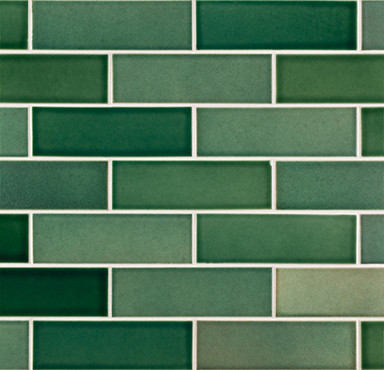
This is a bit of an unusual choice in a residential kitchen, but rubber flooring is becoming more common in homes. Soft, springy and durable, it is a terrific choice if you want to stand for hours in your kitchen without bringing on the aches and pains. Rubber flooring is available in tile and sheet formats, and should be sealed after installation and again every year or two, depending on traffic and wear. 
Material cost: $6 to $12 per square foot
 

Vinyl


A popular budget-friendly option, vinyl flooring comes in both sheet and tile formats and in an endless array of styles and colors. I like to have fun with vinyl; I like to use bolder colors or lay it out in an interesting pattern. However, it's not as durable as other resilient flooring options and can get dinged up pretty easily. Therefore, it tends to have a shorter life span than other options.

Material cost: $2 to $10 per square foot
 

Wood


A favorite flooring material for kitchens, wood is more forgiving on our joints than stone, ceramic, porcelain or concrete. It also looks and feels warmer than nonresilient flooring. Some drawbacks to wood are that it can get scratched and dinged easily, and it also must be protected from contact with water. In kitchens I recommend going with a site-finished wood floor rather than a prefinished floor. Yes, it's a messy business sealing the floor after installation, but by sealing it after installation you also seal up the joints, preventing water and dirt from collecting in them.

Material cost: $5 to $20 per square foot
 

Bamboo


Not technically wood — it's actually a grass — bamboo has many of the same advantages and disadvantages as wood. It's a good option if you are looking to use a sustainably harvested material for your kitchen floor. Not all bamboo flooring is the same, however; be sure to look for moso bamboo, as it's considered the hardest and most durable.

Material cost: $5 to $12 per square foot
 

Laminate


Similar to vinyl flooring products, laminates are a budget-friendly flooring choice and are soft underfoot when compared to rigid flooring materials. They tend to be more moisture resistant than wood floors, but because they are not a solid material all the way through, they can't be refinished if damaged. 

Material cost: $2 to $5 per square foot


Alternate Option: Mats and Rugs


For those who simply must have their hard tile or concrete kitchen floor, there's always the option of placing gel mats or other cushioning rugs in areas of your kitchen where you spend large amounts of time standing, such as at your sink or in front of the range. 

Friday
Aug302013

Bathroom Design: Getting Tile Around the Vanity Right

Article By: John Whipple

Tiling under your new vanity or custom cabinets can prevent shower or sink water from finding its way into your house. Extending tile all the way under freestanding or floating vanities can make a room look and feel larger, too. These vanities are popular choices in today's bathrooms, so it's important to understand the pros and cons of bringing tile all the way under your bathroom storage. 

See how these bathrooms combine vanities and floor tiles, and learn what you should specify when working with your bathroom contractor. 

Making sure the floor is perfectly level is an important step for a vanity like this. Trying to level a vanity after tile installation can be a real chore. If you're having a vanity custom built, designing adjustable legs can help get your vanity and vanity top perfectly level. 

Tip: Consider omitting extra legs in custom vanity designs and securing the vanity to the wall if needed. Getting eight legs to sit perfectly flat is much harder than four! 

If your bathroom floor is a little unlevel and you don't want to spend the money or time making it perfectly level, a little shoe molding (the small strip of molding at the bottom of the vanity toe kick in this photo) on your vanity can visually even things up. Shoe moldings add a lot of charm to a vanity's look and help protect the vanity from water damage. 

Tip: If you are going to use a shoe molding, plan to shim the vanity off the ground by about ⅛ inch or so, so that the only wood in contact with the floor is the shoe molding. If there's ever a leak in your bathroom, the shoe molding, rather than the bottom of your vanity, will absorb the damage. It's much easier (and more affordable) to replace shoe than the entire vanity.


I love how this vanity has higher legs and extra foot room. Traditional bathroom and kitchen cabinets often have a smaller kick space (the little recess below the bottom drawers) with little to no room for your toes. If you like to get up close to your vanity and lean toward the mirror when getting ready, a freestanding vanity with extra leg height is a great idea. 

Tip: If you're installing radiant floor heating, you'll want it to go all the way under your vanity with a design like this. That way your feet will still stay warm when you're up close to the mirror. We prefer cable heating systems rather than heating maps for this very reason; they allow for greater heat placement control.


Tiling under your vanity can help seal up any voids that might collect water and harm your home's construction. Sink and drain lines can leak if not properly installed or prepared, and often this leak runs down the back side of a vanity and into the floor. 

Tip: Make sure all your water supply lines have trim collars inside the vanity. These collars act like little water deflectors and can keep water from running back along a pipe and into the wall.
 

In a larger bathroom, the high cost of tile could be a big factor when you're deciding whether or not to tile under a vanity. Usually we order a 10 percent overage in bathrooms, but for some large bathrooms I'll just order 5 percent and use the off cuts under the vanity. This allows the client to get the benefits of tile under their vanity without added cost. 

Tip: If your tile is crazy expensive, consider using a cheaper, similar tile under the vanity. No one will know but you.
 

Larger vanities with a solid countertop like this can add a lot of weight to a tiled floor. If you're aiming for a similar look and style, considered the added weight your vanity will bring to the room and make sure your contractor prepares the floor for this kind of installation. 


Tip: Curious if your floor is strong enough? Try this simple test for excessive floor deflection: Fill a drinking glass to the top with water, place it in the room before tiling and walk around the room. Move the glass to a few different locations and walk around each time. If the water spills from the glass anywhere, the floor most likely has too much bounce and might not be suitable for a heavier vanity.
 

Adding some light under a vanity makes for a great night feature and brings another layer of lighting to the room. Some tile is so shiny that it acts like a mirror under the vanity, so make sure that the bottom of your vanity is not littered with job tags, addresses or overspray from finishing.

Tip: If you want a more even glow from the lighting, consider shining the light toward the back wall instead of straight down. This creates a little less light but a more even glow.