twitter Facebook Google+

                 linkedin pinterest houzz  

Click for the BBB Business Review of this Countertops in Denver CO 

Google Review 

Sales & Promotions!

Architects, interior designers, and more ∨

Hire a decorator to find that just-right couch and coffee tables for your living room.
Find wall shelves, a customizable closet organizer and stylish furniture for home to whip your closet into shape.
Remodeling and Home Design

Qualify Us Now! ProView 

Cambria logoUp to $45,000 interest free for your project!Finance by Cambria

 convenient and easy.

  • No Money Down
  • Interest-free financing for up to one year without payments
  • Financing up to $45K for any project that includes Cambria (including cabinets, flooring, sinks, plumbing, install & more)
  • Secure paperless telephone application
  • Credit decision in less than 10 minutes


Entries from September 1, 2013 - September 30, 2013

Monday
Sep302013

9 Ways to Avoid Kitchen Traffic Jams

Article By: Jennifer Ott

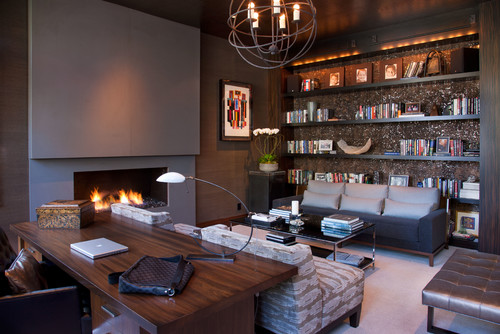
When it comes to designing your dream kitchen, it's tempting to try to squeeze in all of the latest and greatest appliances and gadgets — and enough cabinetry to contain them all. But unless you also put some thought into how you, your family and guests will circulate through the space, you could end up with a dysfunctional layout that is no fun to work in — newfangled gadgets and all. I've pulled together some tips to keep in mind when designing a kitchen to avoid traffic jams and poor flow. 

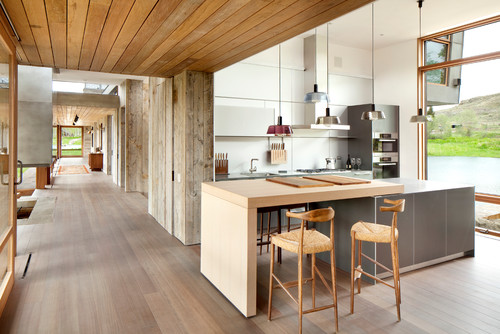
1. Optimize the layout. One of my favorite kitchen layouts is an open kitchen with an island and no closed corners. I find having an island that family and guests can easily circulate around, without getting stuck in a corner, greatly reduces kitchen traffic jams. 

2. Provide ample walkways and aisles. Make sure your kitchen walkways are at least 36 inches wide and your work aisles — those spaces in front of sinks, appliances and prep areas — are at least 42 inches wide, or 48 inches to accommodate multiple cooks. 

Those with larger families or who entertain often may want to go as wide as 54 inches for work aisles. This will allow two people to easily pass behind someone working at the countertop, sink or appliance. 

3. Consider sitting room. If you plan to have a seating area at an island or a peninsula, think about where the stools will be. Ideally you want visitors to be facing you while you are working in the kitchen, and you want to keep them out of your main work aisles, too. 

If you anticipate stools in a walkway or an aisle, allow for the extra space they'll require when occupied. You'll want at least 36 inches so someone can easily pass behind a stool when it is pulled out. 

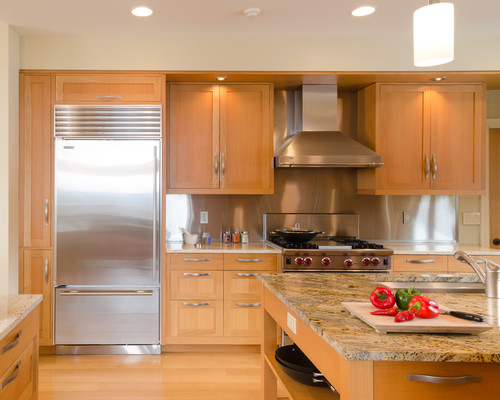
4. Pay attention to appliance and cabinetry clearances. While your goal should be to arrange your appliances into efficient work zones, watch for any awkward adjacencies. Avoid placing major appliances directly opposite each other, as this can create a traffic jam if both appliances are being used simultaneously. 

Also, try to keep appliances away from any corners, as corners prevent full access to the appliance, and the adjacent cabinets cannot be opened if the appliance door is also open. 

This applies to your cabinets as well — make sure you can open all of your cabinet doors and drawers without their running into one another. It's tough to avoid this with corner cabinets, but all other cabinets should open freely without banging into another door or a drawer.
 

5. Don't block kitchen entry points. Leave enough space for someone to enter or exit even if the appliance or cabinet door or drawer is open. 

6. Give your refrigerator ample space. The area around a refrigerator tends to be a high-traffic zone, so don't crowd it in. Plus, some refrigerator doors are a whopping 36 inches wide — meaning they take up a lot of space when open. If your refrigerator is near a kitchen entry point, add a pantry cabinet to act as a buffer so that the open refrigerator door will be less likely to block someone. 

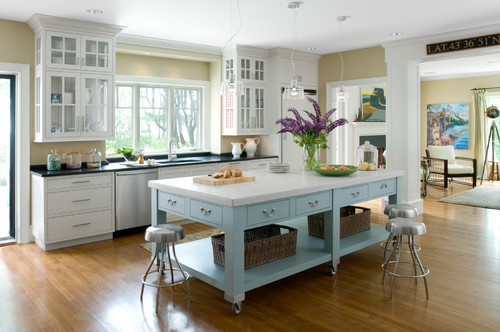
7. Give your sink some space, too. Have plenty of countertop space on either side of the sink, and don't cram the sink in between other appliances, with the notable exception of the dishwasher, which is handy to have right next to the sink for cleanup. Avoid corner sinks — they are major culprits of kitchen traffic jams. 

8. Don't fight with a small space. As much as I love an island in the kitchen, I also value space for moving around. If you have a tight kitchen, keep it as open as possible. You can always add a movable island cart that you can tuck off to the side out of the flow of traffic when it's not in use. As tempting as it may be to cram as much cabinetry and countertop area in as possible, it's just not worth it if that makes the space awkward to use. 

9. Consult an expert. The best piece of advice I can offer is to engage the services of a qualified and reputable designer who specializes in kitchens. If your remodeling budget is tight and you are going the DIY route, consider finding a kitchen designer willing to consult for a few hours with you for a flat fee. This investment of a few hundred dollars can help you avoid ending up with a dysfunctional kitchen layout — and will save you time, money and frustration down the road.

Friday
Sep272013

10 Ways to Cozy Up the House for Fall

Article By: Laura Gaskill

From the first crisp morning and the first leaves that change colors to the first night you need to put an extra blanket on the bed, signs of fall beckon us to spend more time indoors. Satisfy your urge to nest while sparing your wallet with these 10 easy, elegant and, of course, cozy touches for every room. Whether you are looking for an instant change (toss a plaid blanket over your table) or something more permanent (install DIY shelving), here you'll find inspiration to get your creative juices flowing. 

1. Give an old quilt a new purpose. While you wouldn't want to eat on Grandma's priceless heirloom, vintage quilts picked up at thrift shops can make fabulous tablecloths. Spot clean it between uses and give it a full wash only when really necessary.


2. Craft DIY shelving. Why spend big bucks on a fancy industrial-style shelving unit when you can make your own with basic supplies from the hardware store? Check out the tutorial for the piece shown here on The Brick House and thissimilar industrial shelving project.


3. Use a plaid blanket as a tablecloth. A small, round table is the perfect spot for showing off your favorite fall colors and textures in the form of a cozy blanket. Let the blanket drape to the floor — imperfect is what you are going for here. Top it with a cluster of small picture frames or place one large item, like an urn or a lamp, in the center.


4. Display fall gourds the elegant way. Want to try something different from the usual piles of pumpkins this year? Pick up at least five or six big decorative gourds for an abundant display — look for the kind with elegant, swan-like necks — and line them up down the center of your dining table. What could be easier? 

5. Scour fall flea markets for original art. Vintage portraits and landscapes from unknown artists are often affordable. Choose just one to spotlight, or collect art around a theme and make a gallery wall. 

6. Paint your stairs a daring hue. Who says stairs have to be boring? If you have plain wooden stairs, especially if the wood is not in particularly good condition, consider painting them magenta, navy, mustard ... or any color you love.

This is a bold look, so if you are feeling wary, try it on a back stairway or in a tight stairwell — not on the front-and-center entry stairs.


7. Use vintage textiles as upholstery. Although the sectional shown here was custom made, you can draw inspiration from this look to revamp your own sofa, chair or cushions with colorful vintage textiles, including rugs. If you're DIY savvy, you could attempt to re-cover cushions or upholstery yourself, make cozy pillow covers or simply wrap seat cushions in textiles for a temporary change.

If you want to use vintage rugs on your furniture, have them professionally cleaned first. Or you can carefully clean vintage textiles yourself by gently agitating them by hand in a bathtub of lukewarm water with a mild soap. Rinse and air-dry them before using.
 

8. Get beautifully organized. Bring a touch of glamour to your morning routine by setting the items you use daily atop pretty trays. There's no need to buy new trays — just peek into your kitchen cabinet or china hutch, and grab a few pieces you haven't used in a while. 

If you really want to go the extra mile, scoop up a few little glass containers at the craft store and decant your favorite toiletries.


9. Style your kitchen. Corral jars of pretty preserves and artisanal cocktail makings on a tray, bring in a real table lamp for a soft glow, and put something sculptural and a little unexpected (like the antler shown here) atop a high shelf. 

We tend to cook and congregate more in the kitchen during the fall and winter, so why not make it a place that feels just as warm and cozy as the rest of your house?


10. Paint your front door. It's the first thing you see when you come home each day — why not make it gorgeous? A few coats of a rich hue that complements the color of your siding, plus a shiny new door knocker, can completely transform the front of your house for less than 50 bucks.


Wednesday
Sep252013

A Crash Course in Bathroom Faucet Finishes

Article By: Michelle Gann

Choosing a bathroom faucet finish often stumps people. What's the difference between brushed and polished nickel? What are the benefits of satin brass versus satin bronze? Fear not. Here's a crash course in faucet finishes that will elevate your knowledge in less time than it takes you to brush your teeth. 

Keep in mind that most faucets have a lifetime warranty when it comes to finishes, so if you have an old favorite faucet that's looking drab, try calling the manufacturer to see what the warranty policy is.

If you're new to selecting finishes, it's a good idea to get all the other fixtures and accessories in a matching color. Some finishes are a standard color, such as chrome and most brushed-nickel finishes, but not all finishes from different companies look the same. 

To ensure you are getting the exact same finish, buy all the fixtures and accessories from the same company. When shopping for additional fixtures, take a sample with you to match.

Polished Brass

An all-time favorite. A polished brass faucet helps give the bathroom shown here a vintage look. 

Advantages: Easy to clean and easy to find. A durable finish. Easy to match with accessories and other fixtures.

Disadvantages: More expensive than other finishes, such as chrome and brushed nickel.

Styles it works with: Polished brass is actually coming back in style, so it looks great in modern, traditional and eclectic settings. 
 

Satin Brass

A nice twist on polished brass, the brushed-gold look has a lot of class. It's bold without being too showy. Don't be surprised if you see a lot more of this color in bathroom remodeling. 

Advantages: Offers a nice accent color without the polished look. Durable. Being a matte finish, it won't show fingerprints and water spots.

Disadvantages: It's hard to find and more expensive. It's also difficult to match accessories and other fixtures to satin brass.

Styles it works with: Piggybacking off the success of polished brass, this satin counterpart is going to be increasingly popular. Great settings for it are traditional, modern and contemporary.


Oil-Rubbed Bronze

A great aesthetic alternative to standard chrome and brushed nickel, oil-rubbed bronze gives the bathroom a more traditional look and feel. 

Working on a budget? if you don't want to purchase all the matching accessories and you have other brass items in your bathroom, such as an old light switch plate or cabinet knobs, you can always use a brass darkening solution to make all the hardware match.

Advantages: Durable, easy to clean and easy to find. It's also easy to match oil-rubbed bronze with accessories and other fixtures. It won't show water spots or fingerprints.

Disadvantages: More expensive than other finishes, such as chrome and brushed nickel.

Styles it works with: Oil-rubbed bronze goes hand in hand with traditional and Tuscan or Mediterranean settings.


Copper

Copper is unmistakable and bold. It gives the bathroom a rich feeling, especially when mixed with a subtler material, such as marble on a countertop. 

Advantages: Copper has natural antibacterial properties. It's fairly easy to find and also has the ability to "heal" itself. Over a short period of time, a scratch in copper will become darker and eventually blend with the patina.

Disadvantages: A shiny copper finish might require a little more maintenance than brushed nickel, oil-rubbed bronze and chrome, but if you let it age naturally, copper will develop a beautiful patina. It's harder to match accessories and other fixtures to copper, and it's not as durable as other finishes.

Styles it works with: Tuscan and farmhouse. And, of course, steampunk.
 

Satin Bronze

Satin bronze has a nice, smooth finish that's in between copper and oil-rubbed bronze. Having a subtler color gives this finish more flexibility for different bathroom styles and settings.

Advantages: Durable and easy to clean and maintain, this is a great alternative to copper and a lighter option than oil-rubbed bronze. Water spots and fingerprints won't show.

Disadvantages: Hard to find and more expensive. It's hard to match accessories and other fixtures to satin bronze.

Styles it works with: Traditional, eclectic and Mediterranean.
 

Polished Nickel

If you like a smooth, shiny finish but are tired of chrome, try polished nickel. It's darker than chrome, and with different levels of lighting, it can appear to change in color. 

Advantages: Easy to clean. A durable finish. A great alternative to brushed nickel.

Disadvantages: More expensive. It's hard to find matching accessories or fixtures for it.

Styles it works with:Like chrome, it looks great in a variety of settings: modern, contemporary, traditional and eclectic.


Brushed Nickel

The soft metallic look of brushed nickel has stood the test of time. 

Advantages: This is one of the most durable finishes; it has a tendency to keep its finish longer than oil-rubbed bronze and chrome. It doesn't show wear, fingerprints or water spots.It's easy to clean, easy to find and easy to match with accessories and other fixtures. It's relatively inexpensive. Brushed nickel tends to be pricier than chrome but does not cost as much as oil-rubbed bronze.

Disadvantages: Does not coordinate well with stainless steel; it blends in instead of being a statement piece.

Styles it works with: Almost every style.


Chrome

Chrome is currently one of the most popular finishes because of its versatility. 

Advantages: It's generally the most inexpensive finish. It's a very easy finish to clean and maintain. It's durable, easy to find and easy to match with accessories and other fixtures. 

Disadvantages: Shows water spots and fingerprints. 

Styles it works with:Almost every style.


Matte Black

Black faucets are becoming increasingly more popular in the bathroom, because of their ability to match other items, such as vanities and accent pieces.If you want to make a classy statement, or you are just doing a small renovation that doesn't involve changing all aspects of your bathroom, matte black may be the perfect finish for you.

Advantages: Easy to clean. Does not show dirt, fingerprints or water spots. It's easy to coordinate a matte black faucet with bathroom accessories.

Disadvantages: It's hard to match other fixtures to it, hard to find and expensive compared with more popular finishes, such as chrome and brushed nickel. 

Styles it works with: Modern and eclectic.


White

Looking for a clean, brilliant finish? Go with a white faucet as a contrasting statement piece or something that blends beautifully in an all-white bathroom. The white finish comes from durable plastic or porcelain. 

Advantages: Easy to clean. Does not show water spots or fingerprints.

Disadvantages: Porcelain fixtures are more fragile than metal, which makes them more prone to chipping. Porcelain can be expensive, too.

Styles it works with: Farmhouse and modern.

Monday
Sep232013

Wood in the Bathroom? Absolutely!

Article By: Mark Clement

The conventional wisdom is that tile is the go-to for bathroom surfaces. We see tile everywhere, from the bathroom at work to the subway, to everybody's house.

I love tile, but just because it's so popular doesn't mean we have to design with it. And tile and grout aren't as impervious as you might think and are not required for looks, durability or cleanliness in wet areas like kitchens and baths. 

In fact, you can do amazing things with wood, even in the bathroom. The way it feels, sounds and even reflects light is wonderful. It also offers color and depth, and can soften the look of hard ceramic finishes. 

While wood is a durable choice for bathroom floors, it's also fantastic on the ceiling. It adds a sense of natural warmth in a space where, well, most of us are au naturel. 

Yes, this ceiling is above a shower. You can imagine the potential moisture problems. I always recommend using a fan in the bathroom, but adding a second barrier between the steam rising from the shower and what's behind the ceiling might be smart here. I recommend sealing the wood surface with boiled linseed oil and/or urethane. I also recommend sheeting the ceiling joists with 15-pound tar paper (the black paper you see under roof shingles) before installing the wood. 

Tar paper is water resistant and will keep moisture that does make it through the ceiling (not much, if any) inside the room. The moisture will evaporate back into the room and dry with the rest of the air, especially if you're using planks instead of a tongue and groove material.


Wood on an accent wall — in this case, beveled siding — softens and adds texture. Moisture is always a concern in a wet area, and the usual go-to bathroom coating is semigloss paint. 

When it comes to wood, I like the texture to be the star, so I prime the base coat with oil (it's smelly, so do it outside) and make sure the end grains and backs get coated to thoroughly seal the wood. 

Installing wood is often easy, fast and cleaner than sanding drywall.


When you're remodeling a bathroom, there are many materials you can use for the walls that'll help battle ever-present moisture. Water-resistant drywall (often called green board) and cement board are popular, but they're not necessary or any more durable than natural softwood planks like eastern white pine. 

Bare wood will stain, but coating it with a water-based urethane will help keep all that natural wood grain vibrant. And having different-colored wood cabinets and storage is a nice touch, with clean, horizontal lines drywall can't touch. 

I recommend tongue and groove stock, as opposed to planks, to create a continuous barrier to minimize moisture migration into the walls. 

Think creatively. Wood is used on decks and docks, where it is constantly shifting between wet and dry (and getting snowed on). So why not use it the shower floor or another bathroom area?

This pallet floor is custom detailed for this shower assembly. An easily customizable pallet built from any number of widely available lumber species — pine, cedar, Douglas fir — could be designed for a standard shower with a poured and sealed shower pan in place of tile. Or it could cover tile, which is my preference, because I find it easier to clean. 

I also like the idea of creating a simpler element inspired by this design: a wooden bath mat. Wood is easy to seal and clean with basic household detergents, and it's much less slippery than glazed tile.  

Using wood in the bathroom enables a mix of materials to create depth and warmth across different materials and styles. This concrete wall might have appeared cold and heartless were it not for the soaring rafters and V-joint roof decking above. Scale this feature down to convey the same effect in a smaller space. 

I've installed wood flooring in bathrooms. Not only does it deliver a sweet style, but it's durable, in large part because urethane finishes are fantastic. I always put 15-pound tar paper down to protect the floor from any water that does get through.


Other reasons to use wood floors in the bathroom, besides looks, are ease and continuity. It's easier to run flooring that exists in the other rooms of the house through to the bathroom. And it creates a flow, a feeling of continuity, that I find calming.


Friday
Sep202013

6 Great Places for a Discreet Mini Office

Article By: Tiffany Carboni

Not every house has a room that can be set aside for work alone, but the beauty of the home office is that it can be integrated into almost any room. The trick is making the dual purposes play nicely with each other without (come on, it just has to be said) their dueling. Here are some tips to make the best of one room with two motives. 

1. Spare bedroom. A spare bedroom and office combo is one of the most common setups. It makes a lot of sense. Unless you're constantly playing host to out-of-towners, an uninhabited bedroom can be a great workspace. 

Built-in cabinetry will make the most of your room. Keep a few drawers empty for guests; dedicate the rest to files and supplies. Desks with pullout features provide more space when needed and keep delicate equipment safe when visitors wielding oversize luggage come over.
 

To squeeze every inch out of your bedroom office, use a sleeper sofa. Here a built-in bookcase frames an elegant sofa that can accommodate business meetings during the day and guests overnight. 

2. Living room. When integrating an office into the living room, make sure the space has a welcoming, sophisticated air, just as you'd expect from any other well-designed living room. That way guests won't feel like they're encroaching on your private workspace — or worse, sitting in an untidy office. 

In this room the emphasis is on warm, community-oriented features: the fireplace, bookshelves and a variety of seating options. The desk, while spacious and functional, recedes into the background and complements, not competes with, the atmosphere.
 

A desk that matches the living room's level of formality is a clever way to hide an office in plain sight.Here an antique desk is matched with an antique chair and mirror.


3. Closet. If you can afford the space, a walk-in closet can make for a highly effective work environment, thanks to its quiet nature. When the doors are shut, you could go unnoticed by the rest of your household for days.

One obstacle that could stand in the way of a closet office is a lack of adequate light, as closets generally don't have windows. Adding a light tube (if the closet is on the top level of the house) or getting creative with lighting fixtures can solve this issue.


4. Family room. An office in the family room has pluses and minuses. On the one hand, working near the kids offers family integration. Parents get to hang out with their children; the kids don't get resentful that Mom or Dad is always too busy for them.

On the other hand, noisy distractions and important deadlines don't mix well. If you can work out a schedule that suits everybody's needs, the office–family room combo can be a huge success — especially in a room like this, where built-in benches hide toys and provide a cozy environment both during the workday and after hours.
 

5. Kitchen. Every family kitchen should be equipped with a mini office. At least it might feel that way to a parent getting bombarded with requests for signed permission slips and help with homework in the middle of fixing dinner. Itcan be as simple as a drawer organizing system that holds everything from a stash of writing utensils and paper clips to the checkbook for those "I forgot I'm supposed to bring money" moments.


If you can afford more space, a sweet setup like this one keeps household affairs in check and gets closed off behind cabinet doors when not in use.


6. Dining room. No, this isn't about using the dining table as a desk, though honestly its size isunbeatable for large projects. Here a desk is built into a hutch, and a low-profile stool gets tucks out of the way under the counter. When the owners host a dinner party, they can even move the stool and computer and use the desktop as a serving area.


If a built-in hutch isn't a possibility, an antique secretary desk is a great alternative. Its streamlined silhouette and fold-away tabletop allow it to be disguised as furniture appropriate to a room's primary function.