twitter Facebook Google+

                 linkedin pinterest houzz  

Click for the BBB Business Review of this Countertops in Denver CO 

Google Review 

Sales & Promotions!

Architects, interior designers, and more ∨

Hire a decorator to find that just-right couch and coffee tables for your living room.
Find wall shelves, a customizable closet organizer and stylish furniture for home to whip your closet into shape.
Remodeling and Home Design

Qualify Us Now! ProView 

Cambria logoUp to $45,000 interest free for your project!Finance by Cambria

 convenient and easy.

  • No Money Down
  • Interest-free financing for up to one year without payments
  • Financing up to $45K for any project that includes Cambria (including cabinets, flooring, sinks, plumbing, install & more)
  • Secure paperless telephone application
  • Credit decision in less than 10 minutes


Entries from January 1, 2014 - January 31, 2014

Wednesday
Jan292014

11 Ways to Update Your Kitchen Without a Sledgehammer

OK, so you have a perfectly good kitchen. The layout works; the cabinetry is solid; but it just needs a little uplift. There are plenty of relatively minor changes you can make that don’t involve restructuring your life and house. Here are a few.

1. Repaint your cabinets. A fresh coat of paint can transform a kitchen from dark and dingy to light and airy. If you are a few years away from that big kitchen reno, this is a great time to have some fun with color.


2. Upgrade your countertop. Upgrading a dated countertop will give new life to your entire kitchen and add value.  

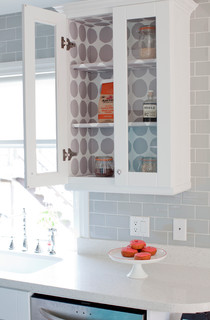
3. Install a new backsplash. If your cabinetry and countertop work nicely but your room lacks pizzazz, a new backsplash can add lots of personality and really dress up a kitchen. A bit of texture, sparkle or gloss will give simple cabinetry a lot of presence. 

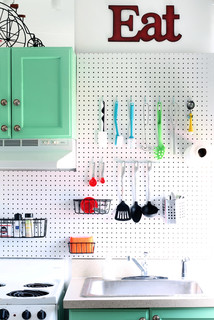
4. Make a statement. New jewelry always picks up my mood. It can do wonders for your kitchen too. New hardware can dress up plain cabinets, while standout lighting fixtures can add a surprising wow factor.  

5. Change your faucet. A detachable hose with a hand spray comes in handy for so much more than just giving a bath to the cat. I prefer a faucet with a flexible braided water-supply hose. It looks better than a plain black rubber hose and will last longer.


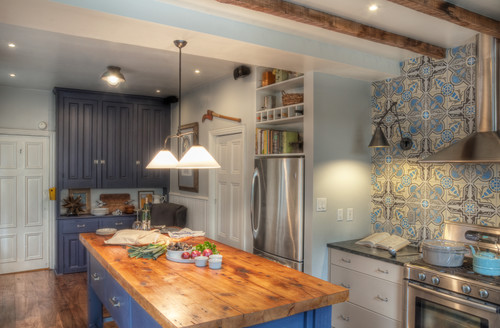
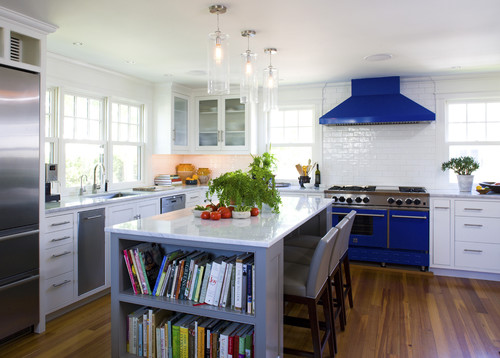
6. Expand your horizons. Need more surface area? Don’t think you need to start from scratch. If you have an island, you can introduce a different material on an added eating counter either below or above the counter.

The standard counter height is 36 inches. A nice option, like you see here, is to add an extension at table height (30 inches is typical). The great thing about adding a table-height extension is that regular kitchen and dining chairs will pull up to the counter comfortably. If you prefer a higher surface, you could go with bar height (40 to 42 inches). 


7. Consider refacing. New cabinet fronts and doors can dress up the cabinetry boxes if the layout already works and they are solid. 

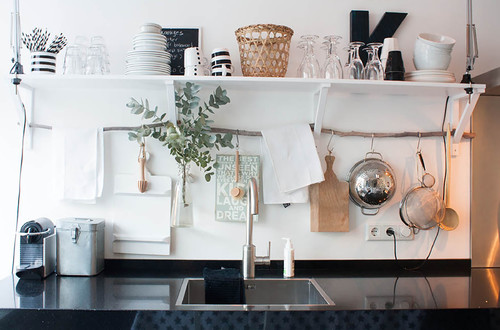
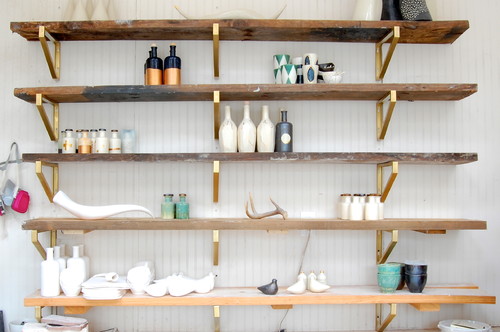
8. Rethink the uppers. Open shelving offers an opportunity to display collections or just keep frequently used items accessible. Wine comes to mind, but that’s just me. 

9. Add some cozy touches. A runner is a great addition to a galley kitchen. I don’t know why we are disciplined to treat our kitchen like it has a different set of rules when it comes to decor. I’m all for adding a table lamp for an unexpected element in a kitchen. 

10. Add a floating island. If a new bank of cabinetry is beyond the budget, try a ready-made freestanding piece to add extra storage and a surface for working and eating surface.

Add a new top to a freestanding piece of furniture and extend the edge for an eating counter. The minimum overhang would be 10 to 12 inches, but there are a few considerations when extending the top. Take care not to shift the balance of weight so much that the piece is unstable (people love to rest their elbows, adding weight to the surface). Also you may need to add brackets to support the overhang.


11. Add a showstopper. A simple kitchen with simple cabinetry is downplayed by a showpiece range. Playing up one feature is a great way to detract from less interesting elements.

Monday
Jan272014

Get the Look of a Built-in Fridge for Less

Counter-depth refrigerators are popular appliances for new kitchens. Their appeal is that they save precious aisle space by sitting flush with the cabinets rather than sticking out. This makes the kitchen look smooth, custom and visually organized. These models can also be finished with matching cabinet doors for an even more cohesive look. 

The downside is that they are very expensive. They can cost two to three times more than a regular freestanding refrigerator, and must be wider to incorporate the same cubic-foot storage. If you want this look without the extra expense, design your kitchen and cabinets so that your regular-size refrigerator sits flush with your cabinets. 

Freestanding refrigerators come in many sizes and configurations. While typical base and tall cabinets are 24 inches deep, freestanding refrigerators can be 30 inches deep or deeper, with varying widths too. Therefore, you should select your refrigerator early in the planning process. 

To get that flush look, you can either recess a freestanding unit several inches into a wall or have your cabinets furred out several inches to meet the refrigerator.

In this kitchen, if you look carefully, you’ll see that the 24-inch-deep base cabinets that extend to the left are recessed behind the oven cabinets. The appliance portion of this wall, therefore, has been furred out. Note that the side cabinet panel on the right has been ordered in a larger size to accommodate the depth of the refrigerator, which is greater than 24 inches.


In this case the refrigerator door sticks out beyond the base cabinets. But because there are deep side panels and a deep cabinet overhead, the refrigerator looks incorporated into the cabinetry and built in. A deep cabinet above the refrigerator is a good place for tray storage or even a TV, as shown here.


Here is another kitchen where deeper cabinets accommodate the greater depth of a freestanding unit. This refrigerator is a bottom-freezer model.


Here the homeowners built a wider set of deep cabinets, which include some open shelves for display.


Another way to “build in” your freestanding refrigerator is to actually build it into the wall, rather than cabinets. If your kitchen plan will allow it, this is probably the easiest and most cost-effective way to get the look, because you can make the opening the exact width and depth you require. You also won’t have any cabinet modification costs. 

This is particularly nicely done. The very linear refrigerator fits neatly into the opening and is trimmed out with house molding. The display shelf above draws the eye up. With a wine refrigerator next to the main refrigerator in a small peninsula cabinet, this is a good area for dispensing drinks.


This kitchen utilizes a very effective way to incorporate a deep refrigerator: The cabinets are stepped, for a very custom look. From the corner to the left of the refrigerator, the cabinets are typical sizes: 12 inches deep on top; 24 inches deep on the bottom. Next comes the upper cabinets and the appliance garage unit, probably 15 to 18 inches deep. The deepest cabinet is around the refrigerator, with display cabinets above. 

On the end is a tall open cabinet that creates an interesting visual display as one enters the kitchen. Note that this cabinet is actually pulled back a few inches from the refrigerator depth, so it continues the stepped look and also makes that corner a little less intrusive.
 

Cabinets and a refrigerator sandwiched within stud walls create a clean and contemporary look here. The cabinets were probably furred out within the walls. 

This refrigerator is the centerpiece of an open display area. This would be a very cost-effective way to house a refrigerator and small appliances while using a short wall. (This treatment even accommodates a radiator.)

Wednesday
Jan222014

9 Big Space-Saving Ideas for Tiny Bathrooms

Article by:

Really small bathrooms can be incredibly challenging to design. When there is hardly room for a toilet and sink, let alone a shower (a tub being totally out of the question), the usual fixtures and room layout simply will not do. These nine ideas go beyond simply making your bathroom look bigger and actually free up more space. 

1. European-style wet bath. A wet bath is exactly what it sounds like: a bathroom where everything can (and does) get wet. This style of bath is quite common in Europe, where you will often see a tiny bathroom with the showerhead directly over the toilet, a small sink on the side and a drain in the middle of the floor. By forgoing a shower surround, you can really maximize square footage in a small space.


Wet bath a little too wet for you? Add a shower curtain on a ceiling track. If you plan the layout so the shower nozzle doesn’t spray directly across the toilet, you’ll have the option of dividing the space with a shower curtain.


2. Wall-mounted toilet. This wet bath has another feature widely used in Europe — a petite wall-mounted toilet. This style of toilet might look a little flimsy, but it’s actually quite strong when properly installed. Not having the center pedestal and upper tank to contend with makes this a major space saver.


3. Compact shower stall. A mini shower stall with a partial wall is another good option, somewhere between a traditional shower and a wet bath. The openness makes the room feel larger, but the partial wall offers some sense of division.

4. Flat mirror plus narrow sink. A regular mirror instead of a medicine cabinet has two benefits: its slim profile visually expands the space, and it allows for a narrower sink profile than a fat medicine cabinet sticking out above.


5. Teardrop-shaped sink. Curves feel more welcoming than sharp angles in a tight space, and this unique teardrop-shaped sink is both a space saver and a focal point. The curved shower wall in this wet bath echoes the lines of the sink, creating a smooth and seamless look.


6. Water fountain–style sink. With a smaller scale than most sinks out there, a single-basin, single-handle, gooseneck faucet sink can fit into even the tightest spots. And it looks pretty swell doing it.


7. Sliding door. The designers of this space-conscious houseboat chose a sliding door to save room. The swing of a traditional door can eat up a lot of floor space; go with a pocket door or sliding barn door instead and save that precious square footage for other things.


8. Shower in a barrel. Rustic, charming and certainly not for everyone, this may be the most creative reuse of a wine barrel we’ve ever seen. The homeowners must wipe out the interior of the barrel after each shower to keep the unsealed wood in good shape, but it’s worth the effort for its scale and unique good looks.


9. Custom-fit shelves. Hard to find storage space? Look closely and you may find a few nooks to tuck shelves into. Even 6-inch-wide shelves can be enough storage for toiletries, washcloths and extra soap. Don’t forget to look up, too — a high shelf or two can be a lifesaver if you need a place for extra towels.

Monday
Jan202014

How to Make Your Garage a Storage Powerhouse

Article by:

Garages often turn into repositories for everything from sports equipment to holiday decorations. But with planning you can turn your garage into a harmonious space with room to actually — wait for it — park the car. 

Why: “The garage is definitely the most underutilized space in the house,” says Amanda Le Blanc, a professional organizer (she owns The Amandas in Birmingham, Alabama) and spokesperson for Organized Living. “I prefer the garage to the attic for storage, because a garage actually has less temperature fluctuation.” 

How: Ginny Scott, chief design officer at California Closets, says to start by determining what you need to store. “You need to think of your goal first. Do you want to store overflow from the pantry? Do you want to make a Costco closet? Do you need a workspace like a potting or tool bench? Maybe you need a place to stash sports equipment. Once you have determined what you want to do, that will inform the kinds of shelving, cabinets or lockers you need,” she says. 

Le Blanc says knowing yourself will help you figure out what kind of storage you need. “It’s all about how you function in a space,” she says. “An organization system won’t change the type of person you are.” 

She says that although a garage lined with storage lockers and cabinets has a clean look — an important factor for garages that open at the front of the house and are visible to the neighbors — if you are of the “out of sight, out of mind” school, closed storage is not for you. “If you are that type of person, then go for open shelves and labeled bins,” she says.
 

Le Blanc says for kids’ items and sports equipment, open shelving is almost always the answer. “I tell parents to forget about lids with kids,” she says. “If there’s a barrier, it seems to keep them from putting things away.”

Whether you are installing shelves that are open or in cabinets, Scott suggests choosing adjustable units for the garage. “It’s more important here than elsewhere,” she says. “We may not change the way we use our pantry much, but what we use in the garage varies from year to year and season to season.”


Scott adds that it’s also important to choose storage units that are made from durable materials; items stored in the garage are often heavy, so you want shelves that won’t buckle or bend. She also says in the tighter confines of the garage, you are more likely to bump, brush or spill things on your storage system, so an easy-clean material such as a high-grade laminate is often best. 

Cost: It depends on material selection. “The good news is that garage storage is often less expensive than regular closets, because we usually use simple materials and hardware, and we usually don’t use glass inserts,” says Scott.

She says an 8-foot run of open shelving in a garage could cost $1,000 to $2,000 (rough estimate). A row of storage lockers of the same length might cost $2,000 to $3,000. 

Project length: From consultation to installation, this kind of project could take three to five weeks, Scott says.

Permit: “Unless we are doing something structural or adding electricity, no permit is generally needed,” says Scott.

Wednesday
Jan152014

10 Creative Ways to Give Your Kitchen a Boost

Article by:

After the flurry of holiday decorating and baking is over, the kitchen can seem a bit forlorn — but if one of your New Year’s resolutions was to eat healthier or cook more meals from scratch, it’s important that your kitchen supports and inspires you. These 10 doable project ideas are meant to revive your kitchen and make it an inspiring space that you can’t wait to spend time in. 

1. Use a found branch for hanging storage. If you have open shelving in your kitchen that rests on brackets, as shown here, extend their usefulness by sliding a thoroughly cleaned branch through the base of the brackets. Use simple S-hooks to hang small pots, spoons and other implements from the branch. You can even hang a small vase or a mason jar filled with flowers — just wrap the mouth with twine or wire to form a loop, and hang it from an S-hook. 

2. Try a pegboard in the kitchen, à la Julia Child.Julia was onto something when she designed the now-famous pegboard pot rack on the wall of her Cambridge, Massachusetts, kitchen. You can do the same by hanging basic pegboard on your kitchen wall and using S-hooks to hang cooking tools. Paint the pegboard to match your walls for a seamless look.


3. Paper the interior of a glass cupboard. This is the perfect place to use up any wallpaper scraps you may have lying around. If you don’t have wallpaper, pretty shelf paper or even quality gift wrap can be used instead.


4. Glam up your shelving. Another easy way to spice up basic wall shelves is by coating the brackets with gold paint. Or, for a similar effect with less fuss, pick up a roll of copper tape at the hardware store and carefully apply it just to the edge of your shelves — this works best if your shelves are the same thickness as the tape, so measure first. 

5. Bring in fresh blooms. You probably buy fresh flowers for other rooms in your home from time to time; why not snip a few for the kitchen? A vase with slots for individual blooms, like the one shown here, is ideal because it is so easy to fill.


6. Add a splash of unexpected color. Transform a plain step stool with a lick of vibrant color, paint the interior of your pantry, or line your drawers with polka dot paper. A bit of color or pattern where it’s least expected is especially welcome when it’s gray outdoors.


7. Give a plain basket a neon makeover. French market baskets are some of the most useful little accessories to keep around the house. Spruce one up with a simple painted-on star or heart in a neon hue and use it as a mini hamper for dirty dish towels and cloth napkins. For an even easier (and temporary) take, simply cut and stick on neon-colored tape.


8. Borrow baskets from the living room for produce storage and display. Have some lovely woven baskets just hanging around with nothing in them? Put them to work storing long-lasting produce like potatoes and onions, or colorful piles of lemons and limes.

9. Hang food magazines on a painted ladder. If you refer to your favorite food mags for recipes and menu ideas, keep them handy. A short ladder leaning against the wall is a perfect spot for stashing a rotating selection of your favorite foodie magazines — and in a pinch, even smaller cookbooks could get slung here, too.


10. Paint your breakfast-table chairs in a rainbow of pastels. Love pastels? I say, go for it. After all, why shouldn’t your breakfast nook be the cheeriest spot in the house? And if you don’t feel up to painting the entire chairs, even giving just the legs or seats a dip in pastel hues would make a big impact.