twitter Facebook Google+

                 linkedin pinterest houzz  

Click for the BBB Business Review of this Countertops in Denver CO 

Google Review 

Sales & Promotions!

Architects, interior designers, and more ∨

Hire a decorator to find that just-right couch and coffee tables for your living room.
Find wall shelves, a customizable closet organizer and stylish furniture for home to whip your closet into shape.
Remodeling and Home Design

Qualify Us Now! ProView 

Cambria logoUp to $45,000 interest free for your project!Finance by Cambria

 convenient and easy.

  • No Money Down
  • Interest-free financing for up to one year without payments
  • Financing up to $45K for any project that includes Cambria (including cabinets, flooring, sinks, plumbing, install & more)
  • Secure paperless telephone application
  • Credit decision in less than 10 minutes


Entries in Garden (9)

Friday
Jul122013

How to Pick the Right Floor for Your Garden Room

Article By: Billy Goodnick

Every room needs a floor, and outdoor garden rooms are no exception. Paths, decks, patios, overlooks, trash can storage pads, lawns, ground cover plantings ... they’re all floors. If you can walk on it, store something on it or roll around on it, I call it a floor. 

The simplest, least expensive floor material is the dirt that comes with a property. Unfortunately, the problem with an all-dirt garden floor is, well, it’s dirty, even downright muddy when wet. It does have one redeeming trait: It's dirt cheap. But it's highly likely that you'll have to choose something other than dirt for most of your garden. How to decide, given all the options? As with any design decision I make, I look for practicality, beauty and sustainability.
 

As the saying goes, form follows function. So first consider how the surface will be used and what's the most appropriate material to support that use. 


Loose materials for more casual spaces. I consider loose materials like crushed rock, graveland shale (also bark mulch) when I want an informal garden pathway or lounging area. They usually cost less and require less labor than other materials, and you don't have to be a master builder to make them look good. But because these materials can be movable after placement, you'll need to do some maintenance to keep them from wandering off.

Hard materials for more formal areas. On the other hand, hard materials such asflagstone, brick, tile, concrete and lumber lend themselves to more "civilized" applications like patios, decks and entryways. These generally withstand a lot of traffic and can easily be cleaned with a broom, a washing down (preferably not in water-scarce climates) or an electric blower, if that's your tool of choice.

Visual appeal. But we seek more than just utility. The first thing we notice in a garden is its visual appeal and sense of style — not how easily ketchup stains can be vanquished. Take cues from the materials and finishes of your house as well as influences from the natural environment.

Environmental impact. Think about where the materials originated, whether they come from recycled sources and whether they are permeable. If you don't know, ask.

Cost. For most of us, cost is the elephant in the room. The best advice I can offer here is to notbe penny wise and pound foolish. I've found time and again that a bit more expense (sometimes a lot) on the front end assures that you've selected the best floor for the job, the one least likely to come back and bite you later.
 

7 Materials for Outdoor Floors — and How to Use Them


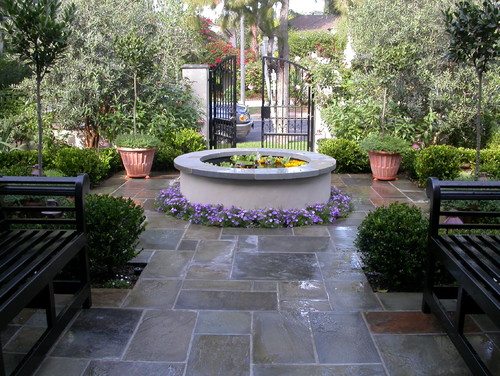
Stone. Stone is enduring and elemental, taking many forms. Where a naturalistic style is most appropriate, irregular slabs of flagstone edged with dainty ground covers look right at home. In formal dining terraces, geometric shapes solidly mortared to a slab are a practical solution, assuring that the stones stay in place and provide a level surface. 

When it comes to selecting the right stone for your project, consider not only the color, but also its surface texture. Too smooth and it might present a slip hazard; too irregular and you'll have a hard time leveling a table (or walking in 6-inch stiletto heels — not a problem for me).

Stability and safety are paramount concerns, so be sure to set the stepping stones on a well-compacted base with some of their mass underground to keep them from tilting and moving around. Check that pathway stones are large enough and ergonomically spaced so you can land on them without having to delicately dance from one to the next.

The color of the stone should harmonize with the exterior of your home, other garden hardscaping and natural elements. You'll find a wide range, from nearly black to gray to white, and browns including rusty oxide-infused shades.

Brick. Brick is another durable flooring material that can express the aura of a classic garden. If the visible foundation of your house is brick, use the same brick as a walkway border to bind the house and the garden into a coherent composition. Or you can unleash your artsy, bohemian style by creating random patterns and infusing the design with random sprinklings of other materials, like stone or decorative tiles.

If you're the one responsible for rolling the trash cans from the side yard to the curb every Thursday evening, you'll be happy you passed on a pea gravel path and went with a continuous ribbon of mortared brick.

The color palette for brick requires additional design decisions; colors include a range of nearly black through gray, brown, red and some yellowish tints. Although individual bricks are rectangular, there are endless patterns to experiment with, including traditional running bond, herringbone, basket weave, radial spokes, gentle curves and whimsical layouts that look like someone pounded down one too many beers at lunch.


In formal situations brick is laid on a compacted bed of masonry sand or mortared onto a solid slab of concrete. This approach ensures that the brick will not subside or shift, a critical detail under tables and chairs. For paths the standard approach is to set the outer edges of brick in a solid concrete base, pave the inner surface with brick set on well-compacted mason’s sand and then brush more sand into the joints to lock them into place.

For shady, moist areas where moss can cause slip-and-fall accidents, be vigilant about choosing materials, like brick, that can withstand a strong blast from a hose or deep scrubbing with a coarse broom.

Caution: Where the ground freezes, loosely set brick can heave, making the path uneven and possibly dangerous. And steer clear of mature trees with surface roots.


Tile. Tile, like brick, offers a broad palette of styles, ranging from crisp, contemporary forms to old-world Mediterranean. Because tile is thin and unable to bear much weight on its own, it is always mortared to a solid foundation. Be careful to avoid slick surfaces, since they can become dangerously slippery when wet.


Concrete. Square foot for square foot, concrete is a smart long-term investment. It starts off in a semiliquid state, meaning it can assume any shape. If plain old sidewalk gray isn’t your style, concrete can be textured and colored to look like stone, seeded with pebbles, pocked with rock salt or stained with intense pigments to create bold designs. One problem with traditional concrete, though, is it's impermeable; it sheds water rather than allowing it to percolate into the soil where it can do some good.

Decking. A contractor friend of mine calls wood decks “dry rot in slow motion.” He’s pretty spot-on. Traditional wood decks, regardless of how much waterproofing sealant you apply each year, will eventually succumb to nature’s forces (or termites). 

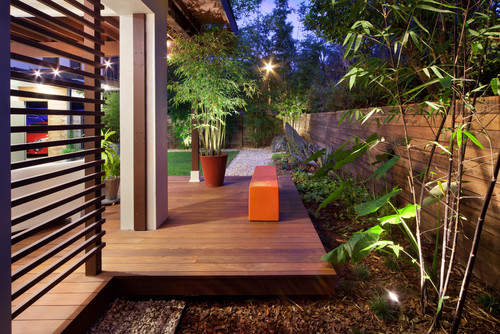
But if you’ve got a sloping property, need a level surface for outdoor entertaining and want to avoid the expense and disruption of building retaining walls, decking is the way to go. Since you’re not likely to add on to the deck once it’s built, now is the time to decide how it will be used and make space for all the furnishings you want.
 

To avoid the effects of weathering and decay, consider building with manufactured plastic lumber made from recycled bottles, plastic bags and wood scraps. It comes in standard lumber sizes, connects with screws and doesn’t rot, making it ideal for rooftop getaways. 


Loose materials.Although they might seem like a low-budget cop-out,loose materials like gravel, crushed rock, compacted shale and decomposed granite can be an inexpensive yet elegant choice, especially whenedged by a richer material, like stone or brick. Advantages include permeability, low cost and ease of installation.

However, these materials are more likely to be displaced, especially if water passes over them. And gritty, sandy materials are the last things you want to track onto your hardwood entryway. One of my favorite design treatments for upgrading crushed rock paths uses enriched thresholds and intersections of stone.


Plants. In addition to inert materials, there’s all the living stuff. Once again, your choice should be guided by the intended use: Active recreation, for example, calls for the evenly mowed surface of a tended lawn.

Another consideration is how "at home" a lawn is in your climate. Where rainfall is dependable and plentiful, you needn't be too concerned about using potable water for irrigation. And there are lots of organic approaches to lawn care, so you can avoid the old-school arsenal of chemical sprays and treatments that can be detrimental to beneficial insects, wildlife and groundwater. But in arid climates, more and more people are going lawnless to help conserve water as well as lower their dependence on fossil fuels for mowing and edging.


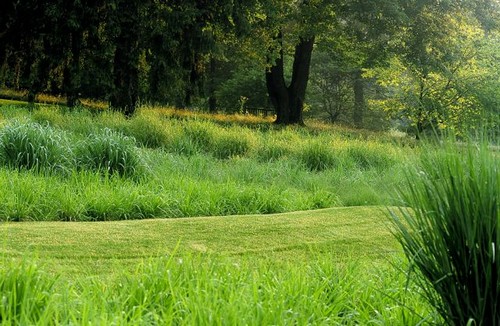
Meadows, with their tussled, just-got-out-of-bed appearance, are ideal for creating a rustic feeling — and can attract a diversity of beneficial insects and other cool things for kids to discover. You can walk through them or mow romantic, sinuous paths to explore. If you don’t need to wander through the space, any combination of ankle-high perennials and ground covers can provide color and an open expanse that will carry the eye across the garden.

Friday
May102013

Greenhouses | A History

Outdoor living spaces are the top of mind as Spring continues to be sprung. The same goes for gardens, whether you're starting one, or continuing to care for one. An element that takes in all of these is the greenhouse. So, in celebration of the greenhouse, here's guest writer (for Build Direct Blog) Amy Moczynski to outline the history and function of greenhouse. 

Photo: Greenhouse via Build Direct Blog

Now that you've filed your taxes and the warmer weather is creeping its way into your neighborhood, you might be thinking of home improvements that will make your yard a top-notch outdoor destination. If you spend a lot of time out in your flowerbeds, or are looking to grow more exotic and warm climate plants for the first time, that tax refund might be better spent on a greenhouse. 

Early History of the Greenhouse

Greenhouses date back to about 30 A.D. when Roman emperor Tiberius built one of the earliest known greenhouses out of tiny translucent sheets of mica (glass had not yet been invented). The first practical greenhouse was designed by French botanist Jules Charles in 1599 and they gained popularity in the 17th century England. During this time period, greenhouses were seen more as a status symbol than something to use for practical growing purposes. Elite "orangeries" as they were called were constructed as an expansion of the home with a solid roof, glass walls and even a stove for heating. These buildings were status symbols and often used for entertaining.

America's first recorded greenhouse was built by Andrew Faneuil in 1737. Faneuiil was a wealthy Bostonian merchant who used his greenhouse primarily to grow fruit. The greenhouse gained popularity slowly, and greenhouses were built primarily for the wealthy. George Washington even had a greenhouse at Mt. Vernon so he could grow and serve pineapples to his house guests.

Greenhouses and the Industrial Revolution

By 1825, greenhouses became wildly popular and their style began evolving. Many used furnaces to heat the air and some were built primarily for the wealthy by south-facing windows, a design concept that is still used today. In the 20th and 21st centuries, aluminum, fiberglass, polyethylene and PCP building materials have made greenhouses more cost effective and practical than greenhouses of the past, making them available to more than just elite homeowners.

In addition to the different types of materials used to construct greenhouses, they come in several styles. While most greenhouses are freestanding, there are attached greenhouses that provide gardeners with easy access to water and electricity. The A-frame greenhouse is great for regions that get a lot of snow, but depending on the size of the greenhouse, there can be limited head room and ventilation.

Styles of Greenhouses

While more decorative than an A-frame greenhouse, the gothic arch greenhouse is more challenging to construct. However, this style of greenhouse is good for regions that receive a lot of precipitation throughout the year as the sloped roof prevents rain or snow from accumulating on the roof. The span roof greenhouse is probably the most widely used greenhouse style and can be considered the most practical. The layout offers room for the gardener, and most varieties are large enough to fit a wheelbarrow, making transporting supplies easier.

A difference in styles isn't the only thing that can make one greenhouse stand out from the others. Greenhouses can be made from a variety of different materials, including glass and plastics. The frame of the greenhouse can also be constructed from wood, plastic, aluminum or steel, letting homeowners mix and match the materials used to construct their greenhouse. More important than the material used to construct the frame is what a homeowner uses to cover their greenhouse.

Photo: Traditional Landscape by Pasadena Design-build HartmanBaldwin via Build Direct Blog 

Materials Used to Build Greenhouses

The material used to cover a greenhouse will dictate how much light is allowed in, as well as how much heat can escape. Glass is the traditional covering for a greenhouse, mostly due to its strength and ability to retain heat better than plastic. Clear glass allows plenty of light to enter into the greenhouse, but frosted panels can help break up the light rays to allow the light to more evenly distribute among the plants. 

An alternative to glass as a greenhouse covering is plastic, usually either film plastic or rigid plastic. Rigid plastic coverings, which can be fiberglass, acrylic, or polycarbonate, are shatterproof or shatter resistant depending on the type of material chosen. They also retain heat well and allow light to pass through the materials. One advantage over glass is during the warmer months, a rigid plastic greenhouse requires less cooling than a glass greenhouse of the same size. 

Film glass coverings offer a tremendous advantage over glass coverings because they are only a fraction of the cost. While they only last typically three to five years, film glass coverings can heat as effectively as glass. Film plastics also offer an additive that lets condensation run down the covering material as opposed to dripping on the plants in the greenhouse, which can help prevent plants from being exposed to contaminated water.

Connected to a Proud Tradition

So when considering new additions for your backyard, think about investing in a greenhouse to connect your home to a long line of luxury and opulence. In addition to creating a shared connection with wealthy and noble figures in history, greenhouses also provide the opportunity to create a great exotic growing environment. They can allow you to grow varieties of plants that aren't native to your hometown and provide a year-round growing environment. Plus, they can add a look of opulence to your traditional backyard. 


(You are reading an article originally posted on Build Direct Blog)

Thursday
May092013

Garden Design for Small Spaces

By now, most people in the northern hemisphere are digging in their yards to make their environments beautiful for summer. Garden design is challenging whether you have an acre or a few hundred square feet, but smaller spaces seem to be especially so. It's easy to get intimidated and overwhelmed with choices when you're a new gardener.

The very first thing to think about is what you want your garden to do. Is it an outdoor living area for entertaining or relaxing? Do you want an outdoor kitchen? Will the yard produce food or do you just want ornamentals? How much maintenance can you put in each week? Do you need privacy? Once you have a purpose, you can begin to fill in the blanks with details.

Photo: via Build Direct Blog

Tailor Your Garden to Your Outdoor Living Space

Here in New Mexico, walled courtyards are popular, leading right out from the home's living area. Roomy ones hold full kitchens, fireplaces, built-in seating, fountains and hot tubs, while less spacious areas have a small table with café chairs. I have seen everything in between, too!

Frequently, the perimeter of a larger courtyard is planted with native and drought tolerant species. Low plantings keep the space open to reflect the expansiveness of the high desert and to keep our 13,000 foot mountains in view. Container plantings of ornamentals are used as accents and focal points, and there may be a small tree on each end as a frame. Flooring is flagstone, or sometimes a small grassy area has been planted. A dining table with chairs or a full set of patio furniture allows for various entertaining scenarios. That's very basic in an area where everyone has an acre of land. The courtyard might be 600 square feet, and it becomes an extra room in three seasons. 

Photo: via Build Direct Blog

In town, the courtyards are very small and need privacy fencing. An entry gate is installed in a traditional eight-foot high latilla fence. Lush vines are grown over it to extend its height, create a garden and offer more privacy. Flooring is concrete, flagstone or small pavers, and gardening is done in containers if there is no more space to dig into the ground. Maybe there is a bench or a small chair and side table. The courtyard becomes more of an entryway than a main living space, but everyone here tries to take advantage of our wonderful climate in even the smallest way!

Vegetable Gardens and Flower Gardens - The Perfect Borders 

If you want to grow food, you don't need much space. Vegetables and herbs can be mixed in with a flower border - lettuces and greens in front, and climbers going up a trellis in the back. Or remove the flower border completely, and just plant vegetables, herbs and fruit!

Many varieties have now been cultivated to grow in pots, since the food growing movement has spread to the cities. Don't be afraid to try your hand at growing food, no matter how small your space. Everyone can have a container with food in it, even if it's a recycled 5-gallon bucket. A few large pots won't take up much of a footprint, and with upright supports they will hold tomatoes, beans, cucumbers and squash. Smaller containers are good for shallow rooted plants like lettuce, kale, chard, spinach and herbs.

Native Plants Means Low-Maintenance

If you need a low maintenance garden, native plants are the best choice. They only need the watering that nature provides, and they are already use to the soil in your yard. They need no soil amendments, and they are acclimated to the local climate, so they don't need to be fussed over.

Also consider slow-growing plants, and install a drip irrigation system with a timer for automatic watering. Several inches of decorative mulch will keep down weeds and keep in moisture to further reduce your workload. Even a few well-placed flowering trees and shrubs can add enough greenery without a lot of work.

Piece by Piece

Envision your garden and yard space after considering your personal needs. Put it together piece by piece, or if it's small enough, spend a weekend digging and planting. Any small space can be beautified with a little planning and a few good plants.


(You are reading an article originally posted on Build Direct Blog)

Tuesday
May072013

Easy Kitchen Updates for a Lazy Weekend

Have you ever had a moment of staring at your space, feeling all kinds of antsy and knowing that something has to change? It might be the wall color that you never liked anyway or that storage issue that is driving you batty. All you know is that in order to continue living in your house, you must embrace that urge to change something!

I often get the urge when I look at my kitchen. No matter how awesome it looks so far, there is always room for improvement. If you have kitchen restlessness like me, here are a few great ideas that you can implement in a weekend. They will make you feel much happier about the way your kitchen looks - for awhile anyway.

Paint Something

Photo Credit: Build Direct BlogEveryone knows that a fresh coat of paint can make a room look like new. But did you ever think about painting not just the wall, but anything else that takes well to a paintbrush. Put chalkboard paint on the front of your refrigerator (assuming it's no longer under warranty), paint your cabinets or create a new backsplash with designs painted directly onto stick-on tiles.


Add in a New Material

Painting is one thing, but an entirely new material is another. Spruce up that boring ceiling with beadboard panels, painted a lighter shade than your walls. Into something more intricate? Try tin ceiling tiles for a much more traditional look. If you don't want to go that far, consider simple new molding in a contrasting color. 

Get Rid of the Doors

Cabinet doors are nice, but it might be even nicer to remove them. If you have a great collection of china or colorful pots and pans, getting rid of the cabinet doors can allow your creativity to shine in new ways. This can also force you to do some spring cleaning on your cabinets, and who doesn't  need a bit of that?


Light Things Up!

Photo Credit: Build Direct Blog

Sometimes the kitchen can seem dreary, especially if the summer sunlight is shining through the windows. Brighter lights, lights that highlight certain areas of the kitchen and fixtures that make a sunny statement are all good options for chasing away the shadows - and the doldrums.

Change the Hardware

It might be a small thing, but it has a big impact. Changing the hardware on your kitchen cabinets and drawers can be as easy as looking at a home improvement store, estate sale or speciality boutique. Choose something that suits your cabinet style but adds a pop of color to your space. It can be done in an afternoon with little cost, and can brighten up the space and your mood.

Get Some New Furniture

Are you tired of that little space beside the fridge? How about that old desk that has seen better days, the one that you parked beside the counter for a place to catch the mail? Plenty of kitchens have furniture, and you can spruce things up with a gorgeous piece of furniture that seems as though it wasn't meant for a kitchen. For instance, a big bookcase to hold all those cookbooks and lovely dishes can make a nice new attraction for the eyes. 

Plant Something

Finally, bring the outside in with a tiny herb garden. Colorful pots that line your windowsill can play host to such delicacies as sage, parsley, chives and rosemary. Depending upon your climate, you could even include a few dwarf trees or plants, such as a Meyer lemon.

You don't have to spend a fortune to make your kitchen look like a million bucks. All you have to do is take a weekend, invest a small bit of money and elbow grease, then step back and admire your new place to cook and entertain.


(You are reading an article orignally posted on Build Direct Blog)

Monday
Oct012012

Rocky Mountain Gardener's October Checklist

Photo: Bev's Colorado GardenOctober is the beautiful bridge month between autumn and winter. The days are noticeably shorter, bright and cool. October is a busy month in the garden, the time to prepare for the harsh cold and snow of winter while enjoying every moment you can spend outdoors.

Winterize Water Features

The freeze-and-thaw cycle of winter weather can wreak havoc on these valuable garden assets. To minimize the damage:

  1. Drain, clean and store or cover freestanding fountains and water pots.
  2. Remove plant debris from ponds and set up a bubbler (a submersible pump with a short piece of pipe attached to the outlet) to keep some of the water surface free of ice.
  3. Disconnect pumps to recirculating waterfalls, especially if the water volume is fairly low. Ice buildup can divert water and cause problems. Moving water will also make your pond colder, which may be an issue if you have fish.
Prepare for Snow

If you haven't had frost or snow yet, you will soon. Early snow tends to be heavy and wet, and can damage plant - especially those that haven't shed their leaves yet. Keep a broom handy and be ready to sweep snow away to lighten the load on tree and shrub branches.

Winterize Your Watering System

Frozen pipes or components can be costly and inconvenient to repair. To prevent this:

  1. Drain your irrigation system and insulate the backflow preventer.
  2. Remove hoses from faucets and drain them. Store hoses and sprinklers in a handy location for winter watering.
Remove Leaves From Lawn Areas

Leaves left on lawn areas will compact under the snow, smothering the lawn and contributing to disease problems like snow mold.

  • Use leaves whole or shred them with your lawnmower or a commercial shredder.
  • Add them to your compost pile now or stockpile them for future use.
  • Use leaves as mulch, 4 to 6 inches deep. Apply now to new planting areas to maintain soil warmth and permit better root growth, apply to bare soil areas to prevent erosion, or apply after the ground has frozen to prevent frost heave and premature soil warming in spring.
  • Keep leaf mulch 6 inches away from the bases of trees and shrubs to prevent damage from rodents.

It's important to remove any diseased foliage from the garden completely - don't compost it.

Amend the Soil

Planning to install a new vegetable or flower garden next spring? Now is a great time to prepare the soil. Use organic amendments to increase water-and nutrient-holding capacity and to improve aeration and water flow. Adding amendments now allows you to work in the garden while the soil is relatively dry, thus preventing the potential for soil compaction that can occur if you try to do it during the wet months of early spring. Come springtime the soil will be ready to plant:

  • Amendments must be mixed well into the soil - spade or rototill to a depth of 6 to 8 inches.
  • Composts and aged manures work best for sandy soils; sphagnum peat or wood chips are ideal for clay.
  • Incorporate 3 cubic yards of amendment per 1,000 square feet of soil. That's about 8 cubic feet of amendment for a 10-foot by 10-foot area of soil.
  • Mulch the bed with a couple of inches of leaves or shredded wood to help prevent soil erosion during the winter.
Enjoy Puttering

Pull weeds and spent annuals, plant bulbs and harvest herbs and cool-season veggie for hearty meals. Most of all, spend time with family and friends surrounds by nature's October glow!