twitter Facebook Google+

                 linkedin pinterest houzz  

Click for the BBB Business Review of this Countertops in Denver CO 

Google Review 

Sales & Promotions!

Architects, interior designers, and more ∨

Hire a decorator to find that just-right couch and coffee tables for your living room.
Find wall shelves, a customizable closet organizer and stylish furniture for home to whip your closet into shape.
Remodeling and Home Design

Qualify Us Now! ProView 

Cambria logoUp to $45,000 interest free for your project!Finance by Cambria

 convenient and easy.

  • No Money Down
  • Interest-free financing for up to one year without payments
  • Financing up to $45K for any project that includes Cambria (including cabinets, flooring, sinks, plumbing, install & more)
  • Secure paperless telephone application
  • Credit decision in less than 10 minutes


Entries from November 1, 2013 - November 30, 2013

Wednesday
Nov272013

15 Ways to Warm Up Your Bathroom for Winter

Article By:

Oh, that dread — you wake up in the middle of the night to take a trip to the bathroom, but you know that cold tile will chill all the toastiness right out of your feet. Or you come in from a chilly football game longing to take a luxurious soak in the tub, but the thought of shedding your layers of fleece stops you in your tracks. Soon it will be that time of year when you want your bathroom to raise your body temperature. Here are 15 suggestions that range from something you can do in minutes for a few bucks to dream-space renovation ideas. 

Add a cozy rug. A bath mat does not have to be a shaggy little rectangle. Add an Oriental rug to enjoy underfoot during fall and winter. The rich colors will warm up the look of the room as well.

Be sure to add a rug pad or rug tape that will grip the floor underneath any bathroom rug to prevent slips.


Blend beautiful natural materials. Soapstone sinksatop wood countertops add so much warmth to this bathroom. The look reminds me of the natural beauty of a rock outcropping in the woods.


Take a different approach to lighting. We tend to think there is a certain type of characterless light we need to choose for bathrooms, like those flush-mount "boob lights." This is not true; open your mind and browse the type of lighting you would usually associate with a foyer or dining room. 

If you are installing a hanging chandelier or pendant light in a bathroom, work with a licensed electrician who knows the codes inside and out. A chandelier cannot be within reach of someone standing in a bathtub full of water; the fixtures will also need to be properly grounded, and you'll need a high ceiling.


Consider heated floors. One of the most luxurious things you can do to make your bathroom toasty in chilly weather is invest in radiant-heat flooring. If you are planning any renovations, learn more about what this entails and what the payoffs are.

If you don't have room in the budget for such a large investment, talk to your electrician about installing a bathroom-safe heater you can turn on before your bath or shower. Again, I stress, working with licensed pros is a must; you don't want to scrimp on safety with electronics in the bathroom.
 

Get your towels toasty. Heated towel bars add luxury to the bath, giving you a wonderful way to wrap up when you step out of a steamy shower.  

Rev up the wall color. So many of today's most beautiful bathrooms are crisp and white, but that's certainly not a requirement. Whether working with wall coverings, paint or tile, think outside the usual bathroom color palettes if the thought of white marble leaves you cold.


Incorporate antiques. The well-worn patina of this table-turned-vanity and the eclectic miners' oil lanterns add warmth and personality to a white bathroom. There are even votive candles in the lanterns for cozy light that creates a relaxing ambience.


Invest in a bathtub that helps retain heat.Materials like copper, brass, volcanic limestone and soapstone retain heat and will help to keep that hot bathwater warm while you enjoy the entire new issue of People

Am I the only one who gets a People in the mail and thinks, "Sweet! It's People and bath time for me tonight"?Just wondering.


Install a steam shower. This is a big-ticket dream-space item, but everyone I know who has one seems to think they can no longer live without it. I did get a chance to test one out at a vacation rental once, and I can report that it was heavenly.


Consider a home sauna. Historically much more common in countries like Sweden, saunas are becoming more popular in the States. 


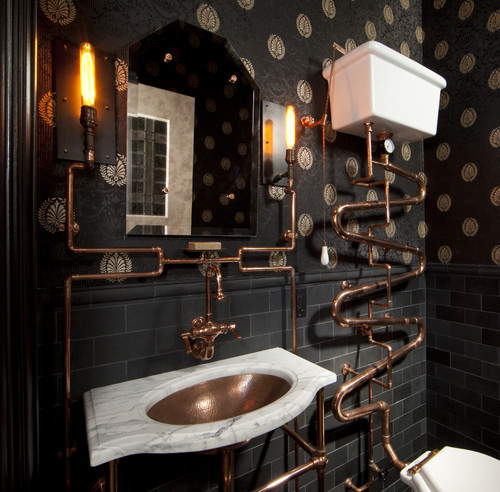
Think steampunk. Winter brings dark, moody days. Instead of fighting the moodiness, this designer celebrated it, stunning us with copper pipes and that old-fashioned high toilet tank. (Remember how awesome you thought those were at TGI Fridays in the '80s?) 

Let in the light. Windows, skylights and a clear glass shower surround make the most of natural light. If your concern is privacy, explore using transoms, acid-etched glass and clerestory windows. 

Get woodsy. In a ski house, cabin or lake house, it's part of the experience to go full-on woodsy in the bathroom. If you love the look, go ahead and do it at home, but do think about whether or not you'll tire of it, especially during the summer. 

If you want to go "woodsy light" instead, give the forest a nod instead of a bear hug. Knotty pine walls are not a requirement — you can get your woodsy on with beautiful fabrics that show trees and branches, plus a wood-framed mirror and other small accessories.


Add a sunny shower curtain. Yellow will perk up a dark winter's evening.


Likewise, patterns can cozy up the bathroom.


Add a fireplace. This is one of the most luxurious bathroom features I can imagine. The first time I ever saw one or heard of it was in a house that had belonged to a Harlem Globetrotter. (And now I'm doing their whistle ...)


Monday
Nov252013

Serveware Storage That'll Serve You Well

It’s time to get those awkward serving platters safely stored so you can enjoy a season’s worth of cocktail and dinner parties without losing your head. Seriously, precariously stacked platters are dangerous. Consider these ideas for keeping your platters secure but handy, so they’re ready when you need them at party time.  

Stacking too many heavy platters on top of one another in an overhead cabinet is a recipe for disaster. It’s great to have a variety of platters to handle whatever dish you’re serving, but that assortment means your platters probably don’t stack well. 

Keeping platters up high is actually a great space saver; the key is to fashion a deep shelf with partitions so platters can be stashed sideways. Standard upper cabinets are 12 inches deep, whereas base and floor-to-ceiling cabinets measure 24 inches, making the latter the most obvious cabinetry option for large platters.

Going vertical. The team at Dearborn Cabinetry included tray storage over this built-in microwave, making efficient use of the work area’s height. Built-in dividers placed in narrow increments keep upright platters safe, visible and reachable.


The top tier of a floor-to-ceiling pantry is ideal for partitioned platter storage. It keeps trays available when needed but out of the way of the pantry’s more frequently used areas. Keep a folding stool nearby to lessen any temptation to climb up shelves.


The comprehensive shelving system in this closet-style pantry takes the need for a stool out of the platter-finding equation. This setup includes vertical storage for muffin pans, another one of the tricky-shaped tools so often used around the holidays.


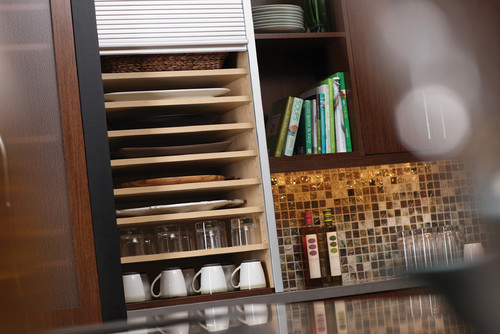
Horizontal stacks. If you still prefer to stack platters, use a deep cabinet or appliance garage and set horizontal shelves in a narrow formation, like in this setup by Dura Supreme. Take advantage of a cabinet’s predrilled borings, if it has them, by adding as many shelves as you need to maximize capacity. You can get additional shelves from the manufacturer or have new ones made to match.

Show it off. Plate racks are an ideal way of putting your favorite dishware on display. If your home is older, you just might be lucky enough to have a built-in plate rack. If not, a carpenter can recess one within a wall (as long as the recess is free of plumbing, electricity or venting) and match the rest of the kitchen’s finishes.


This rack keeps platters near the ovens and island but doesn’t get in the way of the kitchen’s everyday work zones.


These two vintage racks turn an empty wall into effective (and pretty) platter storage.


A more extensive version such as this tall rack allows ample space for plates and platters by placing them sideways. Because its location doesn’t hinge on a connection to cabinetry, it can be hung at any level that makes the most sense. 

Don’t forget base cabinets. If your platters are heavy or you use them often, keep them at hand in deep, partitioned drawers like this one from Cabinet Concepts. No stools needed to find what you’re looking for. 

A single, full-size pullout behind cabinet doors provides room for larger platters. Its location directly under a large countertop ensures an ample workstation for filling up a big serving dish.


Take advantage of shallow spaces. If storage is a difficult thing to find room for, make room in unexpected places, like shallow drawers. In this kitchen the otherwise wasted space below the base cabinets has been utilized for valuable storage.


Wednesday
Nov202013

7 Strategies for a Well-Designed Kitchen

Article by:

What's the most important room in your house? For me it's the kitchen. I love to eat, cook and spend time with family, and the kitchen is where I can do it all. With today's busy schedules, mealtimes are often the only times families have to spend with one another. So how can you have the perfect kitchen for your lifestyle, stay within your budget and maximize resale value? 

One of the most important steps in any project is starting with a great design. It's not just about looks, it's more about function and adding value to your life. More than any other room in the house, a kitchen has to be well thought out, carefully configured and designed to accommodate multiple functions. You probably spend more time in your kitchen than any other room, and that's exactly why it's so important to start with a great design. Consider these seven ways to get there. 

1. Avoid isolation. For many of today's families, the kitchen is the heart of the home and should be a place where people can gather, entertain and relax — not just cook. That's why an open plan, like in this kitchen, works so well. 

The open plan isn't your only option, but it isn't going anywhere yet. Consider your family's needs carefully before choosing a kitchen plan, and know that if resale is an option for you, most buyers these days are looking for an open kitchen. 
 

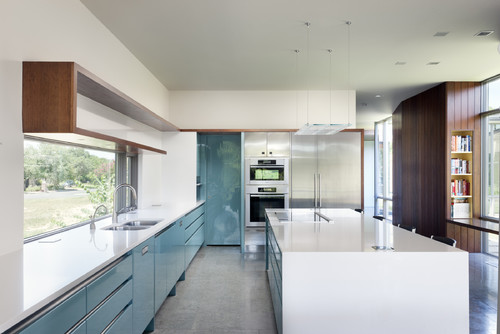
2. Plan a functional layout. If you like to cook and enjoy making meals for family and friends, there is nothing more frustrating than a kitchen that doesn’t function well. Most designs today follow the basic kitchen work triangle of the sink, refrigerator and range to maximize functionality. But take your own needs into account too. Plenty of counter space for prep, especially next to appliances, like in this kitchen, can make your cooking routine go much more smoothly. 

3. Choose a good location. If you plan to make your kitchen the heart of your home, choose a location that connects it with all the other major circulation points. Having your kitchen anchor your home's great room or provide access to the garage through a mudroom or laundry room is a great way to achieve this.


4. Include ample storage. There are so many accessories and appliances available for modern kitchens, it's easy to feel overwhelmed and forget about storage. Don't underestimate how much storage you'll need for food, flatware and all the little gadgets you're planning to stock up on. 


5. Add an island if there's room. Let's face it, people love to hang out in the kitchen — especially when there's something cooking that smells delicious. For families a kitchen island can help make the kitchen a space where everyone can gather and spend time. Space and kitchen layout will impact your island's efficiency, so it's not for everyone. But it's absolutely worth considering. 

6. Plan outdoor access. Again, this will depend on your home's layout and spatial considerations, but it's always great to place your kitchen adjacent to the outdoors. This will give you plenty of natural light (and an enviable kitchen sink window), and can also increase your entertaining space with an outdoor patio or dining area. 

7. Have fun. Above all else, your kitchen should be about you. Don't be afraid to incorporate personality into your design and material choices. Start simple, but don't be afraid to choose what you like best. No one else's opinion really matters in the long run. 

The truth is, great kitchen design is less about looks and more about how it works. Great design translates to a house that functions better, costs less to build, is more efficient to run and maintain, and gets you more for less.

A great meal doesn’t have to cost any more than a regular one. It needs to start with a great recipe, have quality ingredients and be carried out with confidence and execution in the kitchen. The same thing could be said about your next kitchen design. Make sure it’s a great one!


Monday
Nov182013

Countertop + Backsplash: Making the Perfect Match

Article By:

Which do you select first — kitchen counter or backsplash? How do you coordinate colors? Is it OK to mix patterns? The seemingly unlimited countertop and backsplash choices can feel overwhelming.

I've had homeowners approach me after weeks or months of looking at and collecting samples of materials that they love separately but just don't love together. Some settle on a combination that looks good together, but they don't actually like either material on its own. 

Here are 10 examples of stunning and successful countertop and backsplash combinations to help you plan your own mix of kitchen finishes, along with tips to ease your selection process. 

Approach 1: Select the Countertop First

If you feel overwhelmed by the countertop and backsplash options, try focusing on countertop selection first. Your countertop is the workhorse in your kitchen and can constitute a good chunk of your budget, so you'll want to get it right. Your budget and the way you use your kitchen will narrow things down. Plus, there are generally fewer color and pattern options for countertop materials, whereas backsplash options are practically unlimited. Countertops will also be installed before the backsplash, so you definitely need to decide on them first if construction has already begun.

Browse the Houzz photo database for countertop materials that appeal to you and the compare pros and cons in the Houzz guides to countertops. If you want to see something in person, check out what's available at your local stone yard, kitchen and bathroom design showrooms, and home improvement stores.

Shown: Soapstone and butcher block counter; linear glass tile mosaic backsplash
 

Once you've homed in on your countertop of choice (congratulations!), you have immediately narrowed the field of options for the backsplash. Trust me, this makes your life easier. 

Now, you don't necessarily need to exactly match the color or pattern of your countertop to that of your backsplash, especially if you go for an unusual hue or a countertop material with a lot of movement in it. In these cases a simple and neutral-hued backsplash is a good choice, so that the countertop takes center stage and does not fight with the backsplash for attention.

Shown: Orange quartz counter (get the look withOne Quartz from Daltile); Oceanside Glasstile'sTessera mosaic blend in Veil backsplash


If you want to go bold with both your countertop and backsplash, bring a sample of your chosen countertop material with you as you shop for backsplash tile. You will be able to instantly limit your backsplash options to those that work with your countertop material. If you are struggling with finding the right backsplash to work with your countertop selection, consider hiring a pro, even if it's for just a few hours, to help you nail the selections. Or enlist the help of a color- or design-savvy friend.

Shown: Green quartz counter (get the look with Silestone); mosaic glass tile backsplash
 

Approach 2: Select the Backsplash First

Of course, if you happen to find a backsplash you absolutely love before you've even looked at countertops, I say go for it. Making this selection will absolutely help you narrow down the options for the countertop. If you go for a statement-making backsplash such as the one here, find a quiet, subtler countertop material so it doesn't fight with the backsplash.

Shown: Pietra del Cardoso stone counter; Stone & Pewter Accents mosaic glass tile backsplash


I prefer that either the countertop or the backsplash be the star of the show, with the other material playing a supporting role. This stunning backsplash has lots of color and movement and, in my opinion, should not have to compete with an equally attention-grabbing countertop.

Shown: Caesarstone counter; glass mosaic Waterworks backsplash
 

That's not to say you shouldn't consider a mix of colors and patterns for both your countertop and backsplash. But if both of your materials feature multiple hues and have different patterns, aggregates or movement, stick to one overriding color palette for both materials. This will give the materials a nice cohesiveness, so they don't fight with each other.

Shown: Bianco Romano granite counter; stained glass mosaic tile backsplash
 

Approach 3: Use the Same Material for Both Counter and Backsplash

Love your countertop selection and want to keep this process simple? Consider running your countertop material up onto the wall as the backsplash. This is an especially smart option if you are required to purchase entire slabs of your chosen countertop material and you happen to have enough material left over to use the remainder as the backsplash.

Shown: Get the look with a Pietra del Cardoso stone counter and backsplash.
 

You can also use the same or similar countertop material for your backsplash but break it up by selecting a tile format for your backsplash rather than a slab. This can be a budget-friendlier option than purchasing extra slabs to create a backsplash.

Shown: Get the look with a Carrara marble counter or, for a more durable option, check out Misty Carrera from Caesarstone; Carrara marble subway tile backsplash
 

Another cost-effective approach is to run your countertop 4 to 6 inches up the wall as a short splash. It will give you a nice finished edge where the countertop meets the wall, and it will also provide protection to the part of the wall most likely to get wet or dirty. Just be sure to check your local building code requirements regarding the minimum height of noncombustible materials on the wall area above the range or cooktop.

Shown: Uba Tuba granite counter; colbalt-blue Daltile subway tile backsplash
 

Approach 4: Hire an Expert

Some homeowners just have a difficult time visualizing their finished kitchen, which is why material selection can prove so challenging. And all too often you are asked to make too many decisions in too short a time period. If you know you are prone to analysis paralysis, do yourself a favor and give yourself enough time to weigh your options, but with a firm deadline to make the decision. Engage the assistance of a friend whose taste you admire, or hire a design professional to help guide you or bless your selections.

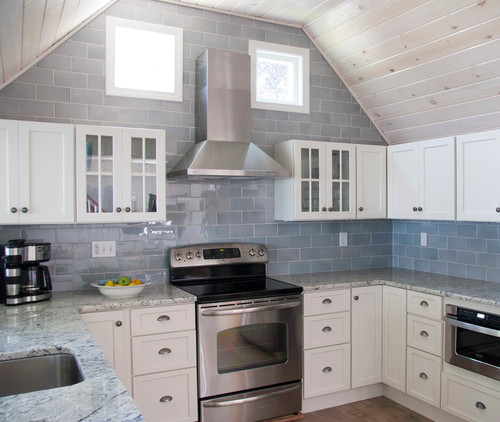
Shown: Gray and white granite counter; oversize ceramic tile backsplash


Friday
Nov152013

8 Ideas for High-Functioning Mudrooms

Mudrooms help us transition from our adventures in the great outdoors to the comforts inside our homes. But when packed with clever built-ins, space-maximizing storage and nifty organizers, a mudroom can also become a high-functioning, double-duty space that can accommodate anything from folding laundry to making crafts. 

Don't believe me? Check out these fantastic mudrooms and my space-saving mudroom organization tips to see how you can make the entry to your home attractive, functional and clutter free.

Office space. Transform your mudroom into a double-function space with a built-in desk and file storage. One wall is all you need if you plan it right. The cubbies and hooks help keep outdoor gear and clutter separated from the desk area. 

Helpful hooks. Turn an awkward or a dead space into something you'll actually use. A row of simple hooks around the perimeter and a few well-placed wire baskets have turned this once-empty nook into a valuable drop zone near the home's entry. 


Neat and clean. Not all of us like to have our jackets and coats on display. These floor-to-ceiling cabinet doors keep clutter out of sight and add an architectural statement.


Laundry time. If you have a spacious mudroom at the back of your house, take advantage of all that room. Consider including a laundry section to make life a little easier. A washer, dryer and small sink mean you can throw dirty clothes right into the wash as soon as you get home. 

Pet station. If you share your home with furry friends, your mudroom is the perfect place for a doggie stop. This pet-friendly mudroom's special space for cleaning pets means the owners will never see a muddy paw print in their house again. A sophisticated palette of durable materials makes it feel sleek, despite its practical purpose.


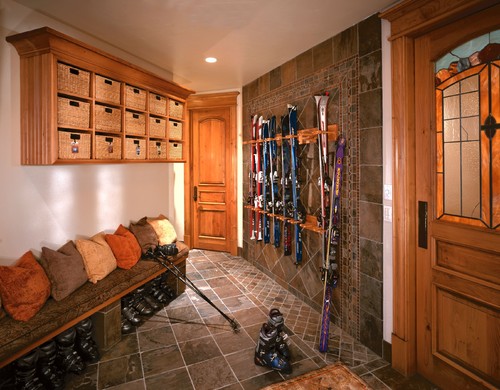
Seasonal storage. Mudrooms can be the perfect place in which to store outdoor sports gear for all four seasons, with the right organizational techniques. This ski-loving family came up with a great solution to keep their winter gear under control: Cubbies for gloves and hats up top, spots for boots below the bench and custom ski racks keep everything neat and tidy.

Personalized. Clever and colorful solutions help bring this mudroom to life. Let your little ones choose a favorite color to make their special space in your mudroom more fun. Color-coordinated baskets add a little personality to an all-white space with minimal cost and effort.


Get crafty. If you have the room, incorporate a workstation into your mudroom. Wrap a gift, help your child with a school project or prepare a package for the mail on your way out the door. Having everything in one spot will make multitasking much easier.