twitter Facebook Google+

                 linkedin pinterest houzz  

Click for the BBB Business Review of this Countertops in Denver CO 

Google Review 

Sales & Promotions!

Architects, interior designers, and more ∨

Hire a decorator to find that just-right couch and coffee tables for your living room.
Find wall shelves, a customizable closet organizer and stylish furniture for home to whip your closet into shape.
Remodeling and Home Design

Qualify Us Now! ProView 

Cambria logoUp to $45,000 interest free for your project!Finance by Cambria

 convenient and easy.

  • No Money Down
  • Interest-free financing for up to one year without payments
  • Financing up to $45K for any project that includes Cambria (including cabinets, flooring, sinks, plumbing, install & more)
  • Secure paperless telephone application
  • Credit decision in less than 10 minutes


Wednesday
Oct162013

8 Stunning and Soothing Shower Designs

Article By: Shane Inman

Modern amenities for the shower such as rain heads, body jets, steam showers and hand wands allow you to easily wash away the stress of the day. Take a look at these incredible spaces — from a stained-glass surround, to a soothing and meditative shower, to a Roman bathhouse-inspired space — to see how designers are taking advantage of today's materials and accessories. 

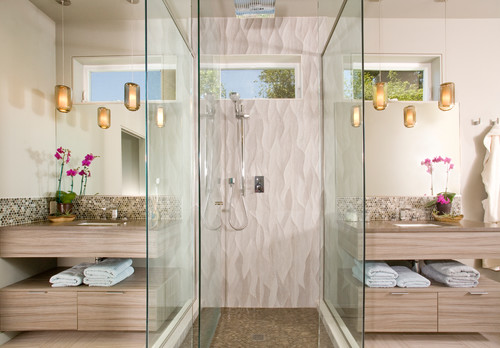
Middle ground. Divide your master vanity right down the middle with a stunning shower, like this glass enclosure made of two floor-to-ceiling panels and a door at the end. The textural shower wall creates an instant focal point, too. 

All around. Have your shower give your tub a hug. This shower enclosure encapsulates a full array of body jets and shower heads, while the round tub sits snugly in the middle of the design. I love how the unique shower shape has doors on both sides! 

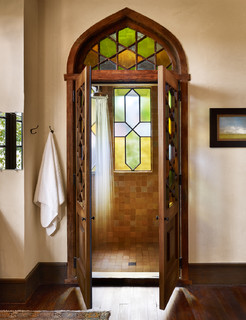
Behind closed doors. These stained-glass doors open into a heavenly shower experience enhanced by an oversized rain head. The light spilling through the colored glass could even become a form of chromotherapy, where colored light restores balance and energy.


All in one. Save time and space by positioning your bathtub inside your shower. The frameless enclosure holds both the shower and the freestanding bathtub in one stunning area. 

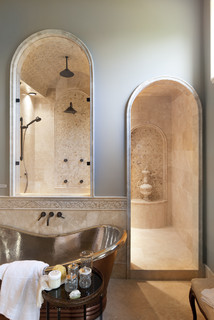
Ancient history. Repeat history and re-create a Roman bathhouse feeling with arched doorways and marble tile. A stainless-steel tub and a luxurious shower with multiple shower heads and body jets can soothe you just as much as an ancient spa, but with all the modern amenities.


Sleek and modern. This super-modern shower steps away from everything traditional. The vanity's glass backsplash defines the entire space, separating the vanity area from the adjacent shower. With mirrors on one side and towel hooks on the other, the single piece of glass manages to serve both spaces effortlessly.


Soothing and meditative. The dark and cool color palette in this shower creates a serene feeling, reflected by the colorful koi mosaic floor. I love how the wall-to-wall bench allows you to soak in the jets, rain heads and steam in utter relaxation. 

Center stage. This bold shower immediately calls out as the room's main attraction. Two vertical towers that hide the plumbing appear as columns to the eye. The seamless transition from the shower floor to the floor beyond is stunning — although it's certainly not for the shy. 


Monday
Oct142013

Bathroom Surfaces: Ceramic Tile Pros and Cons

Article By: John Whipple

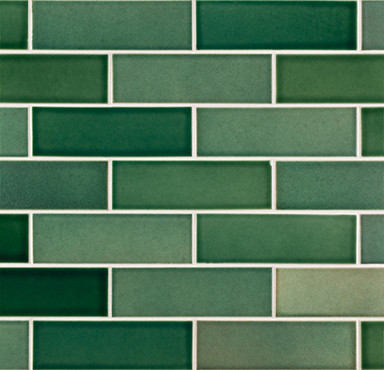
Often praised for its durability and variety, ceramic tile is a popular choice for bathroom finishes. If you're drawn to color and texture, this material can deliver on both fronts. But the sheer variety of ceramic tiles is endless, which can make finding just the right tile very difficult. 

Because ceramic tends to cost less than porcelain and is much lighter, it's often used for wall and ceiling installations. However, there are some major cons to this material, too: It's not as strong as porcelain, so it doesn't make the best walking surface. It can be very cold underfoot in the winter, and heavy tile can be difficult to install. 

Curious if ceramic tile will work in your bathroom? Here's what you should know before making the purchase. 

The basics: Ceramic tiles are wide ranging; all are generally made from red or white clay that's been fired in a kiln and glazed or finished. If you're a tile nerd like me, ceramic tile technically includes porcelain tile too, but for this ideabook we'll exclude that category. 

Cost: Ceramic tile is often priced below $2 per square foot. Higher-end tiles can easily run $20 to $40 and more per square foot. The average tends to be around $7 to $9 per square foot. 

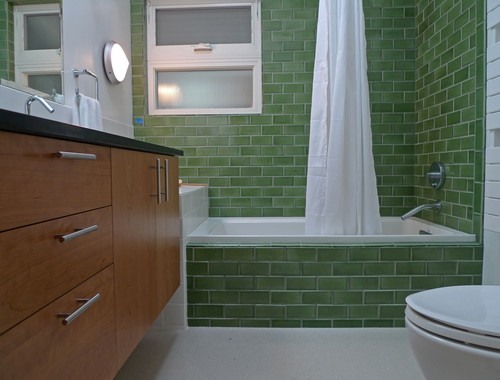
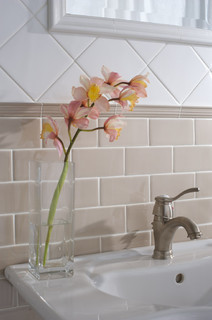
Pros: Ceramic tile can be incredibly affordable, and there's a ton of variety in styles, colors, finishes and textures. It's also easy to customize it for details like chair rails, soap dishes and special edging and nosing, as in this bathroom.


Cons: Ceramic tile is not as strong as its cousin, porcelain tile, but what it lacks in strength, it makes up for in price.


Special considerations: Since ceramic tiles often have texture, you may want to consider this to add dimension to your bathroom. The eased edge on this tile adds a little extra something to a bathroom wall, but can make it difficult to figure out how to cut end tile. Consider using a tile edge profile, like a Schluter strip, to make the transition less awkward. 

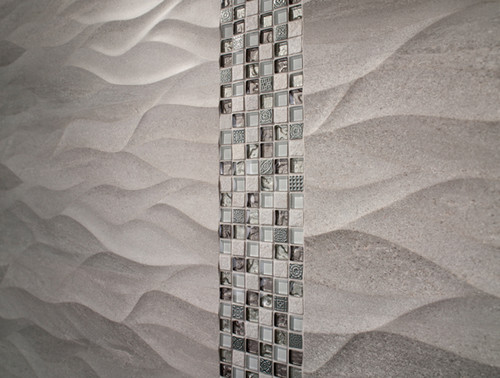
However, today's ceramic tile offers much more than an eased edge. This wavy tile from Porcelanosa is just one example of the texture and detail available today. 

This type of tile can make for a great accent in a bathroom, but I'd avoid using too much texture in a shower , since it can make for difficult cleaning. Try using it for a feature wall or feature corner instead.
 

Maintenance: Make sure you choose a ceramic tile with a durable finish. How can you tell? Buy a sample, take it home and clean it to death. 

I recommend cleaning ceramic tile with a white nylon scrub brush and a little soap. You shouldn't need much more than that. Ceramic is very durable, but it's best to stick to mild household detergents and to spot test before using anything new. 

Installation: Installing ceramic tile is pretty straightforward; it could even be a DIY project if you have some experience working with tile. Many of today's ceramic tile actually has directional arrows on the back side; make sure you keep them lined up the same way so you get the correct look. 


Friday
Oct112013

How to Replace Your Kitchen Faucet

Article By: Meg Padgett

Kitchen remodels require a multitude of skills from conception to completion, and ours was no exception. From tearing down walls to replacing floors, we've been through it all — and we're exhausted. Luckily, the very last change was the quickest and easiest to tackle.

Replacing our basic kitchen faucet with a gorgeous one-handle high-arc pull-down faucet was the finishing touch our kitchen remodel needed. The process was surprisingly easy — it's a do-it-yourself project that almost anyone can accomplish. 

All you'll need are a new faucet and a few household tools:

  • Adjustable basin wrench
  • Slip joint pliers
  • Safety glasses
  • Bucket or bowl for catching water 

Clean out the area underneath the sink so you have ample space to inspect your work area and move about freely. Next, turn off both the hot and cold water supplies via the shutoff valve under the sink. Test that the water is off at the faucet.


Using a basin wrench or slip joint pliers, unscrew the connections for each water line at the shutoff valve. Have a bowl handy to catch any residual water, and place the ends of the water lines in the bowl.


Unscrew the mounting nuts that hold the faucet to the sink, using either the wrench or the pliers. Remove the faucet from the sink and set it aside. Instead of tossing the old faucet into the trash, consider donating it to a salvaged goods shop, like a Habitat for Humanity ReStore. Check here for locations

Once the old faucet has been removed, clean the surface of the sink. I used a baking soda paste to eliminate water stains. 

Place the gasket that came with your new faucet around the sink hole and slip the supply lines and faucet tailpipe through. Our new Moen Woodmere faucet required only a single hole for installation, so we capped the remaining three holes on our stainless steel sink with covers that can be found at any hardware store. In lieu of capping, consider adding accessories such as a soap dispenserwater filter faucet or hot water dispenser. You can also use the deck plate that is provided with some models.

Note: Some faucets do not include gaskets; you need to apply sealant to the sink.


Secure the faucet in place from beneath the sink with the provided installation hardware. Ensure the faucet is positioned correctly and then tighten the mounting nut securely. Check the faucet from above to make sure it doesn't wobble or wiggle. 

Attach the faucet's supply lines to the shutoff valves and tighten the connections with a wrench.


Our faucet included a pullout sprayer, which required a few extra steps. If yours does too, simply insert the spray hose through the faucet and push through until the hose is visible beneath the sink.


Then attach the spray hose to the water line and push in the locking clip.


Turn on your water supply and test that the water is working. If the stream is irregular, you'll need to adjust the flow at the supply.


Attach the spray nozzle to the spray hose.


Tighten the connection with a wrench or pliers.


Attach the spray nozzle weight to the hose between the marked area and the curve.


Once again test that the spray nozzle works.


Here's what everything looks like from below once the faucet is fully installed.


Wednesday
Oct092013

How to Light Your Bathroom Right

Article By: Tiffany Carboni

The bathroom is one of the only rooms in a multibodied household where we’re expected and encouraged to lock ourselves inside. With that kind of permission, it makes sense to use this private space as a luxurious sanctuary. Make the most of your haven by giving it the proper lighting.

I spoke with two lighting experts about how best to transform a bathroom into a relaxing, functional refuge with light. Here's their advice. 

The four types of light needed for the best bathroom atmosphere are task, accent, decorative and sparkle. 


Task Lighting

This is the light by which you can best see yourself. “Proper task lighting at the mirror is important,” says lighting designer Randall Whitehead.

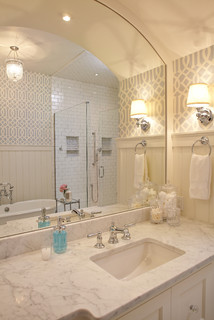
He recommends using a pair of sconces mounted at eye level on either side of the mirror to provide shadowless illumination. This creates the best scenario for makeup application, shaving, tooth care and so on.


Tip: Avoid adding a light above the mirror. That includes recessed lighting in the ceiling. “That would throw a strong light onto your forehead and cast deep shadows below your eyes, nose and chin,” Whitehead says. “Not only is this light ineffective for shaving or applying makeup, it can visually age you by 10 years. People should look their best when they look at their reflection.”

Proper lighting in the bathroom will make you feel better about yourself and promote confidence throughout your day.


Wattage for task lighting. “In the master or guest bathrooms, use fixtures that provide 75 to 100 watts' worth of illumination," Whitehead recommends. “You can get these wattage equivalents in a 24- to 26-watt compact fluorescent or 20- to 25-watt LED.” 

Tip: Putting task lighting on a dimmer will allow your eyes to adjust first thing in the morning; it will also help you wind down at night.


Task lighting wattage in the powder room. Task lights in powder rooms can have much less wattage (think 45-watt range), as this is not a space where anyone will be performing the morning ritual. Lower wattage provides a softer, relaxing ambience for guests. 

Find a color temperature that makes the room feel inviting and illuminates guests in the most attractive way.


Accent Lighting

If you enjoy art in your bathroom, accent lighting will show it off best. Recessed directional lights provide focused illumination for each piece of art — or, in this case, for an alcove dedicated to a sculptural bouquet of flowers. 

Decorative Lighting

This adds visual sparkle. Whitehead advises using a single pendant in a square-shaped bathroom for just the right touch.


In a grand rectangular bathroom, he recommends using two to three fixtures installed along the ceiling plane for adequate illumination. 

Candles also offer wonderful sparkle and set a distinctly relaxing, romantic tone. Just make sure you keep them well away from any flammable objects, such as towels and hair, and never leave them unattended.


Ambient Light

This acts as fill light. “In bathrooms with taller ceilings, a cove or cantilever details, ambient lighting fixtures can be installed along the perimeter of the space," Whitehead says. "Architectural details such as these can hide the fixture and create indirect lighting.” 

A pendant fixture with a translucent shade can be a source of both decorative and ambient light.


Putting It All Together

Interior designer Katie Anderson transformed the dark bathroom shown here in many ways, but one of the most significant — and most universally useful — was bringing in light.

Before, there weren't enough light sources or appropriate fixtures to layer light," Anderson says. "Moreover, there wasn’t any natural light."

Her mission: devise a lighting plan that would illuminate the shower, tub and sink areas evenly. Here's what she did.
 

AFTER: Sconces on large mirrors at the sink vanities now offer functional task lighting. Recessed cans on dimmers provide ambient light for whatever mood is desired. Dimmers are especially useful in the tub area, where relaxation and romance are priorities. Wall sconces offer additional ambient and decorative light. 

Large mirrors, both at the vanity and over the tub, effectively reflect all of these layered light sources for the best effect. 

Whitehead suggests putting the fan and lighting on separate switches. “I don't want the fan to go on automatically every time I go in to wash my hands,” he says. Putting each light source — or a logical combination of light sources — on different switches allows you to choose what you want lit when.

Tip: If you use recessed cans over the sink, make sure they are on a different switch than your task lighting, as Anderson did.

Monday
Oct072013

7 Awesome Add-ons for Kitchen Cabinets

Article By: Jennifer Ott

I remember when having a microwave or an electric can opener mounted under your wall cabinets was considered state of the art. Now you can attach your smart phone and tablet, and even hide the necessary outlets out of sight. Curious what today's cabinet additions can do for you? Check out a few of the latest and most useful offerings in cabinet-mounted gadgets and accessories to see what will work in your kitchen. 

Contemporary Kitchen by Wellesley Kitchen & Bath Designers Divine Kitchens LLC 

Lighting. Even if you're a minimalist who prefers to keep the area under your wall cabinets clear, consider installing some lighting. Undercabinet lights provides crucial illumination for food prep and, if dimmable, work well as a nightlight once the kitchen is closed for the evening. My current preference for undercabinet lighting is low-profile LED (light-emitting diode) strip lights. LED lighting technology is continually advancing, so check with your local lighting retailer or electrical contractor to see what is the best option for your kitchen. Prices vary depending on size and quality, but you can currently get 12-inch strips starting around $20. 

Power. You've spent time and money selecting and installing the perfect backsplash tile, so don't mar the beautiful surface with outlets. An undercabinet outlet strip gives you a plethora of plugs — and always one right where you need it — without a line of receptacles all across your lovely backsplash. If, however, you tend to keep your countertop appliances plugged in, you may not enjoy seeing the cords dangle down from underneath your cabinets. 

Kitchen Cabinets 
Belkin Kitchen Cabinet Tablet Mount - $34.19 
Tablet mount. Watch a cooking video, refer to a recipe, check your email or call your mom on Skype, all while keeping your device up and away from any countertop messes with an undercabinet tablet mount.
Kitchen Lighting And Cabinet Lighting
Under-Cabinet Lighting System by Legrand 
If you have multiple devices that you want accessible in the kitchen, check out this modular undercabinet lighting system. You can get docks for all of your devices, along with the receptacles to power them.
Knives And Chopping Boards
Knife block. I realize undercabinet knife blocks aren't exactly new technology, but this model from Wusthof is notable for its slim profile. It also conveniently swings in and out with the touch of a finger.

Food Containers And Storage
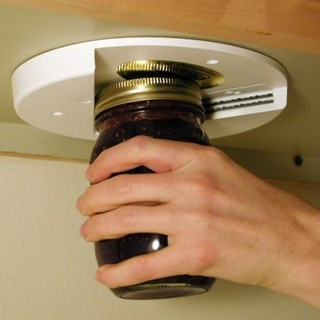
Jar opener. For those who struggle with opening bottles and jars, here's a clever gadget that's easy to mount under your wall cabinet. This would make an excellent gift for someone who suffers from arthritis, or anyone else who could use some assistance with tough-to-open lids.

Barware
Stemware rack. If you are tight on kitchen storage space, you'll want to make use of every nook and cranny you can. Here's a great option for storing your stemware under a wall cabinet.

I've mounted a similar rack inside a cabinet, and I really like its functionality — you can store a good number of glasses in a small amount of space without the risk of having them tip over onto one another like dominoes. I should note that this may not be the best storage option if you don't use the glasses very often, or if you don't have adequate ventilation in your kitchen, as the stemware is likely to attract grease and dust.
Barware
Bottle holder. Display your wine bottles next to your stemware, all underneath your wall cabinets. Just be sure to mount this away from your range or cooktop, so the bottles don't feel the heat.